How to Add Apple Music to Google Map on Android/iOS (2025)
Since most people like to listen to music while driving to keep themselves focused and calm, Google Map improved their services by allowing built-in music playback controls for Android and iPhone users to prevent drivers to get distracted from switching music streaming services like Apple Music and Google Map.
If you want to know how to add Apple Music to Google Map, then you are just in the right post because here, we will talk about how you can add Apple Music to Google Map for both Android and iOS devices.
Also, an additional tip on how you can listen to Apple Music anytime and anywhere to any device, media player, and even if you are offline. So, without further ado, let’s get started.
Article Content Part 1. How to Add Apple Music to Google Map?Part 2. How to Listen to Apple Music Anywhere You Want?Part 3. Conclusion
Part 1. How to Add Apple Music to Google Map?
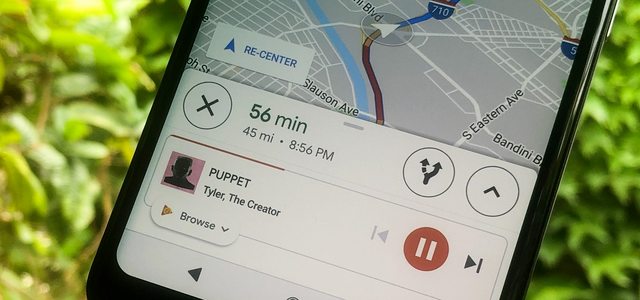
Like what I have mentioned above, Google Map has added a new feature that allows Apple Music to access their songs while navigating using Google Map without the need to switch from one app to another.
This feature lets the users keep their minds focused and at the same time enjoy their favorite Apple Music tracks without being distracted because one can control directly by using Google Map.
For you to add Apple Music on Google Map, we have to set Apple Music as your default music playback especially if you are using Google Map on an iOS device because this feature is not instantly turned on. Therefore, we need to make the extra effort like download your songs from Apple Music and you must still activate it first before you can control Apple Music using Google Map.
Don’t worry because we got you covered. Below, I provided you with the steps on how you can add Apple Music to Google Map on your iOS and Android device so you can start playing your most desired tracks using your Google Map.
Steps on How you can Add Apple Music to Google Map on your iOS device
- Using your iOS device, launch your Google Maps. Note: Make sure that you have installed Google Map on your device.
- On the upper part of your iPhone’s screen, tap on the gear icon that you will find. Then, select “Settings” on the new window so you can access the Maps settings.
- Proceed to the “Navigation” menu so that you can toggle the option of “Media Player Playback Controls”.
- Lastly, on the “Media & Apple Music’” settings of your iPhone, tap on the “Sound & Voice’” option so you can select the “Music playback controls” button and set your default app to “Apple Music”
Steps on How you can Add Apple Music to Google Maps on your Android device
- On an Android phone, after you have opened Google Maps, please navigate to the ‘Settings’ button from the left side of the screen.
- Once on the settings window, keep scrolling down until you find the “Navigation” option wherein you can choose your preferred default app. Tap on it when you found it.
- You will see in the Navigation option the “Music playback controls” option. Generally, this option function is turned off, once you opened it you can choose Apple Music from the services available as your default app.
- Once you have set Apple Music as your default app, you will be asked of your Apple ID to authorize and control Google Maps directly.
Note: Please ensure that you have downloaded the latest version of Google Maps before following the given instructions above. If you are an Android user, you can go to the Google Play store for updates, and for iOS users, you can check your App Store.
Now that you know how you can add Apple Music to Google Map, you can finally navigate and control your favorite Apple Music songs using your Google Map.
If you wish to know how you can listen to Apple Music anywhere, then just continue reading this post because I will be going to guide you on how you can make it possible and what special tool you can use.
Part 2. How to Listen to Apple Music Anywhere You Want?
Most of us know, for you to completely enjoy the services that Apple Music offers, you need to pay for its subscription. But do you know that you can listen to Apple Music anywhere? If you want to listen to Apple Music anywhere without restrictions, then we have a perfect tool for you which is the TunesFun Apple Music Converter that you will love!
TunesFun Apple Music Converter is a professional converter that can convert songs from Apple Music and even to iTunes. It is different from other converters because it has a powerful feature that can remove the DRM protection that is encrypted on Apple Music songs, which means that once the DRM is removed, you can access and transfer the converted songs to any device anytime and anywhere even if you don’t have an internet connection. Moreover, you can select the audio format such as MP3, WAV, etc., which is compatible with your device.
Other features of TunesFun Apple Music Converter that are worth mentioning is its, quick conversion speed that even with such speed, it still maintains the quality of the song similar to the original track and also, its advanced ID3 tag technology, which helps preserve the organization of the tracks even after conversion. It keeps the song's information such as the title of the song, album, name of the artist as well as its artwork and metadata. Those information can be edited or changed according to your preference.
Therefore, if you want to experience how amazing TunesFun Apple Music Coveter is, its installer is readily available once you visit their official website. You can choose the installer based on the operating system of your computers such as Windows and Mac. Once you have it installed, return to this post so I can guide you on how you use this software and you can start listening to your Apple Music tracks anytime and anywhere.
Step 1. Choose your preferred Apple Music tracks

Open your newly installed TunesFun Apple Music Converter. Selected the songs from your Apple Music lists that you wish to convert. You can choose more than one song at a time since this tool can perform batch conversion.
Step 2. Change the parameters of your selected songs
Once you have selected your preferred songs, it is time to set or change the audio output format according to your preference. You can also set the destination folder where you want to see the converted songs.
Step 3. Start the conversion process of your Apple Music songs by clicking the “Convert” button.
If you are already satisfied with the songs you have selected as well as the parameters, you can now proceed with converting your Apple Music songs by clicking the “Convert” button. Then, you can now view the converted songs on the folder that you have set previously. After you have converted your Apple Music songs, you can now freely play and transfer them to any device that you have.

Isn’t amazing? with the use of the TunesFun Apple Music Converter, you can now listen to Apple Music anytime and anywhere even if you are offline and without an Apple Music subscription.
Part 3. Conclusion
To sum it all up, navigating using Google Maps and at the same time listening to Apple Music can make your driving and listening experience to the next level. Good thing that Google Map has to include a new feature that allows users to add Apple Music to Google Map which can help users keep their minds focused and relaxed while driving without distracting themselves to switch apps just to select what songs to play.
Also, you discovered here that it is possible to listen to Apple Music anywhere even without a subscription just by converting your Apple Music tracks using a powerful tool called TunesFun Apple Music Converter. Users find this software convenient because it makes Apple Music tracks accessible to any device and media player once the DRM protection has already been removed. Plus, you can finally play those tracks even if you are offline anytime and anywhere without worrying if you have a stable internet connection
Well, that’s everything for now! I hope that by reading this post, you can able to maximize your Apple Music experience by just navigating and controlling them using your Google Map. Thank you for spending your precious time here and see you again on my other posts. If you find this useful, just kindly share it with everyone you know so they can also add Apple Music to Google Map.
 Home
Home
Leave a comment