Here Is How Easy To Add Music To Premiere Pro
Premiere Pro is a software app that’s best used by people for video editing purposes. Whether you are creating a project for your school assignment, for your business, for your work, or just for any personal reasons, adding some spice to it would be good. Thus, you might be interested in knowing how to add music to Premiere Pro. Don’t worry, if you are eyeing to use your favorite tracks from Apple Music, this post was dedicated to users like you.
Apple Music has been one of the best platforms offering enormous perks to its subscribers. We can’t blame those who wish to use the tracks from Apple Music as background music for videos and the like. It is just quite unfortunate that the songs under Apple Music are protected making it quite difficult to download them and use them outside the app.
In order to add your favorite music to Premiere Pro, particularly Apple Music songs, you have to ensure that a great and reliable tool must be used to get all the limitations on streaming and usage removed. Let us get to see how to add Apple Music songs to Premiere Pro.
Article Content Part 1. Can You Use Songs from Apple Music in Premiere Pro?Part 2. How to Add the Downloaded Songs in Premiere Pro?Part 3. How to Add the Downloaded Songs in Kinemaster?Part 4. Summary
Part 1. Can You Use Songs from Apple Music in Premiere Pro?
From the introduction of this article, you were already exposed to the fact that being able to add your favorite music to Premiere Pro (specifically Apple Music songs) is not directly possible. This section was created to get the dilemma addressed.
Reading this section’s heading, you are already aware of how this part will go. In the case of solving the issue when it comes to downloading Apple Music songs and finally being able to add music to Premiere Pro, what we are to use is this professional tool named TunesFun Apple Music Converter. Not only Premiere Pro, but you can also add music to TikTok, Capcut, and even your Google Slides. Though there are various professional tools that you’ll see on the web claiming the same functions, we do recommend the use of this app over them. Here are the reasons why.
- Get the DRM protection of Apple Music songs removed making them playable on any device or media player.
- Supports the transformation of tracks to common formats like MP3, FLAC, WAV, AAC, AC3, and M4A.
- 16x conversion rate, fast, efficient, and convenient.
- Keep the original quality, ID tags, and all metadata the songs contain.
- Perfectly compatible with Mac and Windows operating systems.
- Simple navigation keys and functions are easy to understand.
- Support from technical and customer service is always available in case needed.
Process of Downloading and Converting Apple Music Songs
Can you use songs from Apple Music in Premiere Pro? Yes! If the above major features of TunesFun Apple Music Converter made you want to try using it, you may refer to the below procedure to get the Apple Music song you like downloaded and be able to add your songs to Premiere Pro.
Step #1. After ensuring that installation needs are met, have this app installed on your PC, launch it, and start adding the Apple Music songs to be converted.

Step #2. Select a format the app supports. Don’t forget that our main goal here is to be able to add music to Premiere Pro so choosing a format supported by Premiere Pro is needed. In this case, MP3 will always be a good choice. Moreover, there are output parameter settings options displayed on the screen’s bottom area. Check those and see which ones you want to modify.

Step #3. Tap the “Convert” option that is at the bottom of the screen to get the process started. While the conversion of files is ongoing, the removal of their DRM protection shall also happen at the same time.

In a few minutes, you shall have the tracks from Apple Music transformed and DRM-free. Now, we are ready to add music to Premiere Pro using these tracks. The second part will further explain how we can complete the process.
Part 2. How to Add the Downloaded Songs in Premiere Pro?
To add your music to Premiere Pro, you may try different media streaming platforms like YouTube, Apple Music and Spotify, or from your local computer, and more to get music resources. Premiere Pro even supports music that you made and arranged. To finally complete the process of how to add music to Premiere Pro, we will now further dig into how we can use the converted and downloaded Apple Music songs. We’ve got the detailed steps here that you must follow to do that.
Step #1. On your computer, launch the Adobe Premiere Pro app.
Step #2. Let’s move on to the Audio workspace. Tap the “Audio” menu that is at the top of the screen. Alternatively, you can click “Window”, then “Workspaces”, and finally, “Audio”.
Step #3. Tap the “Window” button, then “Media Browser” to see the panel for “Media Browser”.
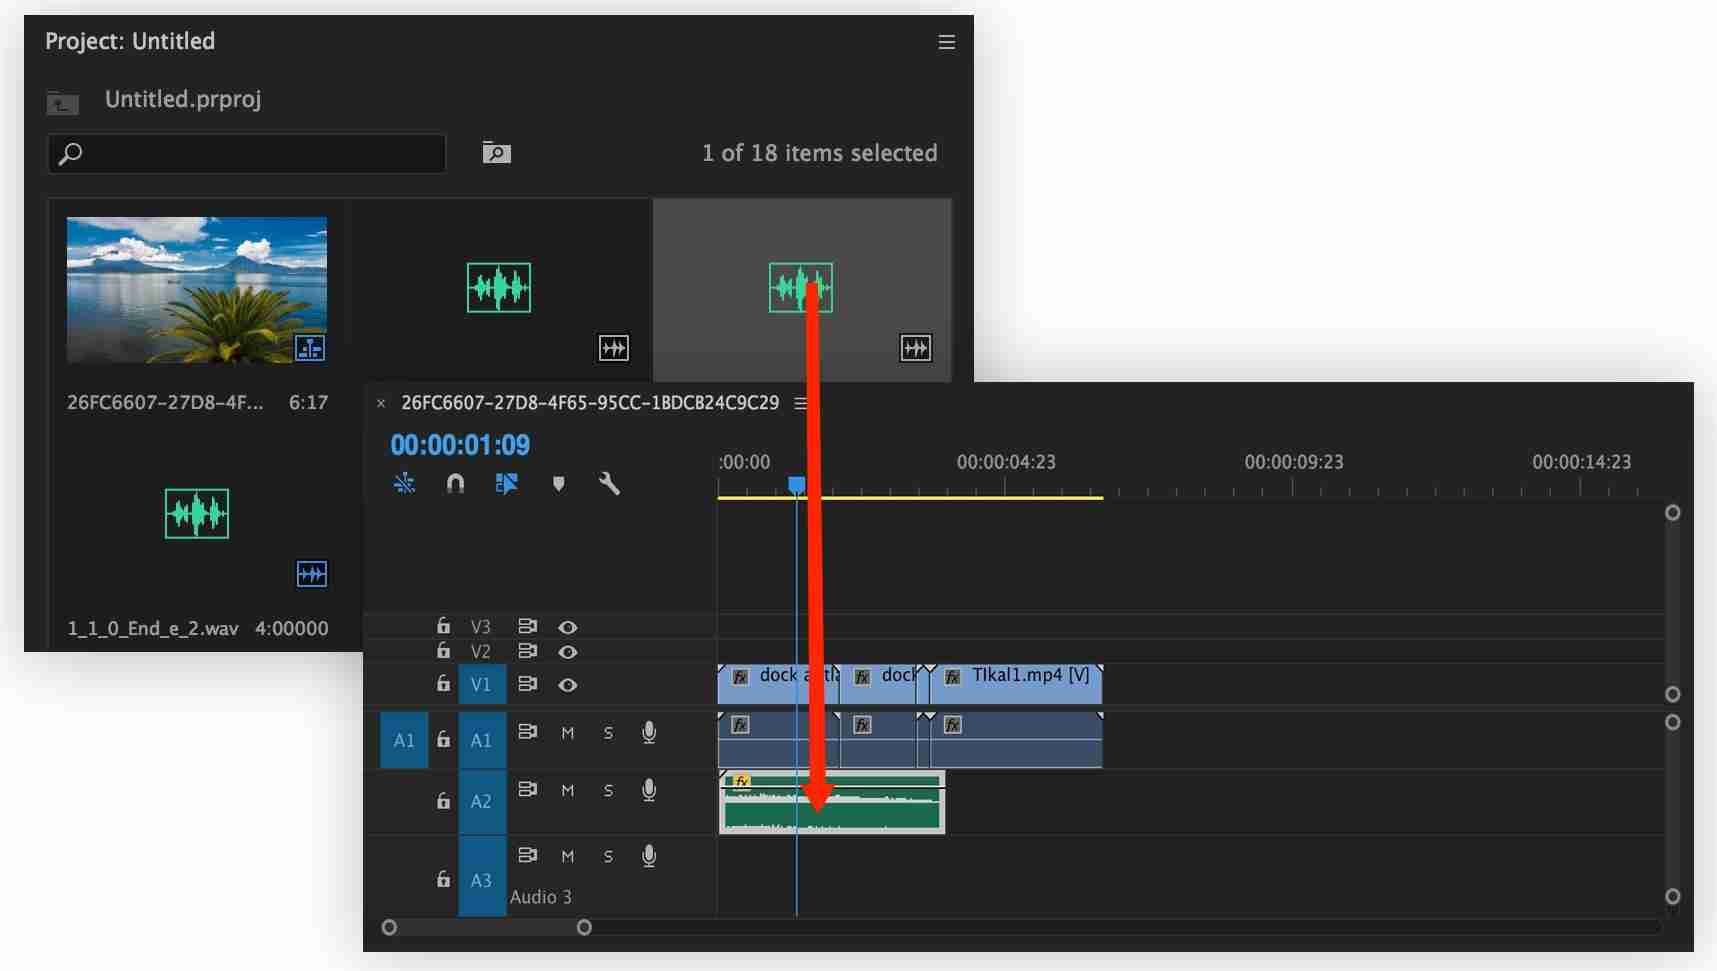
Step #4. Within the Media Browser, navigate to your audio file, right-click (Windows) or Control-click (macOS) it. From the options shown, choose “Import” to finally get the selected Apple Music track added to the Project panel.

Step #5. Choose "Window" > "Project" to reveal the Project panel. The audio file you just imported will be selected. Double-click it to open it in the Source panel, and notice the waveform. You can play the audio file here if you wish to listen to it. Drag the audio clip to the sequence in the Timeline panel. You can drop it on any audio track below the video tracks. Trim the audio clip as you would a video clip.
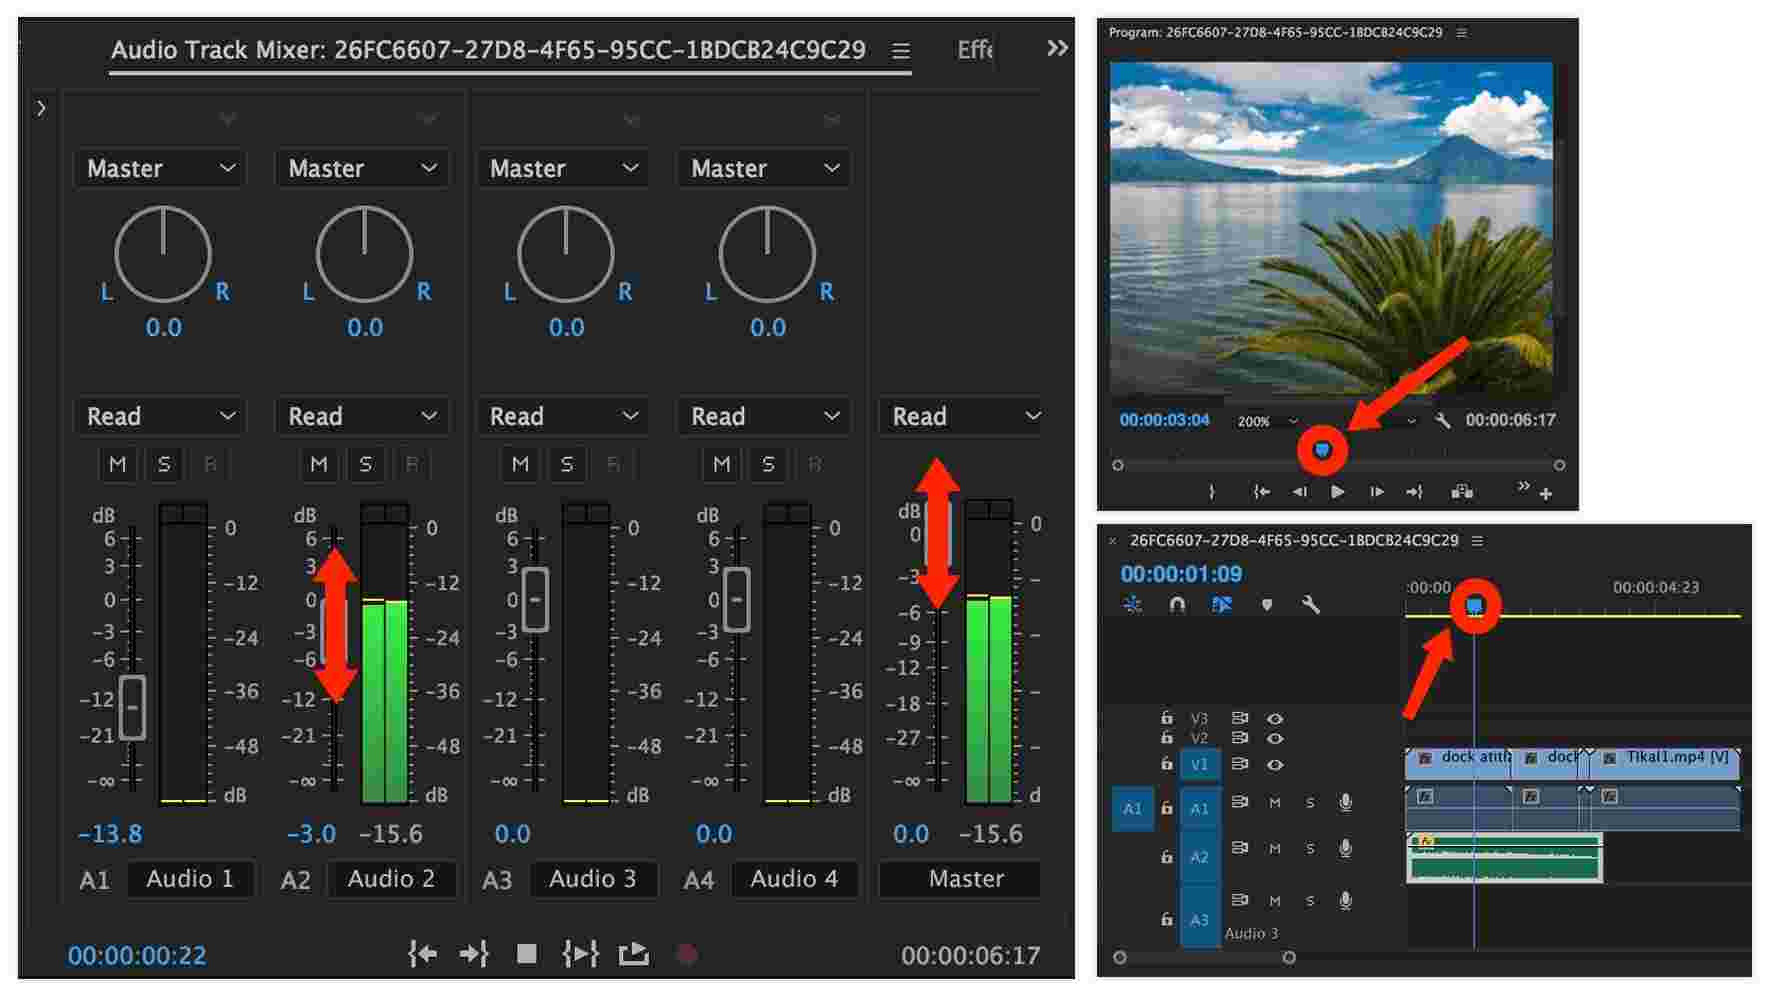
Step #6. For you to play the sequence in the Program panel, you can just hit the “spacebar” on your keyboard. To stop the playback, hitting the same key on your keyboard will work. You can use the blue play head to move and drag to the part you wish the playback to start.
Step #7. If you want to change the volume of each audio track independently, choose "Window" > "Audio Track Mixer" > [sequence name] to reveal the track mixer for your sequence. The playback controls at the bottom of the Audio Track Mixer panel allow you to play, stop, and even loop sequence playback. As your sequence plays or loops, move the sliders up and down to increase or decrease the volume of each individual audio track in your sequence. Slide the Master control to adjust the overall audio level.
Upon completing the above procedure, you’ll finally be able to also complete the process of how to add music to Premiere Pro. Indeed, it is too easy to do with the help of a professional tool such as the TunesFun Apple Music Converter.
To give you an extra tip in case you wish to add music to a video via an alternative app on your mobile devices – Android and iOS, you may also check out the next part.
Part 3. How to Add the Downloaded Songs in Kinemaster?
Premiere Pro is indeed a great software app that helps users especially with their video editing needs. If you wish to switch to using another via your mobile or handy devices (Android and iOS), there should not be an issue as there are bunches of apps that you can use. Sometimes, apps that can only be used on computers are quite difficult to navigate and fees often apply.
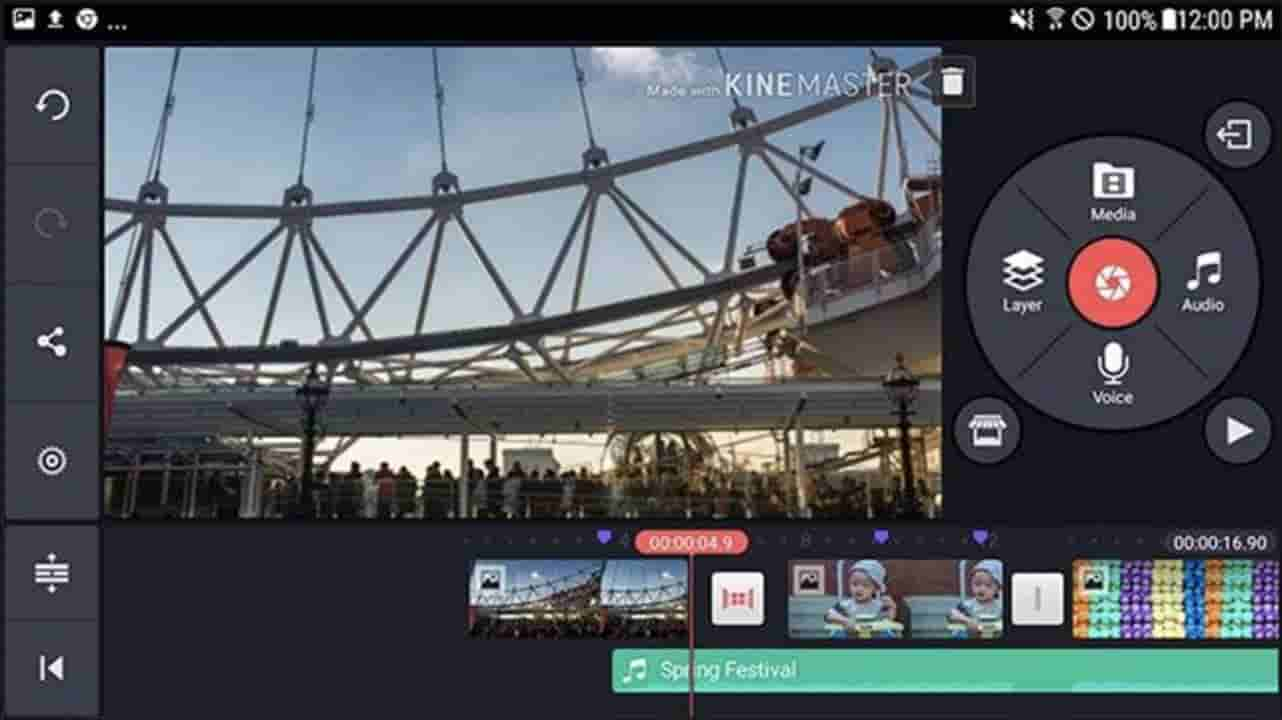
Just in case you are interested in finding out about other video editing apps that work well on mobile devices, Kinemaster could be a good choice. This is totally capable of adding music to your video files. Here’s a quick reference of how you can use the Kinemaster app when adding background music to the video clips that you have.
Step #1. Getting this tool is just very easy as you only have to navigate to your Google Play Store or App Store to search for this and then download it on your device.
Step #2. Once installed, launch the Kinemaster app on your mobile phone. Tap the audio option right away. This is where you shall see the option to add music – recorded audio, SFX audio, and more. All you need is to tap the “+” button.
Step #3. Afterward, just export the video containing the music.
If you wish to edit the video clip, there are also built-in features on Kinemaster that you can take advantage of. The same case as above, if you are looking at using protected songs from Apple Music, then using apps like the TunesFun Apple Music Converter is what you need to do first.
Part 4. Summary
To be able to add music to Premiere Pro, you just have to basically get the audio clips imported to the app. The case would be different if you are eyeing to use tracks from platforms such as Apple Music since the songs in there are encrypted with protection. Fortunately, apps like TunesFun Apple Music Converter can aid in the protection’s removal as well as song conversion.
 Home
Home
Leave a comment