List Of Effective Apple CD Burners [2025 Updated]
Music streaming has been brought to a whole new level now that there are numerous sites and platforms offering the service to people around the globe. Apple Music, one of the highest-profile platforms, is what we’ll focus on in this article. Indeed, it managed to climb the ladder and continuously grew the content it is offering.
It has been made very convenient for users to stream their favorite Apple Music tracks as the app is supported by almost all devices. Though convenient enough, there are still some who prefer knowing more about Apple CD burners and would wish to try burning their Apple Music favorites. Well, the use of Apple Music CD burners is still very useful since having your files on CDs makes it a lot easier to stream and manage them on a PC, a CD player, and even a sound system.
If you totally agree with the above and you are one of those longing to find effective and reputable CD burners for Apple Music that would help you burn Apple Music tracks for storage, then you’ve arrived at the right page. We’re here to present you with a list! We know you’re too excited so let’s finally begin!
Article Content Part 1. Is It Possible to Burn Apple Music to a CD?Part 2. Best Tool to Help Burn Apple Music to CDsPart 3. The List of Apple Music CD BurnersPart 4. Summary
Part 1. Is It Possible to Burn Apple Music to a CD?
Before we head to the list of CD burners you can check out and use, one of the most vital pieces of information that you should know is the answer to this query – is it possible to burn Apple Music tracks to a CD?
Well, the answer to the above is positive! That’s why this article was created! However, there is an important thing to take note of. Burning Apple Music tracks to CDs via Apple CD burners can’t be done directly as the tracks are protected under Apple FairPlay’s Protection Program. The files are encrypted! Though this seems to be a dilemma, it actually isn’t. There is always a workaround!
What we need in this case is to get this DRM protection of the Apple Music tracks removed and get the files converted to formats compatible with CDs such as MP3! Once that’s done, then you can use your preferred CD burner for Apple Music and get your favorites saved to a CD!
As you move to the next part, the best tool to use when it comes to DRM decryption will be highlighted. Before you move to the second part, ensure that you have prepared the items needed to burn Apple Music songs to a CD.
Things you Need Prior to CD Burning Process
- As mentioned, a trusted Apple Music Converter would be required to get the DRM protection of the songs removed.
- Your computer must have a CD burner. If this isn’t present, the use of an external CD burner will work!
- A blank CD
- Your chosen Apple Music CD burner
Part 2. Best Tool to Help Burn Apple Music to CDs
Before you can finally select which Apple CD burner you shall use, as you have read in the previous part, what you need to do first is to get the protection of the songs removed via a trusted tool. The best one to use is the TunesFun Apple Music Converter.
What makes the TunesFun Apple Music Converter the most advantageous to use? Of course, this tool is recommended as it can easily do the Apple Music DRM removal procedure – one of the hindrances when it comes to CD burning.
Apart from this, it is also a reliable tool that can aid in the conversion of the tracks to formats compatible with CDs such as MP3. Apart from MP3, it does support other formats – M4A, FLAC, AC3, AAC, and WAV. Do you have to pay for Apple Music? Now you can play converted music files offline on any device you want for free.
This software app is also remarkable as it can do the file conversion process within a span of a few minutes as its conversion rate is at 16x. All ID tags and metadata details shall be kept and preserved so data loss won’t be experienced! It works perfectly great with Mac and Windows computers so installing this app isn’t a problem at all!
We know you might also be wary when it comes to using the tool. Don’t worry! Its interface was designed to be friendly enough! Here is a guide on how easily you can use the TunesFun Apple Music Converter.
Step #1. Once this app has been installed on your device, launch it and start previewing or selecting the songs you wish to process.

Step #2. It is suggested that you choose MP3 as the output format as its perfectly compatible with audio CDs. After doing so, set up the output folder and ensure that you have modified anything you wish from the output parameter settings at the bottom area of the screen.

Step #3. Tap the “Convert” button that is at the bottom of the page to finally get the chosen Apple Music tracks converted to the format set in step 2.

Step #4. Tap the “Finished” button to view the DRM-free and converted Apple Music tracks.
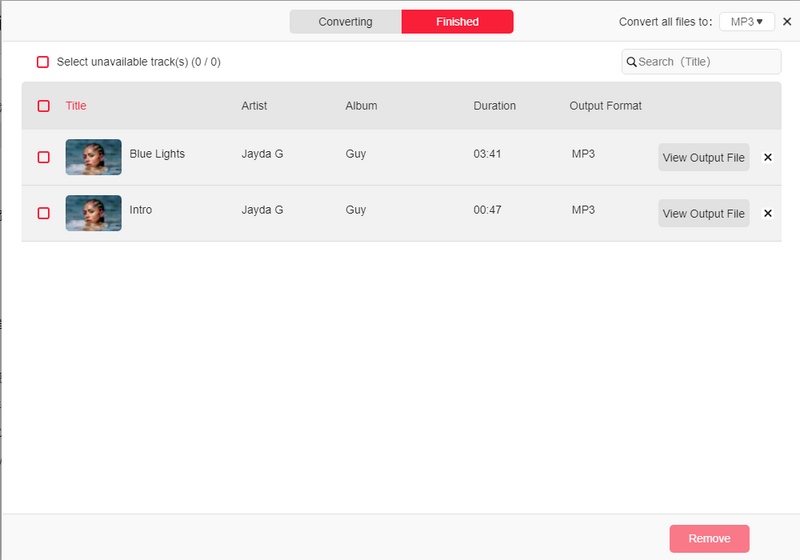
Now, let us get to know those Apple CD burners you can use to proceed with the burning process. The third section has the list!
Part 3. The List of Apple Music CD Burners
The most important thing in the Apple Music CD burning process is to get the DRM protection of the tracks removed and their formats converted to a CD-compatible one. Since we are done with that, we can now let you read the list of the CD burner for Apple Music you can try using.
Use the Music App on your Mac
How to burn Apple Music to CD efficiently? The Music app on your Mac computer is a good CD burner to consider. Here is how you can use it.
Step #1. Insert a blank CD disc into the drive and a dialog will pop up. Select Open Music in the action list to launch the Music app, and click the OK button to apply.
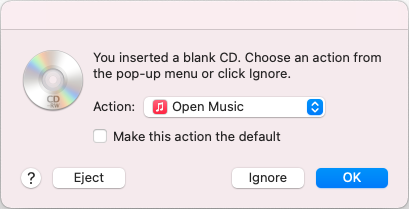
Step #2. On your Mac, launch the Music app and proceed to create a new playlist. Then add the converted MP3/M4A music tracks you wish to burn to your blank CD to this new playlist.
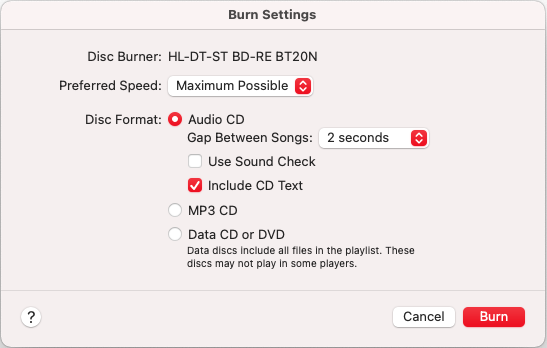
Step #3. Choose the created playlist. Hit the “File” button, then the “Burn Playlist to Disc” option next, and the Burn Settings dialog will pop up. Choose Audio CD or MP3 CD depending on your need and click the Burn button to start burning the converted Apple Music songs to a CD.
Use the iTunes App on your Windows PC
Of course, the iTunes app will always be on the list of the most reputable Apple CD burners. Here is how it will work if you have decided to use the iTunes app.
Step #1. Using your Windows PC, launch the iTunes app. The same as with the Music app, you have to create a playlist first where the files to burn will be saved. To do so, tap “File”, then select “New”, and choose “Playlist”.
Step #2. After creating a playlist, insert the blank CD into the disc drive. Click the “File” button at the top and ensure to choose the “Burn Playlist to Disc” option. You can also try to right-click the name of the playlist.
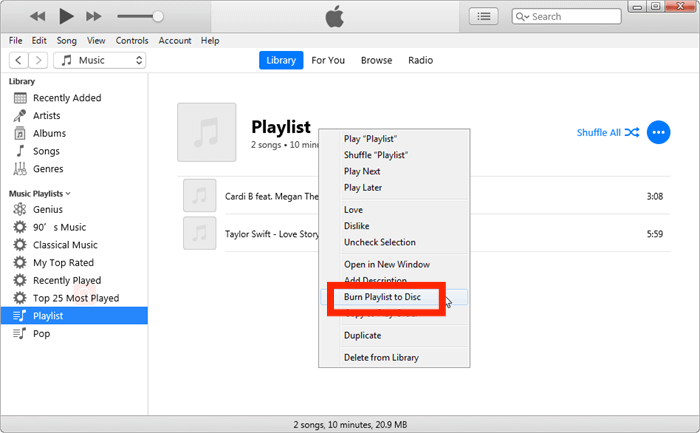
Step #3. Now is the time to get the burning settings adjusted as you prefer.
Step #4. To let the iTunes app begin the burning process, tap the “Burn” button at the bottom of the screen.
Use the VLC Media Player
One of the universal and most commonly used media players is the VLC Media Player. It wouldn’t surely surprise you that it can be used as an Apple CD burner. Here is how it works!
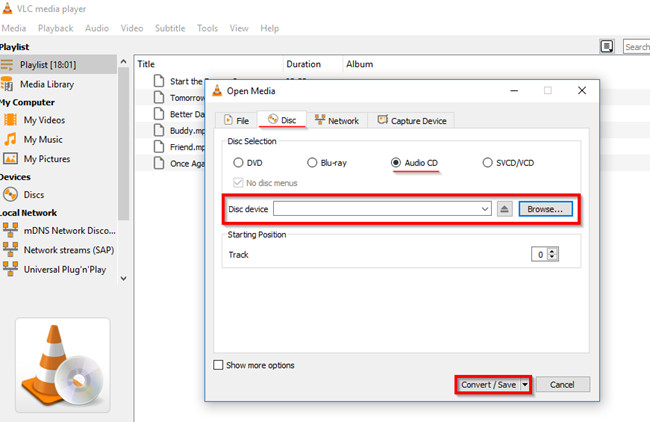
Step #1. Once you have launched the VLC media player, create a new playlist and drag and drop those tracks you wish to process onto it.
Step #2. Tap the “Media” menu after completing the first step. Click “Convert/Save”, then the “Disc” button.
Step #3. Insert your CD onto your PC’s disc drive. Tap “Audio CD”.
Step #4. Once the “Convert” screen has been shown, tick off the “Browse” menu and ensure to choose the newly created playlist. Tap the “Convert/Save” button next to finally start the Apple Music to CD burning process.
Use the Windows Media Player
The Windows Media Player can also act as a CD burner for Apple Music! Below are the steps you have to follow the use it during the Apple Music to CD burning procedure.
Step #1. Import the transformed Apple Music tracks to Windows Media Player. A new playlist must be created first.
Step #2. Drag and drop the tracks to the playlist and get your blank CD inserted into the disc drive.
Step #3. Tap the “Burn” button that is at the top area of the interface and drag and drop the playlist create to the “Burn List” dock that is at the right side of the screen.
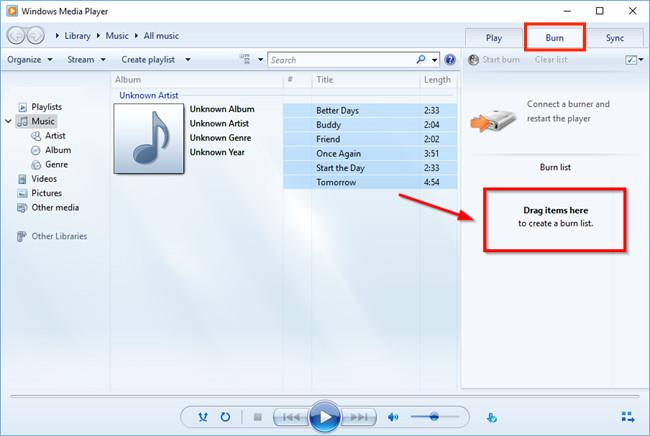
Step #4. From the menu, the Audio CD option must be selected. Afterward, hit the “Start Burn” menu to begin the Apple Music to CD burning process.
Part 4. Summary
There various Apple CD burners that you can use as long as you have your Apple Music favorites already converted to a CD-compatible format and you have their DRM encryption already removed. You can choose from the four free apps presented in the third part after processing the Apple Music songs via the TunesFun Apple Music Converter!
Leave a comment