Important Details About Apple Music Family Sharing Are Here!
Indeed, Apple Music is regarded as one of the best platforms offering great music streaming services and perks. With millions of tracks available for millions of subscribers around the globe, there is no doubt that users will surely get to enjoy their favorites. Fortunately, if you wish to try the service for free, you can do it by getting the free trial offer. After then, one can subscribe to one of Apple Music’s subscription plans – student, individual, or family plan.
Getting any of the paid plans of Apple Music will allow one to enjoy several benefits and advantages. Though there are various plans being offered by the app, we will be focusing on Apple Music family sharing in this post.
All the important information about Apple's Family Sharing will be presented here – what it actually is, the requirements to get it, the advantages of subscribing to this paid plan, how the setup can be done, how to use it, and more. In addition, we will also help you learn a great way of keeping your Apple Music favorites on any device that you’d like to use.
Article Content Part 1. Basic Information About Apple's Family SharingPart 2. Setting Up and Using Apple's Family SharingPart 3. Bonus : Downloading Apple Music Songs Without LimitationsPart 4. Summary
Part 1. Basic Information About Apple's Family Sharing
As previously mentioned in the introduction part, sharing an Apple Music Account with Family Sharing is one of the ways to listen to Apple Music together. This actually works via the iCloud Family Sharing method which indeed is a convenient way of sharing with members. Apart from Apple Music songs, other media files such as TV shows, movies, and electronic books can be shared. This plan costs 14.99 USD monthly and can be enjoyed already by up to 6 members.
The good thing about subscribing to the Apple Music family sharing plan is that all members can get to share their favorites and discoveries with one another. More so, each can access one account even by using multiple devices. If you are worrying about one’s privacy, you have to know that this won’t be sacrificed as one will be able to decide on which media files to share or what not to.
This plan is available globally. But, of course, you can also check if wish to make sure. Visiting the official website of Apple Music will surely show you this information.
You should also be aware that the Apple's Family Sharing plan is part of the Apple One subscription bundle. There are other advantages one can get from getting this bundle including the 200 GB storage capacity for iCloud. Of course, this bundle costs more – 30 USD per month.
Requirements to Get Apple's Family Sharing Running
Knowing general details about Apple Music family sharing isn’t enough. You also have to know the basic things or requirements to finally get this one running. You should have an active Apple ID as well as an iOS device in iOS 8 version or later. Of course, you can also use a Mac computer or even an Android device.
Remember that before getting the Family Plan, you need to ensure that the Family Sharing feature for iCloud has been enabled.
Now, if you are currently subscribed to Apple Music’s Individual plan, you can switch to the Family plan just through your iCloud subscriptions. Simply head to your device’s “Settings”, choose “iCloud”, then “Apple Music” (if you are using an iPhone).
After knowing the basic information about Apple's Family Sharing, we will finally jump into the setup process as we head to the second part. Let us now move to the next part then.
Part 2. Setting Up and Using Apple's Family Sharing
Of course, after sharing with you the important information about Apple Music family sharing, we will be discussing now how one can set up and use it well. It is worthy to note that Apple Music is supported by various devices including iOS and Android devices as well as on computers – Windows and Mac. Here are the detailed guides for setting up Apple's Family Sharing on different devices.
Setting up Apple's Family Sharing on iPad and iPhone
Step #1. On your iOS device, head to “Settings” and tap your name which you’ll see at the top area of the screen.
Step #2. Hit the “Family Sharing” option and then the “Get Started” button next.
Step #3. Simply follow the on-screen instructions to continue the setup.
Step #4. Once the setup has been done successfully, you’ll be able to invite other family members to join.

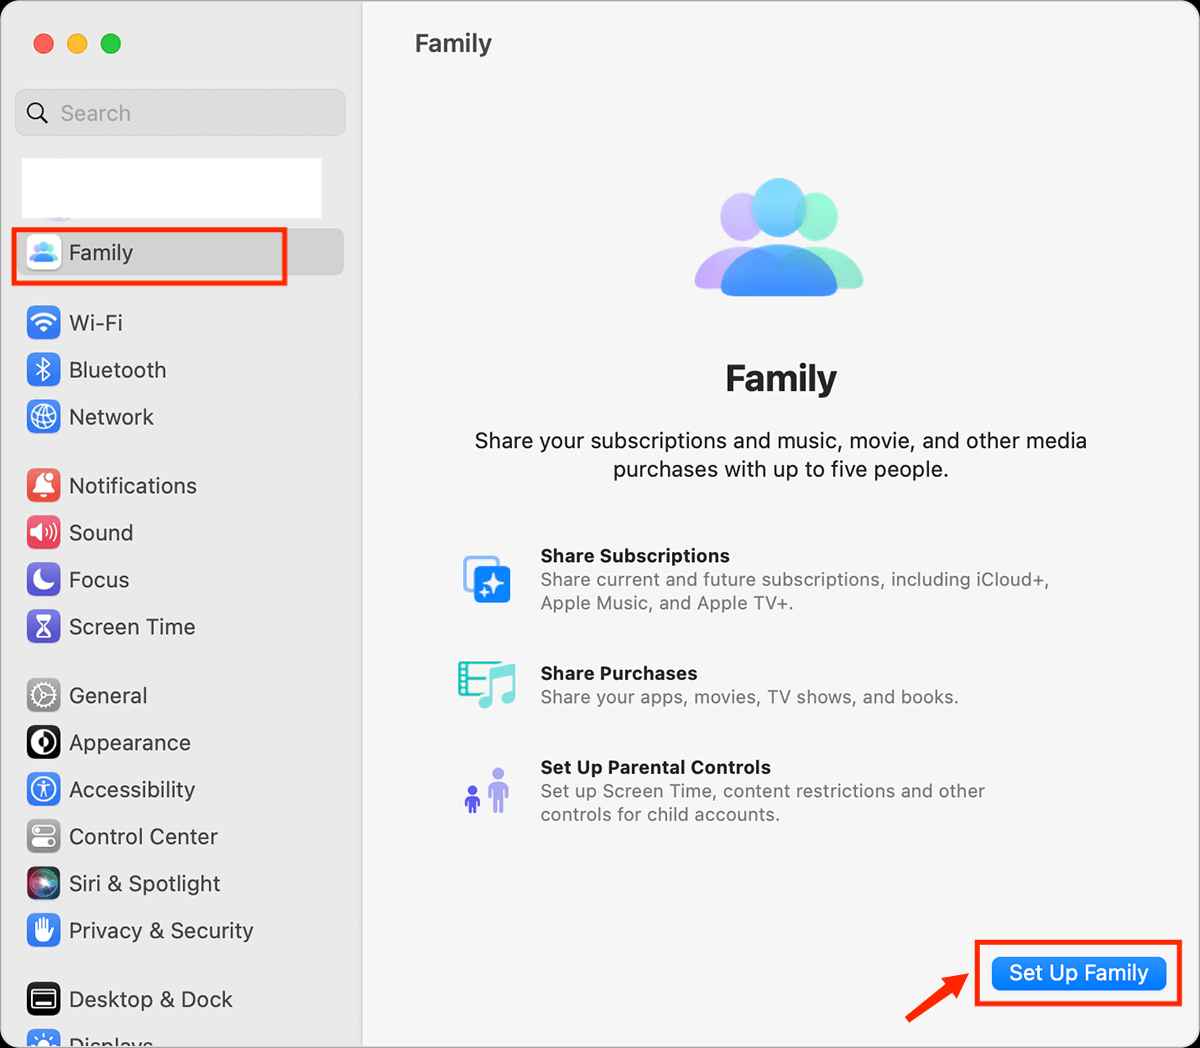
Setting up Apple's Family Sharing on Mac
Setting up Apple Music family sharing on Mac PC is actually easy to do. Choose Apple menu > System Settings, then click Family. Click Set Up Family. Follow the onscreen instructions to set up your family and invite your family members.
Setting up Apple's Family Sharing on Android Devices
Step #1. On your Android device, install the Apple Music app (one can download the app from the Google Play Store).
Step #2. If this is your first time using Apple Music, tap the trial offer. If you are already subscribed to a plan, just tick “Sign in” and then Tap Upgrade to Family to change the subscription plan.
Step #3. If asked, input your login credentials. If you don’t have an Apple ID yet, just create a new one as it’s easy to do.
Step #4. You now need to validate your billing information and details. You just have to agree to the terms and conditions if asked.
To enable iCloud Family Sharing, tap the “three-dot” icon, select “Account Settings” then “Manage Membership”, and finally, tap “Manage Family”.

One of the best advantages of utilizing Apple's Family Sharing is that premium account owners can enjoy downloading the songs they like and streaming them offline. However, accessing such tracks will only be possible on authorized devices and via the app. Also, once the subscription ended, the downloaded songs will also vanish.
Part 3. Bonus : Downloading Apple Music Songs Without Limitations
It could be true that subscribing to any of the Apple Music plans such as Apple Music Family Sharing will give one the advantage to download Apple Music songs for offline listening. However, streaming and keeping them forever have limitations. Do you wish to know how you can download and keep your Apple Music favorites forever without thinking of anything? Well, the answer to this is in this section.
With the help of apps like this TunesFun Apple Music Converter, you can actually download Apple Music songs with ease and even have them converted to common formats like MP3. With its ability to remove DRM protection from Apple Music songs, you can have the power to access and save them on any device that you like to use.
This works fast enough letting you save time while ensuring that the original quality of the tracks will be maintained alongside the songs’ ID tags and important details. With the easy interface this TunesFun Apple Music Converter has, anyone will surely be able to use it well. Of course, we have a guide here on how one can fully use the app when converting and downloading Apple Music songs.
Step #1. Once all requirements are met, install the app on your Windows or Mac PC. Launch it after the successful installation and begin previewing or selecting the Apple Music tracks to be processed. You can select a bunch of songs since batch conversion is supported by the app!

Step #2. Do the selection of output format to use! In addition to this, you can also modify the other output parameter settings if you wish to.

Step #3. After tapping the “Convert” button at the bottom, the app will start converting the chosen songs as well as begin the DRM removal process.

In just a few minutes, you’ll have the DRM-free and converted Apple Music songs ready for offline streaming!
Part 4. Summary
We are re glad that you are now fully aware of the important details relative to Apple Music family sharing. Indeed, getting an Apple Music plan is an advantage as there are several benefits that one can enjoy from subscribing to a plan. However, if you are looking to keep your favorites forever on any device that you like to use, make sure to utilize great and trusted apps like this TunesFun Apple Music Converter.
 Home
Home
Leave a comment