

Setting Up Apple Music Sleep Timer Is Just Easy: Here’s How!
Before we sleep, when lying on our beds, most of us get the relaxation we need by streaming our favorite great songs. We bet you’ll surely agree to this! If you happen to be using Apple Music as your music streaming platform, you should then know that you can actually easily set up an Apple Music sleep timer!
At night time, there are instances when we suddenly doze off and then fell asleep while listening to the songs playing on our devices like phones or tablets. Due to this, we just usually find out they weren’t stopped before we sleep and so, we’ll just notice the next day the app is still up and running and that our devices are almost out of battery, worst case, drained. How can we have this avoided? That’s simple! It would be amazing if you could set up the app to stop after playing a certain number of songs, right?

If you just paid for a premium subscription to Apple Music, and have found out that there is this Apple Music sleep timer that you can fully utilize but aren’t sure how it works or can be set up, don’t worry. The next parts of this article will give you guides on this topic. Let us now get into each section one by one!
Article Content Part 1. How Do You Put a Sleep Timer on Apple Music on iPhone?Part 2. How Do You Put a Sleep Timer on Apple Music on Android?Part 3. How to Set a Sleep Timer for Apple Music on a Mac?Part 4. How to Set a Sleep Timer for Apple Music on Windows?Part 5. How to Convert Apple Music to Plain MP3 FormatPart 6. Summary
Part 1. How Do You Put a Sleep Timer on Apple Music on iPhone?
If you are fond of using your iPhone to listen to your Apple Music favorites, you must then know that you have two options to set up an Apple Music sleep timer as this isn’t a built-in feature in the Music app. Well, for Apple Music users, this isn’t an issue at all. We will be explaining them both here and you can choose which one will work for you better.
Method #1. Utilize the “Clock App”
One method of setting up an Apple Music sleep timer is through the clock app on your iPhone. Here is how you can do it.
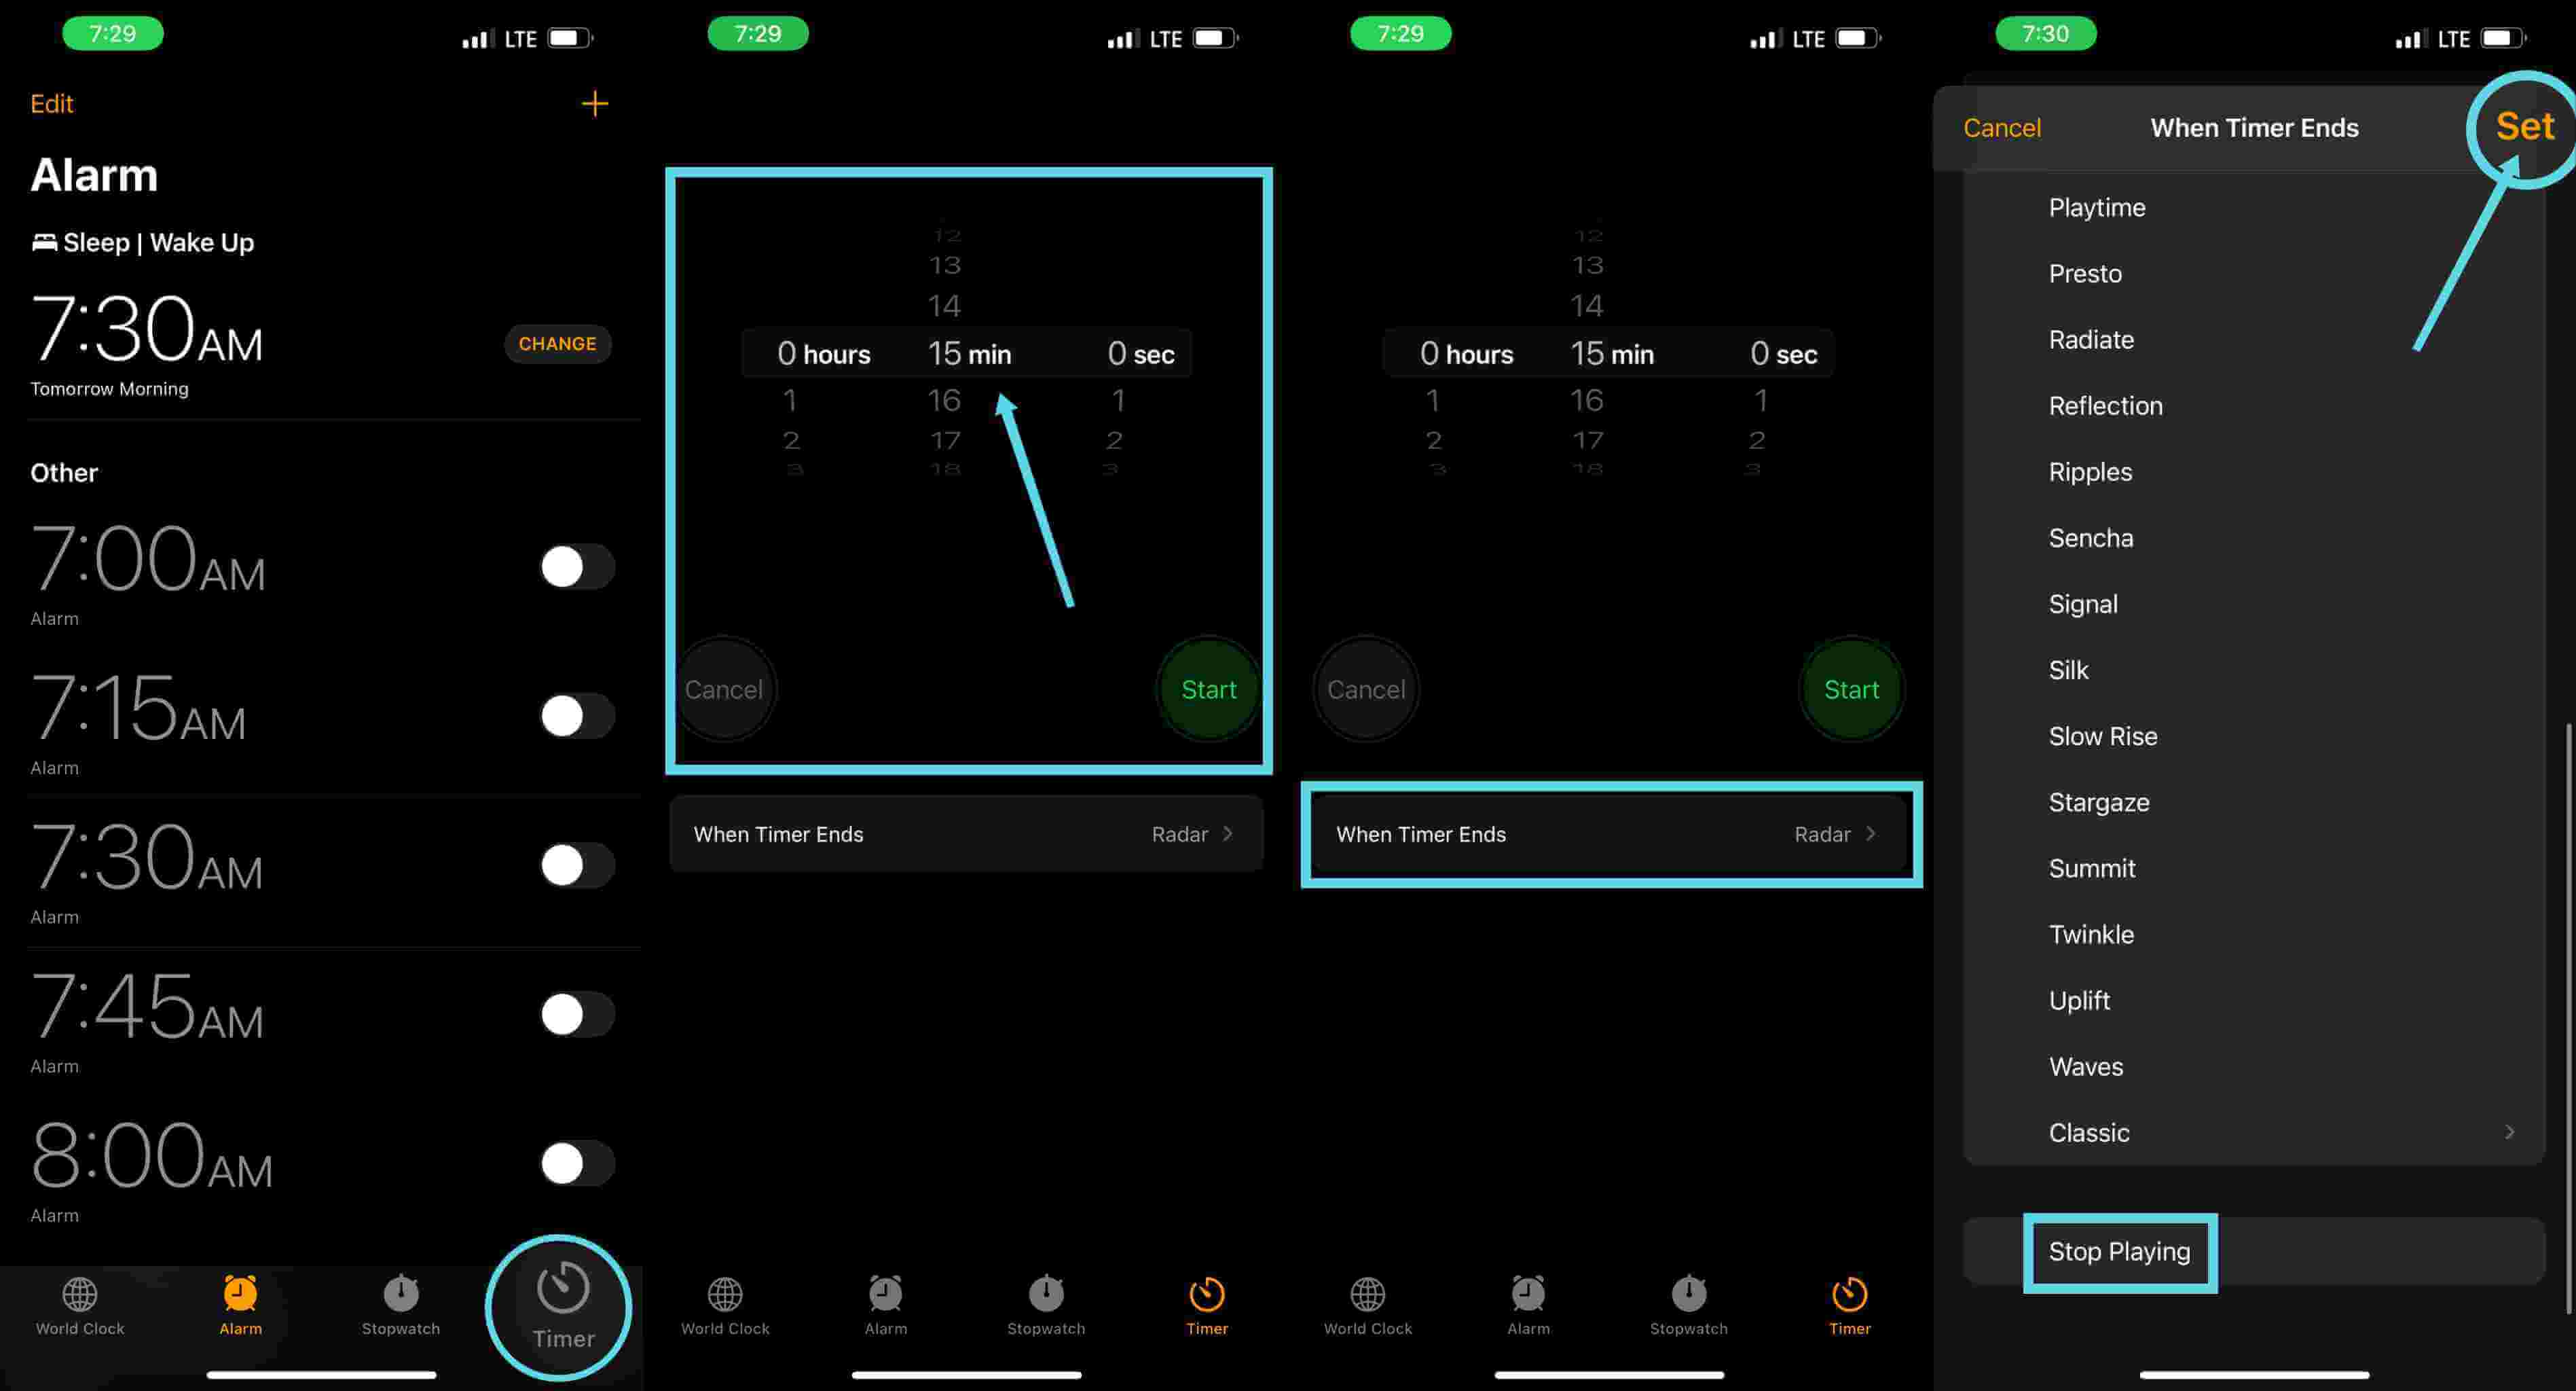
Step #1. On your iPhone, launch the “Clock” app. At the bottom part, you shall see the “Timer” option.
Step #2. You can now choose the duration you’d like to set. After setting this app, you can now tick off the “When Timer Ends” option.
Step #3. Scroll and then choose the “Stop Playing” button. Afterward, click “Set”.
Step #4. Once you got back to the timer screen, click the “Start” button next.
Step #5. You can now head back to the Apple Music app and then choose a playlist to play while lying on your bed or doing some stuff. The playing of the playlist will stop once the timer ends.
Method #2. Creation of an Automated Sleep Timer
Apart from the first method mentioned, another way that you can use to set up an Apple Music sleep timer on your iPhone is by creating an automated sleep timer. If you are looking at streaming Apple Music daily at a specific time of the day, this method will be too helpful to you because you can set up a fixed time of when the songs will stop playing every day! This sounds interesting, right? If you have a regular sleep routine, this method surely suits you more! Here's what you need to do.
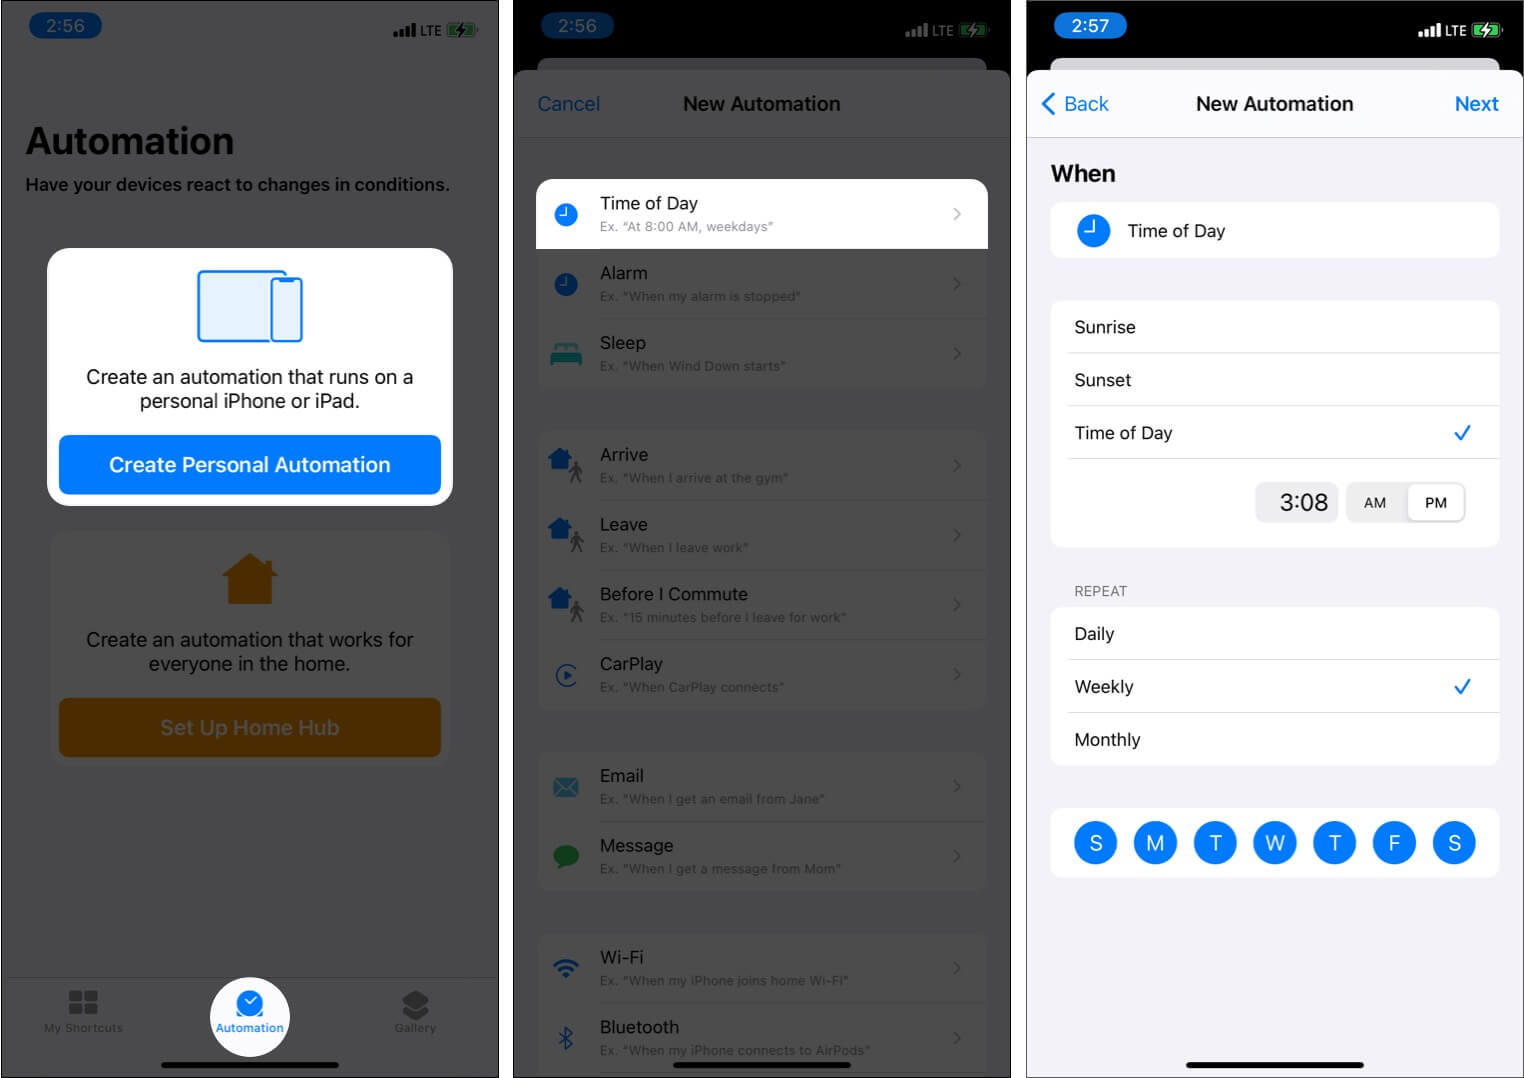
Step #1. On your iPhone or iPad, open the “Shortcuts” app. You need to download it first before you can finally open it. At the bottom tab, you will see the “Automation” tab. Select it and tap.
Step #2. If you have never tried before to create automation on your iPhone, choose the “Create Personal Automation” button. Otherwise, choose the “+” button that is at the top-right corner of the screen then hit “Create Personal Automation” next.
Step #3. Press the “Time of Day” option and select when you would want to pause your Apple Music. Click “Next” afterward.
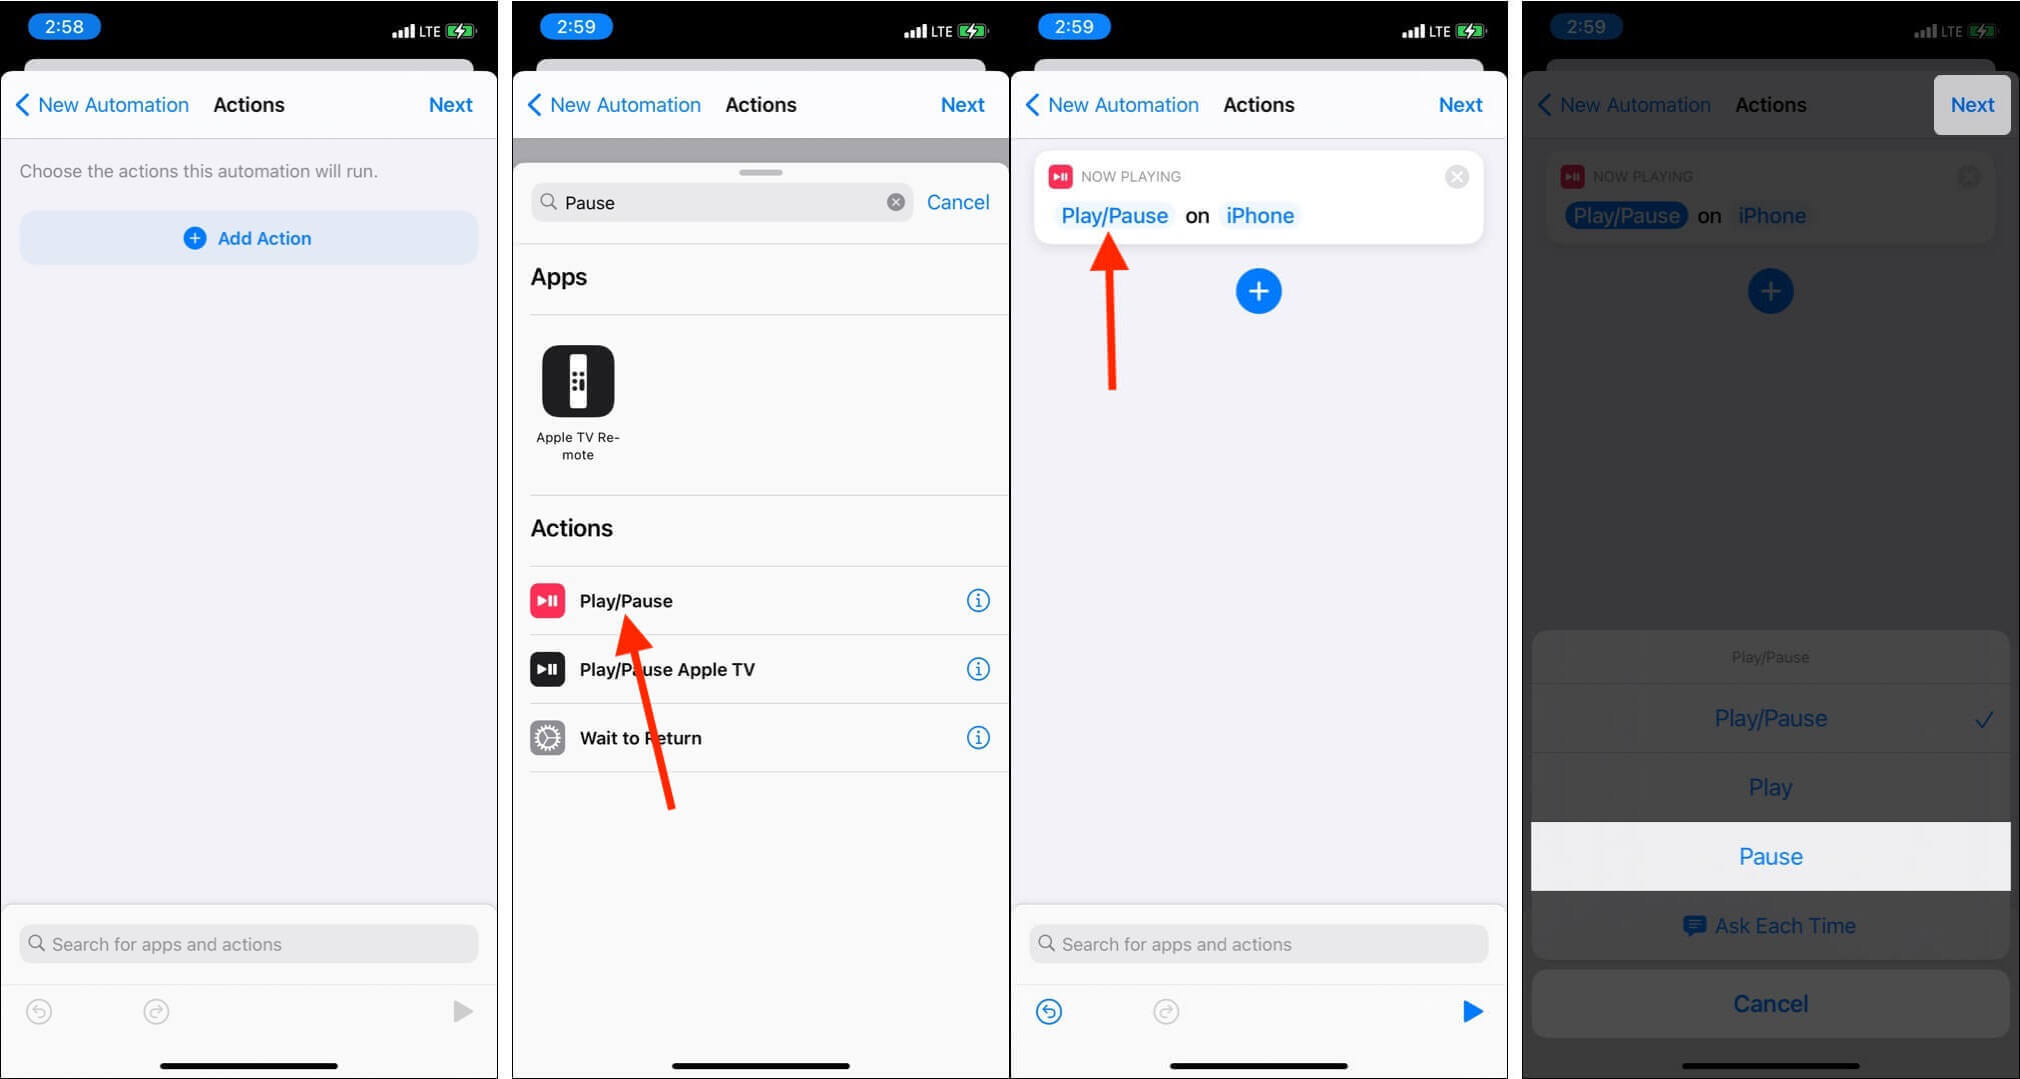
Step #4. Click “Add Action”. Utilize the search bar and type “Pause”. Tap the “Play/Pause” button next and choose “Pause” from the menu that you will see at the bottom. After that, tap Next.
Step #5. Toggle off "Ask Before Running". Finally, tap Done. You have successfully set the automation.
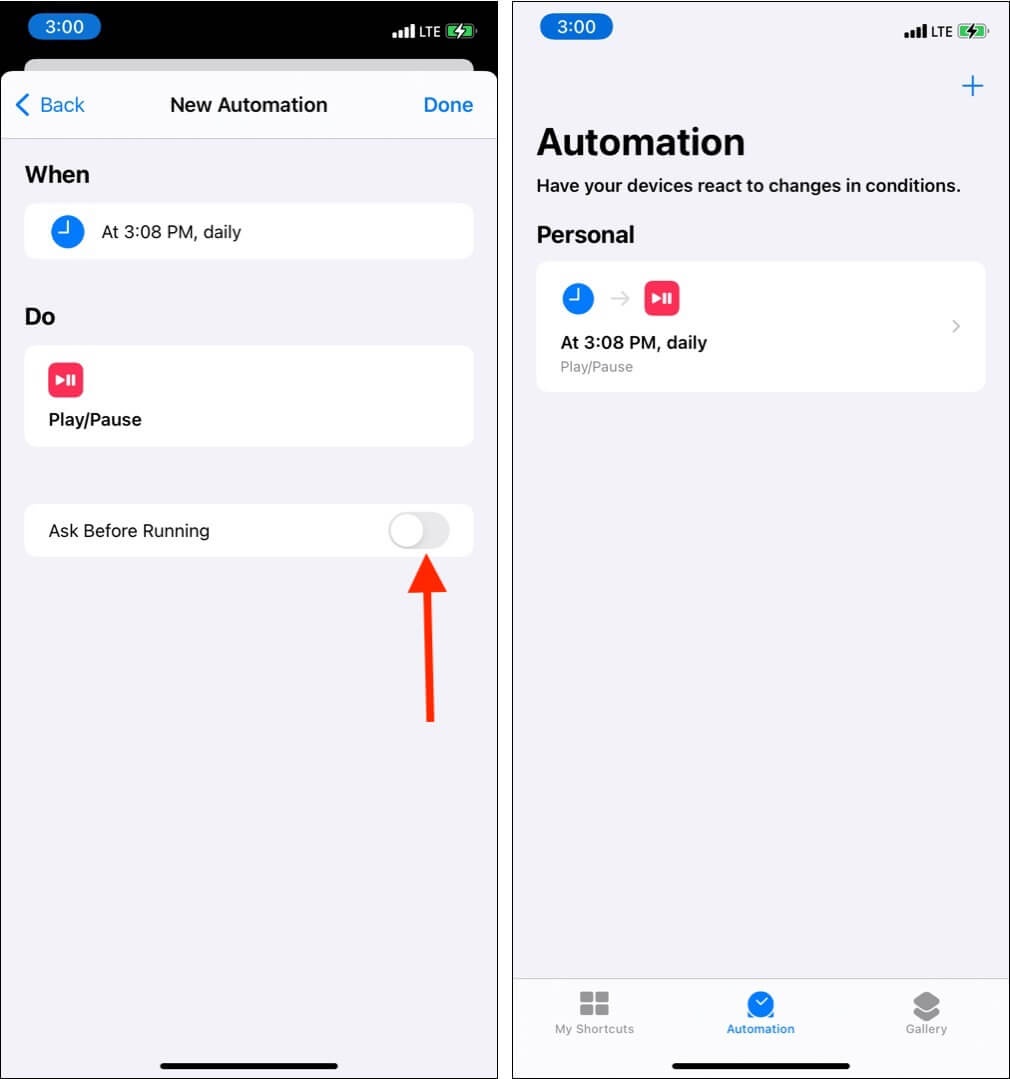
Using the Shortcuts app is an alternative way to set up Apple Music sleep timers. By doing the above procedure, you can just listen to playlists and songs every night before going to sleep and automatically, your iPhone will stop playing at the time you specified. If you no longer need this, open the Shortcuts app and tap Automation. Swipe right to left on the Play/Pause automation and tap Delete.
Part 2. How Do You Put a Sleep Timer on Apple Music on Android?
Knowing how to set up an Apple Music sleep timer on iPhone isn’t enough. Android users should also be capable of doing the same. For Android users, a third-party app is needed to successfully do the sleep timer setup. If you are one of the Android users who are also curious about the process, you can simply follow the below guide.
Step #1. Visit the “Google Play Store” and look for the “Sleep Timer” app. Download it and install it on your Android device.
Step #2. You may now select how many minutes you wish the Apple Music app to be utilized. Moving the slider around the circle will help you with the setup. You will see the number of minutes in large font in the middle of the circle.
Step #3. Just tap “Start”.
The Apple Music app will stop after the duration you had set up. This “Sleep Timer” app for Android devices is as well good because there are other functions that you can enjoy from using it. You can, in fact, change or adjust some options via its built-in settings.
Though others find this app quite good, some users have experiences with this app not working as expected. There are reported instances that the app would just mute the songs but will still keep on running in the background. Thus, causing the drainage of one’s Android device battery.

Part 3. How to Set a Sleep Timer for Apple Music on a Mac?
Now that we’ve learned how to set up an Apple Music sleep timer on mobile devices, we will now be exposing the detailed procedure of how you can do it using your Mac. The whole process is also easy. Here is what you need to follow.
Step #1. On your Apple menu, choose “System Preferences”.
Step #2. Tick the “Battery” button.
Step #3. At the bottom of the side section, you will see “Schedule”. Click it.
Step #4. A page shall open, there is a box next to the “Sleep” option. Make sure you put a checkmark on it. A drop-down menu will be displayed when you try clicking “Sleep”. Instead of putting your Mac to sleep, you can choose the option to shut down if you’d like to.
Step #5. You may now set the days and time you wish your Mac PC to be in sleep mode. Afterward, choose the “OK” button.
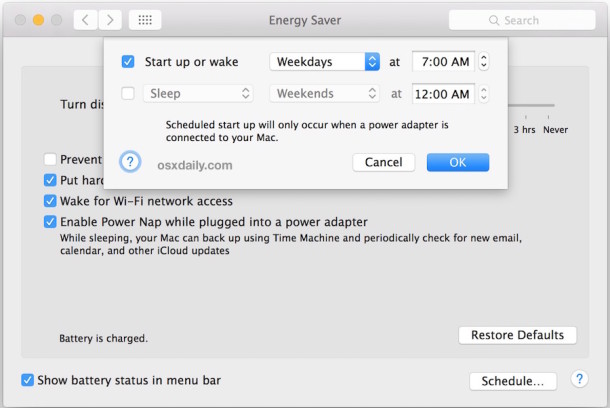
After finishing off the above five steps, you can then play songs during your bedtime using your Mac PC. It will automatically pause and enter the sleep mode 10 minutes before the scheduled time. This may not have been the best method to set up an Apple Music sleep timer but this will also work just fine.
Part 4. How to Set a Sleep Timer for Apple Music on Windows?
Of course, since we have shared how you can set up an Apple Music sleep timer on your Mac computer, we will also share how you can do it on your Windows PC. The same with Mac, it is suggested to schedule a sleep timer for your PC in general to automatically have the Apple Music app paused. Here is how you can do it on your Windows computer.
Step #1. Press the “Windows” key and the “R” key on your keyboard at the same time.
Step #2. Type “cmd” on the dialog box that will prompt then just hit your keyboard’s “Enter” key.
Step #3. You will then need to type “shutdown -s -t 3600”. 3600 is the number of seconds for the timer which, of course, you can change to your liking. Hit the “Return” button next.
Doing the above 3-step procedure will make your Windows PC shut down on the specified time set which will also pause your Apple Music app.
Part 5. How to Convert Apple Music to Plain MP3 Format
After learning important information relating to the setting up process of the Apple Music sleep timer on different devices, we will now be sharing bonus information with you – how you will easily be able to convert your Apple Music favorites to plain MP3 files.
At first, you will surely wonder how the conversion of Apple Music songs will work given that they are protected files. Well, that is simple. There are actually professional apps that can help you do the removal of that protection with ease.
The TunesFun Apple Music Converter is one of the best professional software apps that can help with the process of DRM removal of Apple Music songs as well as convert them to formats that are playable on the majority of devices and media players. MP3 would be a very good example of such formats. Apart from MP3, TunesFun Apple Music Converter actually supports FLAC, AC3, M4A, and AAC.
With the fast conversion speed of this app (16x faster compared to other converters), you can surely save time. It is also worthy to mention that this converter works lossless. With this note, you can be assured that the output files will maintain their 100% original quality as well as their ID3 tags and important details. This also perfectly works with both Windows and Mac PCs and so compatibility during the installation process isn’t actually an issue at all.
With the easy interface this app has, even the first time users and beginners won’t have a hard time in using its functions. For your reference, here is a guide to convert Apple Music songs to MP3 with the use of this TunesFun Apple Music Converter.
Step #1. We suggest you visit the official website of TunesFun first to see the detailed list of the installation needs of the app. Complete and meet all those then install this converter on your PC. Launch it afterward then start selecting the Apple Music songs you’d like to convert to MP3 format.

Step #2. Once the songs are imported, select MP3 as the output format to use and make sure you also set up the other output parameter settings.

Step #3. After reaching satisfaction from the setup made, just tick off the “Convert” button at the bottom of the page. The app will start converting the uploaded songs right away as well as the DRM removal procedure.

Since the app worked pretty fast, you shall have the MP3 files ready within just a few minutes. The converted Apple Music songs can now be played offline on any device that you like to use because they are now free from protection. You can also have them saved on any external drives, burn them on CDs, or share them with others.
Part 6. Summary
At this point of the article, we are glad to know that you had learned already the process of setting up an Apple Music sleep timer. You are surely happy to know that you can do the setup on many of your devices like your handy and portable ones as well as on your computer. More so, you also gained a better understanding of an amazing way of how you can have your Apple Music songs converted and downloaded to MP3 format, that is through apps like the TunesFun Apple Music Converter.
 Home
Home
Leave a comment