Answered: Can I Transfer Apple Music to Spotify?
“Can I transfer Apple Music to Spotify?” You are perhaps one of the many users who are also wondering about the answer to the abovementioned query. Well then, you’re lucky as we are about to have this answered in this post.
With the many available music streaming platforms that any user can take advantage of, we can’t deny the fact that Apple Music and Spotify are two of the best. If you have been an avid user of Apple Music but suddenly, decided to switch and subscribe to one of Spotify’s premium plans, you might be wondering if you can bring your Apple Music playlists with you during the changeover.
It’s quite unfortunate to know that Apple only makes it achievable and easy to transfer files within the Apple ecosystem. So, to answer the “Can I transfer Apple Music to Spotify?”, we would say that it is indeed possible but there’s no direct way via the Apple Music app to do it. Of course, we’ve got techniques to share in order for you to transfer Apple Music to Spotify successfully. The first part of this article will immediately highlight what you need to do so, jump into it now!
Article Content Part 1. Ways to Transfer Apple Music Playlists to SpotifyPart 2. The Best Way to Transfer Apple Music Songs to SpotifyPart 3. Summary
Part 1. Ways to Transfer Apple Music Playlists to Spotify
Since we have already initially answered the “can I transfer Apple Music to Spotify?” query in the introduction part, we will now be delving into the strategies that we wish to share with you when it comes to moving your Apple Music favorites to your Spotify account. We’ve got two ways here. You can either utilize the iTunes app or rely on third-party software applications like FreeYourMusic. Details relative to these two will be explained further below.
Try Importing Local Files to Spotify Through iTunes
The first workaround that we are to share for this “can I transfer Apple Music to Spotify?” dilemma is trying to import local files to Spotify via the iTunes app. When applying this method, you must ensure that your iTunes or Apple Music library would be updated with playlists that are desired to be moved to Spotify. After ensuring that, you may now follow the below steps.
Using Your Desktop PC
Step #1. Launch the Spotify app. At the top area of the screen, you shall see your profile name and photo. Just tap this to start.
Step #2. Head over to “Settings”.
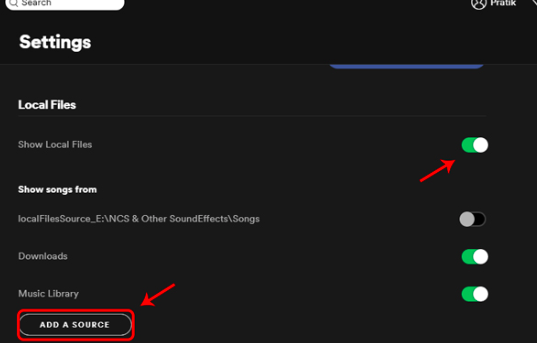
Step #3. Scroll down until you see the “Show Local Files” option. Toggle the slider next to it to have it enabled. Upon doing this, imported files from your PC shall show up.
Step #4. Under “Show Local Files”, the “Show songs from” option will be shown. The slider next to the “Music Library” option must also be toggled to be enabled. After doing this, tap the “Add a source” button.
Step #5. A pop-up menu shall be shown. It is now time to choose the local folder containing the tracks that you wish to move to your Spotify account. To choose songs from the iTunes app, tap the “Music” menu, then “iTunes”.
Step #6. Head over to “iTunes Media” and then hit the “OK” button.
Step #7. Launch your Spotify app and move to the “Your Library” section. Search the “Local Files” folder.
All your imported local files will be shown in this folder. Though we are seeing this method as a possible workaround to this “can I transfer Apple Music to Spotify?” dilemma, it must be noted that there are instances that this does not work (when the songs aren’t in the iTunes library or are not encrypted in M4P or MP3 format).
Using Your Mobile Device
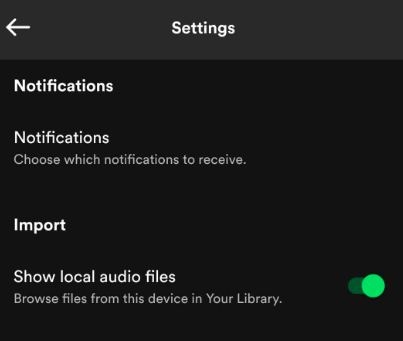
Step #1. Using your mobile gadget, open the Spotify app and hit the icon for “Settings”.
Step #2. Scroll down until you see the “Import” option. Under this, you shall see “Show Local Audio Files”. This must be turned on.
Step #3. Head to the “Your Library” section and then tap the “Local Files” folder to open it. All the audio files from your mobile gadget that’s in use shall be seen here.
In this method, importing shall only be possible if you are using a Premium Spotify account.
Try Using Third-Party Apps
Another way for you to transfer Apple Music to Spotify is via the help of third-party apps such as FreeYourMusic. If you wish to try this, you only have to follow the below guide. Remember that while you are using apps like this, there could be a possible risk with your billing data so it is suggested that you should be careful enough.
Step #1. On your mobile device or computer, install the FreeYourMusic app.
Step #2. On the homepage, you can choose which platform would be the source when moving data. Since we are aiming to transfer Apple Music to Spotify, you must select Apple Music as the source.
Step #3. Head over to the next page to set the destination which is Spotify.
Step #4. You may now start choosing the songs or playlists that you would like to transfer from Apple Music going to your Spotify account. Checking the number of the selected audio files can also be done if you want to.
Step #5. After the selection process, you may now hit the “Begin Transfer” option.
Step #6. Once the transfer process has been completed, a notification shall be displayed – “You have transferred”.
Once the above notification is seen, you may now head over to your Spotify account to see the transferred audio files. In the future, you may allow automatic syncing (if you don’t want to undergo the hassle of doing the same steps). However, you can also do that with a premium plan.
Part 2. The Best Way to Transfer Apple Music Songs to Spotify
We somehow addressed the “can I transfer Apple Music to Spotify?” query in the previous section of this article. However, there are known limitations such as the formats of the audio files and the presence of the Spotify premium plan. In this case, we must be finding the best way to deal with this scenario.
Fortunately, there are professional software apps that can help us download our Apple Music favorites. Though protected with DRM, with the help of tools such as the TunesFun Apple Music Converter, we can get the songs that we love downloaded without any issues. This has the ability to do DRM removal and even aid in the transformation of the songs to formats like MP3. Actually, apart from MP3, it supports other common and flexible output formats as well.
With the 16x conversion rate that’s being offered by TunesFun Apple Music Converter, you can have the output files ready within just a few minutes. You can even rest assured that these files will have the original quality maintained alongside their metadata information and ID3 tags. If you would want to install this on your PC, you won’t have any issues as this is supported by both Windows and Mac OS.
Another amazing thing about the TunesFun Apple Music Converter is that it can also function as an audiobook converter. So, if you’ll also look for a tool to convert your audiobook files in the future, you may rely on using this app.
Of course, the TunesFun team made sure that the TunesFun Apple Music Converter would be good for all users. Thus, navigation keys and functions were designed to be simple enough. When downloading and processing Apple Music songs through the TunesFun Apple Music Converter, the below three simple steps must be accomplished.
Step #1. Install the TunesFun Apple Music Converter on your PC and start to select the Apple Music songs to be processed right away after arriving on the app’s homepage.

Step #2. Choose a format that’s supported by Spotify. Selecting MP3 will always be a good choice. Upon selecting the format to use, don’t forget to review the output parameter settings at the bottom. You may modify these options as you like.

Step #3. The conversion of the selected Apple Music songs shall happen once the “Convert” menu has been tapped. The DRM removal process shall also happen at the same time.

Once you have the converted and DRM-free Apple Music songs, you’ll surely have no issues when trying to import the tracks as local files to your Spotify account!
Part 3. Summary
At this point in the article, the “can I transfer Apple Music to Spotify?” question should no longer bother you! We’re glad to have shared with you some techniques relative to this dilemma. As always, when dealing with cases like this, don’t forget that the best practice would always be to rely on professional apps like the TunesFun Apple Music Converter!
 Home
Home
Leave a comment