How To Convert Public Spotify Playlist To Apple Music?
If you have already exerted a lot of effort in creating your Spotify playlist, it would be hard for you to suddenly transfer to Apple Music. Well, this is not known to many but there is a way to convert public Spotify playlist to Apple Music. The processes can be easy as long as you get to try to understand the methods on how to properly do it.
In this article, we are going to figure out how to move public Spotify playlist to Apple Music. If you wanted to know all the proper methods, we are getting into the discussion in the next parts of this article.
Article Content Part 1. How to Transfer Spotify Playlists to Apple Music?Part 2. How to Conveniently Listen to Any Music You Love at Any Time?Part 3. To Summarize It All
Part 1. How to Transfer Spotify Playlists to Apple Music?
Apple Music is Apple's streaming music service. Apple Music boasts access to more than 100 million songs. Spotify is also a popular music streaming service. Curated playlists are almost always the first thing you see when you load any version of the app. These are updated constantly, so your favorite ones never grate following extended use.
But Apple Music supports Spatial Audio and Lossless Audio, two features that are being provided to Apple Music subscribers at no additional cost. Spotify streams songs at three different rates (96kbps, 160kbps and 320kbps). When it comes to resolution and bit rate right now, Apple Music's library of lossless content has Spotify beat. So, many audiophiles are considering moving from Spotify to Apple Music.
To switch between the streaming services, you'll first need to sign up for an Apple Music subscription. If you don't want to lose access to the Spotify playlists you've curated and saved over the years. There are a few tools you can use to make that transition painless since they have compatibility issues. Now, let us get started and discuss some of the methods to convert public Spotify playlist to Apple Music.
On Your iPhone
One of the third-party tools that you can use to convert public Spotify playlist to Apple Music is SongShift. If you wanted to do it through the use of your iPhone, this is the best app that you can use. This app is downloadable in the App Store in case you wanted to try it out. Here are the steps on how to use the SongShift in converting your Spotify playlist to Apple Music.
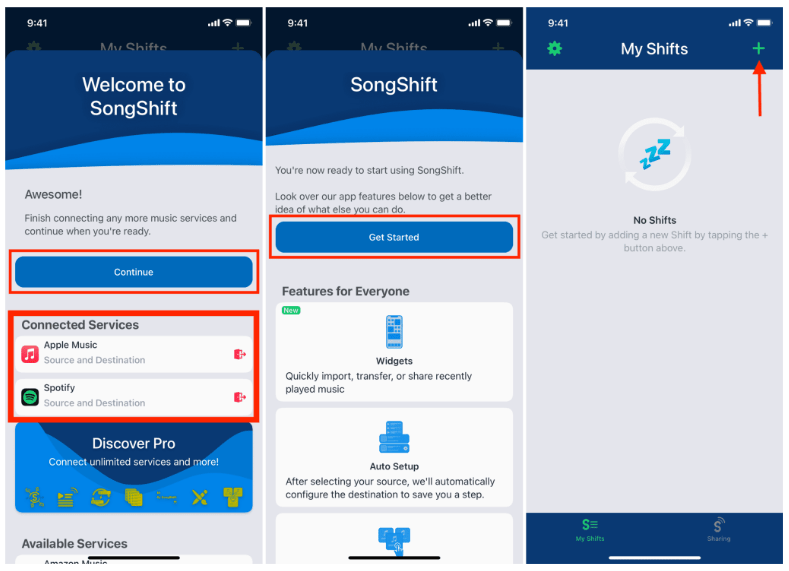
- Go and download SongShift on the App Store, and then launch it.
- On the Music Services page look for Spotify. Enter your login details. Then Tap Agree.

- Next, tap the Apple Music icon and then tap Authorize to grant the app access to your Apple Music library and set a token.
- Once you’ve connected all of the required services, tap Continue.
- Then tap Get Started.
- Tap the + icon in the upper right corner.

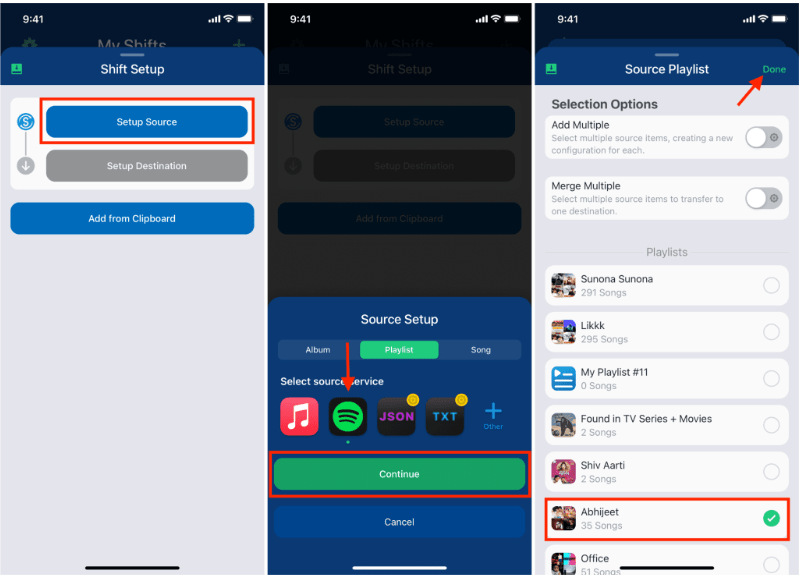
- Tap Setup Source.
- Tap the Spotify logo then tap Continue.
- Choose the playlist you want to transfer then tap Done. SongShift will automatically add your other connected service as the Destination.

- Then tap the I’m Finished option.
- Tap the card under Ready for Review and then tap Confirm Matches. And then you are finally done!
On Your Android
Now that we have ideas on how to convert public Spotify playlist to Apple Music on an iPhone, it is now time that we figure out how to do it on an Android device. This time we are going to use a third-party tool called Soundiiz. If you are up to knowing the process of how you do it, let us see below.
- On the website, tap the Start Now button.
- Then on the login page, select the Sign in with Spotify option.
- You have to authorize Soundiiz so that it can access your Spotify account.
- Go and choose Apple Music as the destination service in order to proceed.
- Then you have to go log in to your Spotify account.
- Then on the Menu, select Transfer > choose Spotify > select the Playlists option. You have to see the Spotify playlist in order to transfer it.
- Then go and choose Confirm and Continue.
- Hit the Save Configuration which is located at the lower part of the window.
- Then go to the Confirm Tracklist tab. Choose Apple Music.
- Login with your Apple ID in order to continue.
Using Your Personal Computer
Of course, the other device that you can use is your personal computer to convert public Spotify playlist to Apple Music. And you also have to use a third-party tool and the one that you can use is called TuneMyMusic. Aside from this one, there are other websites that you can go to, and if we are about to use this third-party tool, here are the steps that you have to follow.
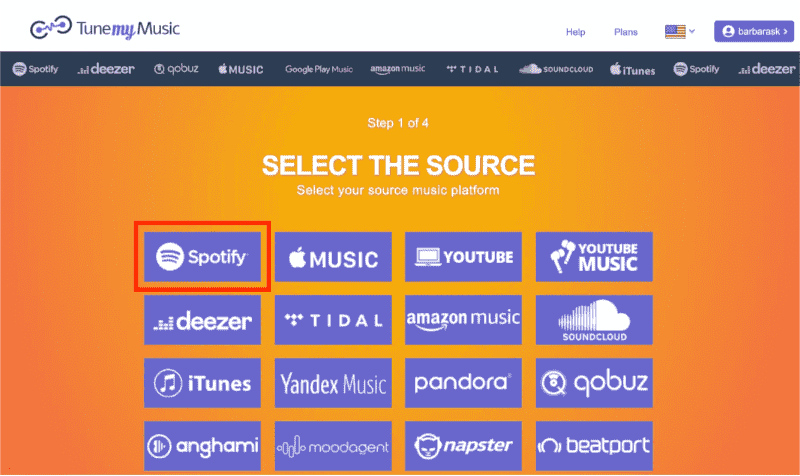
- On your personal computer, go to the website of TunesMyMusic.
- Go and tap the Let’s Start button.
- You have to go to the Select the Source option, and then select Spotify.

- You then have to log into your Spotify account using your credentials.
- Go and look for the playlist that you wanted to convert.
- Then, you have to copy the URL of the playlist that you have chosen and then paste it into the search bar. You can also directly upload it to Spotify if you wanted to.
- Go and select the Load Playlist option.
- Then tap on Next: Select Destination tab.
- Then proceed to Apple Music.
- Then you have to sign in with your Apple ID.
- Then you have to go to the Start Moving My Music button to proceed.
And there you are! We have some different ways how to move public Spotify playlist to Apple Music. You just have to choose which one suits resources and your wanted outputs. If you are up to discovering one of the most convenient ways to access your Spotify playlist using the Apple Music platform we have the best option to share with you in the next part.
Part 2. How to Conveniently Listen to Any Music You Love at Any Time?
There is truly a lot of ways to convert public Spotify playlist to Apple Music. We have discussed some of these in the previous part of this article. What if you ever change your mind and want to keep using Spotify? You can as well do the opposite. You can also send your latest playlists back the other way, from Apple Music to Spotify. Is there a more convenient and easier way to do it?
We are talking about two of the most popular online music platforms which are completely different from each other, we have some ways to use them. You can even access music tracks from Apple Music and have them all moved to other devices or music services so you can listen to any of them at any time you want. This can be possible through the use of a third-party tool called the TunesFun Apple Music Converter.
All the music tracks from Apple Music are protected by DRM encryption. This hinders you from easily accessing the files when you do not have enough authorization to do it. One of the simplest ways is to get a paid subscription to the plans. It is also a must that you make sure that you have the right devices to use before you get through.
It is also a little wiser that you have enough knowledge on how to use the TunesFun Apple Music Converter, as well as the features that it has so you are able to use the tool in the right ways as well.
We have listed some of the features of this third-party tool for your reference.
- If you believe that time is gold, you have to try this professional tool. It can convert your music files at a faster conversion rate helping you save lots of time and energy as well.
- The TunesFun Apple Music Converter offers various formats which you can choose from. You can convert Apple Music songs to MP3, it also supports other common audio formats including AAC, M4A, AC3, FLAC, and WAV.
- To easily access the music tracks that you want on any device that you have, the tool can also help with the process of DRM removal of Apple Music songs which is adopted by the music files.
- The conversion process might be fast, but the quality of the files will remain as good as ever. You even get to keep metadata and ID tags of songs.
- The tool is not hard to use. Its interface is also simple, and there are not many steps to deal with. We have also listed the steps to guide you well in the use of the professional tool.
Step 1. To begin the TunesFun Apple Music Converter must be downloaded and installed on your computer. Open the tool once the installation is done, then start importing the files by tapping the Add Files button you can also try the dragging and dropping method or the copying of the URLs as well.

Step 2. Select the format of the files that you want or need. And then create the folder where all the files will be saved after the process of conversion.

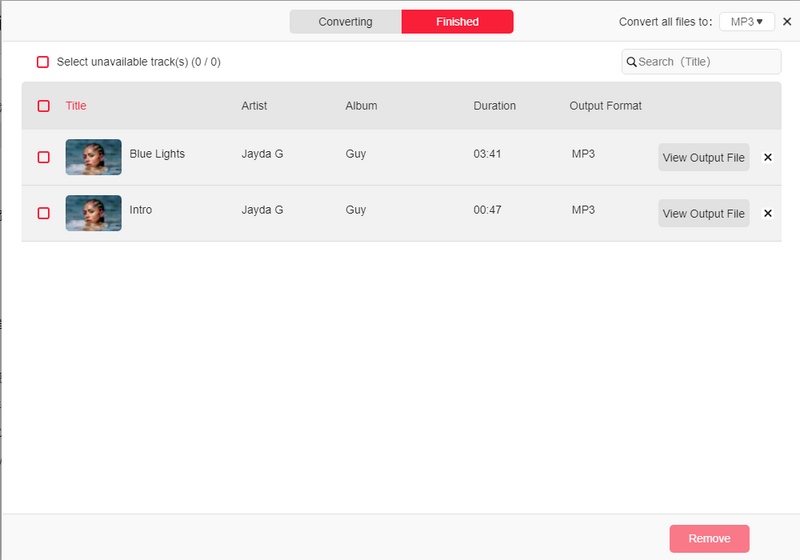
Step 3. And then hit the Convert tab to start the process of conversion.

Step 4. After a few minutes, you can finally enjoy the music files from both of the platforms and listen to them anytime you want.

Part 3. To Summarize It All
It is great to know that we are able to convert public Spotify playlist to Apple Music with the use of different methods. By this, it has become possible to connect the two completely different platforms. Also, in order to do things easier, we recommend the use of one of the most trusted and efficient professional tools these days in the name of TunesFun Apple Music Converter.
Leave a comment