Copy Playlist From iPod: How Do We Do It?
There are lots of ways to copy playlist from iPod, when you go over the web and look for them, you would be so glad to discover these ways and have them used to enjoy songs you love. It would also be so nice to have all the playlists or songs you love to be played not just on your iPod but on every device that you have. There are lots of simple ways to do this, however, the certainty of the said steps is the problem. We could not be assured that it is the right thing that we should do.
That is why, in this article, we are going to talk about how to copy playlist from iPod, and what can be the tools that can help us execute the task properly. We will also share with you an easier way to enjoy any song you have from a device to all of the devices that you have, so if you are ready let us get rolling.
Article Content Part 1. How To Copy Playlist From iPod Using iTunes?Part 2. What Are The Tools To Help Copy Playlist From iPod?Part 3. How To Access Any Songs That You Love On Any Device That You Have?Part 4. To Summarize It All
Part 1. How To Copy Playlist From iPod Using iTunes?
One of the most popular ways to copy playlist from iPod, which could also be applicable in individual song files is through the use of iTunes. Since you might have difficulty dealing with the drag-and-drop method you might want to try the steps that we have below.
- To start, you have to connect your iPod to a computer using any compatible cable, then go open your iTunes account in case you have already installed it on your computer.
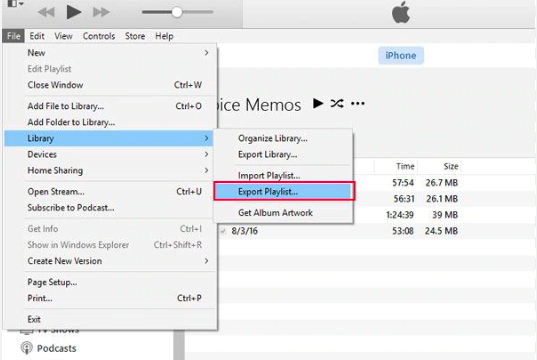
- Then on the Devices section, tap the options where you can see your device name.
- Then you have to choose a playlist that you wanted to copy to your iTunes.
- Then once you have chosen, go to the Library section of the Files option, and then tap the drop-down menu, and tap the option, Export Playlist.
- Then you have to give a name to the export, and then tap Save in order to playlist on a text file.
- Then on the left part under the Library Section, you have to choose Songs.
- Then proceed to File and then to Library and then tap the option Import Playlist, then you have to choose the text file that you have created using the previous steps that we have mentioned.
You have to be sure that you have carefully followed the instructions one by one, and in case you have got everything right it means that you have successfully copied the playlist from iPod. In case you have lots of playlists that you wanted to copy from your iPod, you have to repeat the steps one by one for each of the playlists that you have. If you have a lot of playlists to copy, we are going to share some of the other methods that would be so helpful to you.
Part 2. What Are The Tools To Help Copy Playlist From iPod?
Now that we have ideas on how to copy playlist from iPod on your iTunes, we have to discover other tools that can help us easily copy all the songs that we love on any device that we have. We have listed these tools, and let us see what we have below.
iMazing
One of the tools that you can use to copy playlist from iPod is iMazing. It is one of the simplest tools that you can use to restore and back up your media files and data. To start, you have to download the application using the official website of iMazing. Then you have to open and run the application and then start copying the playlist that you have on your iPod to the personal computer that you are using.
It is possible to do it using your data cable, or you can also do it wirelessly. You also do not need iTunes or iCloud to do it, the method can go on without them. Although this tool or application is smooth and flawless, there could still be dilemmas when you try to back up and restore your data or media files. On the other hand, you also have to remember that the photos are read-only and there is no way that you cannot edit their information.
iExplorer
Another application that we can use to copy playlist from iPod is iExplorer. To start, you have to download the application from the official website of iExplorer. And using a cable you have to connect your iPod to the computer that you are using. Once connected, you have to make sure that you have tapped Trust the computer to go on with the process. Then on the Media Library page, tap the Auto Transfer option, and then you can now start the process to copy playlist from iPod. There can be issues along the way while you are using the iExplorer. There are also a lot of ads and pop-ups as you use it.
Part 3. How To Access Any Songs That You Love On Any Device That You Have?
Have you ever thought life could go on without music? Things might be dull and helpless and people would be always wary and sad. There is an ingredient in music that makes it something that completes a person, a place, or even a happening in life. This might be the reason people would always dare to look for ways to access it. And the best thing is, today, we have a lot of ways to do it.
There are lots of online music streaming sites in the globe today, like Apple Music, cliche as it may sound, Apple Music is amazing in all ways. It has features that made it loved by so many people. Except for the fact that there are difficulties in downloading music files you love from here, nothing could possibly go bad when you use this online platform. Apple Music tracks are protected by DRM encryption which protects all of its tracks from the potential attacks of abusive people who wants to illegally sell or distribute original digital files.
This is where it could be necessary to use professional converters especially if you are going to use the music for personal or own use. It is also a great thing that there are various professional converters these days. One of the most recommended ones is called the TunesFun Apple Music Converter. Being able to give outstanding services to people through the various features it has, the TunesFun Apple Music Converter is really a must-use!
Knowing that Apple Music tracks are bound to DRM encryption, the TunesFun Apple Music Converter can get all of DRM encryption down! Make sure that you are able to access your music tracks anywhere you go, this tool is really amazing! Well, aside from DRM, another reason why accessibility is restricted is because of file incompatibility, which means that the format of a certain file is not playable on a specific device.
And for this, the TunesFun Apple Music Converter can also help you convert your music files! And even if the files are too many this professional converter can fully handle it, the tool can convert your music files faster than basic converters in the market. The tool will also assure you that the output files will be as good as the original ones, giving you a way to keep the ID tags and metadata of these music tracks. The TunesFun Apple Music Converter is also easy to use, to make sure that we understand how to use the tool properly, let us see the steps below.
Step 1. To begin using the tool, you have to download and install it on your computer. Once the tool has been installed, you have to open it to start the importing of music tracks for conversion. You can tap the Add files tab and then use drag and drop or the copying of the URLs of the files.

Step 2. Make sure to choose the file formats that you wanted to have for your music files. Also, start creating a folder where the converted files will be saved after the process of conversion.

Step 3. Tap the Convert tab and you just have to wait for a few minutes before the files have been fully converted.

Part 4. To Summarize It All
It is a good thing that there are lots of ways to copy playlist from iPod. We are happy to share with you the different methods and applications that can help you easily access the types of music that you wanted to use on any type of device that you own. On the other hand, if you do not want to have difficulties accessing the music files, there is always an easier way through the help of professional tools like the TunesFun Apple Music Converter.
 Home
Home
Leave a comment