All That We Have To Know About Downloading And Burning Music
There are actually a lot of things that you have to know when it comes to downloading and burning music. There are steps that must be done in succession to be able to make sure that the execution will be smooth and polished. There can be a lot of reasons why one needs to know facts about downloading and burning music.
It can happen that there are songs that you have already downloaded and you want to listen to at a later time, of course, you cannot bring your computer along with you, so the best thing that you can do is to burn and download them and store them on an MP3 player or a CD. It is not an unusual fact that once you have burned your music into a CD, you can bring a CD player along with you and play the songs that you have downloaded or loved at any time that you want.
In this article, we are going to discuss the methods for downloading and burning music so you can conveniently listen to them at any place you are, and at any time you desire to.
Article Content Part 1. Download And Burn Music In A CD?Part 2. How To Burn Music To A CD Using The Windows Media PlayerPart 3. Bonus: How To Download Music Tracks From Apple Music Hassle-Free?Part 4. To Summarize It All
Part 1. Download And Burn Music In A CD?
Let us get straight to our point and discover the steps for downloading and burning music on a CD. If you are knowledgeable enough about the steps and the things that you have to do it will help you attain the hassle-free listening that all of us wanted.
Step 1. To start, you have to locate all the songs that you wanted to download and save them to your personal computers. The web is really huge and it is where you can choose any song that you would like to have. In case you saw a song that is available for free downloading, you can simply right-click on it, and then choose the option to save the file, you will see, “Save file as”, then once you are ready you have to choose a location on the computer that you are using to where you wanted to save the music file that you have downloaded.
Step 2. Then you can also use a download software that you usually use to download all the songs that you love. One of the most popular ones is the iTunes app. Tap the iTunes app, and then go to the iTunes Store, and then tap the music CD that you want to buy or to purchase, once chosen tap Purchase. Once the purchasing has been completed, you can now set up the music downloads to the iTunes Media Player.
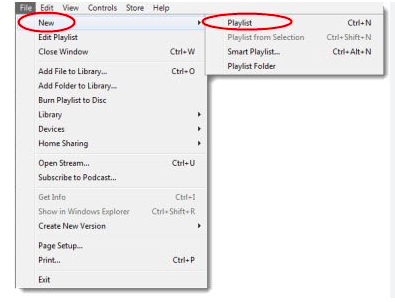
Step 3. Open the media player, it can be Windows Media Player or the iTunes app, and then you have to create a new playlist. You have to go to File and then to New Playlist. Then hit and then drag all the downloaded files going to the playlist canvass. In case you are using iTunes you have to choose the Recently Added option and then right-click on the tracks and then choose the option that says, Add to Playlist.
Step 4. Then you have to insert the blank CD into the CD burner of the computer that you are using, and then you have to close out all the AutoPlay that there is, as well as the other prompt windows.
Step 5. Then you have to choose the option Burn on the Media Player, and then you will see all the downloaded music on your playlists and you will see that they are already burned in a CD as you wish.
Part 2. How To Burn Music To A CD Using The Windows Media Player
- To begin, you will need a blank CD, once you have it, you have to insert it into the CD drive of your computer.
- Open the Windows Media Player app.
- In order to add the songs to the Windows Media Player, you have to make a folder and then put all the tracks into it. Then right-click on the Music option that you will see at the left sidebar and then choose the option Manage Music library. Tap the Add option, choose the folder, and then you have to choose the Include folder option, and then tap Ok.
- Tap the Burn tab which you will see on the right part of the screen, and start dragging all the music tracks that you need to burn under the said tab.
- You will see a small Burn options button at the below part of the tab, you have to choose it, and then choose Audio CD in case you wanted to play it using a CD player. Or you can also select Data CD, in case you only want to back up the said tracks.
- Choose the Start button to begin the burning process. And you just have to wait for minutes until the final output is finally ready.
And there you are! These are just some of the methods for downloading and burning music on a CD using iTunes or Windows Media Player. If you want to discover other ways to conveniently download and burn all the music that you wanted, you have to read the next part of our article.
Part 3. Bonus: How To Download Music Tracks From Apple Music Hassle-Free?
One of the best ways to make sure that you are doing the right thing is when you are able to access music with ease and convenience. Music has become one of the greatest necessities of many people these days. Although there are various ways to access the music files we love, there are restrictions as well as requirements that you have to be ready with.
Apple Music has been one of the most successful online music streaming platforms today. In order to access songs from Apple Music, you have to subscribe to the premium version of the platform and you have to make sure that you are using an Apple-authorized device. Otherwise, it will be difficult for you to listen to any song you love on your own time pacing.
But, we can do better. There is something that we can use to be able to easily address this concern. We can use a tool called the TunesFun Apple Music Converter, and this will make your access to music so much better. Here are the things that you have to know about the tool, so you will be familiar with the concerns where you can use it.
- Apple Music tracks are protected by DRM technology, to be able to get rid of it, you can use the TunesFun Apple Music Converter. Through it, you will now be allowed to access converted Apple Music tracks on any device that you own.
- In order to get rid of the restrictions, you can use the TunesFun Apple Music Converter to convert your music files to flexible file types like MP3, FLAC, AIFF, WAV, MP4, and a lot more.
- Convert your music files faster than you have ever imagined. Through the use of the fast conversion rate of the TunesFun Apple Music Converter, you can save a lot of your time which you can dedicate to doing other important things that you have to accomplish.
- Even if the process of conversion is fast, you can be assured that the quality of music files will never be compromised. You even get important data like ID tags and metadata of songs.
- The interface of TunesFun Apple Music Converter is beginner friendly and would not be a problem for first-time users. It has a simple interface and simple steps as well.
Let us get to know how to use the TunesFun Apple Music Converter, below.
Step 1. You have to make sure that you have downloaded and installed the TunesFun Apple Music Converter on your Mac or Windows computer. Then you can now begin the process of adding all the files that you wanted to convert.

Step 2. Once all the songs are onboard, you can now choose the file format that you need or want. You also have to make a folder so that all the converted files will have a home to stay at.

Step 3. Hit that Convert button, and wait a few minutes until everything is set up. In just a few times, you will surely enjoy listening to songs you love while hassle and incompatibility were elicited.

Part 4. To Summarize It All
Downloading and burning music is not an easy task to do. There are things that you have to prepare to be able to proceed. We are hoping that we have shared some of the needed information that you can use in case you wanted to burn your music and access it using a CD or an MP3 player. If you wanted to have a hassle-free experience in downloading and burning music, TunesFun Apple Music Converter will be of great help, just in case.
 Home
Home
Leave a comment