Guide to How to Export iTunes Music to Android
Online music streaming apps are coming in waves today and they are a breath of fresh air when it comes to listening to music. They provide an array of music selections from various artists worldwide.
You need to stay connected to the internet if you want to listen to your saved tracks or keep them for offline listening. But wait, it’s not that simple, you need to be a premium user in order to get the most of streaming app features like skipping annoying ads. And, it comes with a price of course.
However, many users still prefer to download and save their favored song collections on their hard drives so they can listen to them any time and anywhere, even without the internet. Now, that’s seamless music streaming.
The only downside? You have to update your collections every now and then.
Luckily, iTunes comes to the rescue. You can sync your iTunes library to your device. And if you are using an Android phone, well, you need to make an extra effort to get your iTunes music exported over.
There are several ways to export iTunes music to any Android phone and that is what we will be discussing in this article. We will teach you how you can enjoy unlimited music streaming.
Article Content Part 1. Can You Export Music from iTunes?Part 2. Ways to Export iTunes Music to Android?Part 3. FAQs about iTunes Music to AndroidPart 4. Summary
Part 1. Can You Export Music from iTunes?
iTunes may now be left behind with the rise of Apple Music to most apple devices. Mac already ditched iTunes. However, iTunes is still very much active on Windows and Android devices.
The good old iTunes is still one of the most competitive when it comes to music players, the reason why many Android users wanted to make use of iTunes.
However, since iTunes is still an apple service, exporting music from iTunes to Android is a bit challenging. You can EXPORT music but the steps are complicated.
Apple introduced a method wherein you can COPY all your playlists so you can use them on another computer via iTunes but it does not include the actual songs or videos.
There is no direct way to transfer music files from iTunes to Android, Apple did not bother to develop an easier way even though they have tons of users coming from the Android platform.
So you got to figure things out on your own if you are eyeing those hundreds of songs from your iTunes. There are plenty of steps to work around your iTunes but we gathered the 3 simplest and easy-to-digest methods that even beginners can follow.
Find out the next steps for the guides.
Part 2. Ways to Export iTunes Music to Android?
Before anything else, make sure to allot enough time if you want to export iTunes music to Android, especially when you do it manually. Once you have moved all your songs to your Android phone, you’ll realize that it is worth the wait and challenges.
You will now get to listen to your favorite groove wherever you are with and without the internet. All you need then is a power bank to keep your battery alive.
Method 1. Move iTunes Music Files to Android via USB Cable
Moving iTunes music to Android via a USB cable is the least technically challenging method, but, time-consuming.
If you are using a USB cable in transferring your files from Android to the computer, the steps are highly similar, except that in this method, we will navigate through the iTunes library.
Check out this detailed guide on how you can move iTunes music to Android manually:
- Open a file explorer. At this point, you can create a new folder on the desktop or anywhere you want to save the music files.
- Go to C:\Users\<your user name>\Music\iTunes\iTunes Media\ or you can copy this path. Note that <your user name> refers to the account or computer name. This directory will lead you to your iTunes library
- Find and select all the music files or folders that you would like to export to your Android. You can use the drag and drop or copy-paste mode. You may also copy \iTunes Media\ folder to copy the entire library
- Paste the files inside the folder you have created a while ago
- Hook your Android phone to the computer with a USB cable. If needed, tap MTP or File Transfer on the Android USB notification
- Navigate to your Android’s storage, choose whether to save the folder internally or to your SD card.
- Open the folder where you have saved all the iTunes songs and copy or drag them to your Android’s storage folder
- Paste the folder to your Android device and wait for the process to be completed
- Safely disconnect your device from the computer
And there you have it; you have finally exported iTunes music to your Android device.
Method 2. Sync iTunes Music with Google Play Music
Google Play joins the bandwagon of streaming music online. It recently introduced Google Play Music, Cloud storage where you can upload over 50,000 songs from your computer to Google Play, for free!
Once you have uploaded the songs, they will be automatically available on any of your devices, the web, your Android phone, or tablet. This method gives birth to another wireless transfer in between devices.
What you need to do is simply sign up for Google Play. After that, you need to download a Music Manager, which is a desktop application that enables you to upload your collection from your iTunes music library or from any music folder to the cloud.
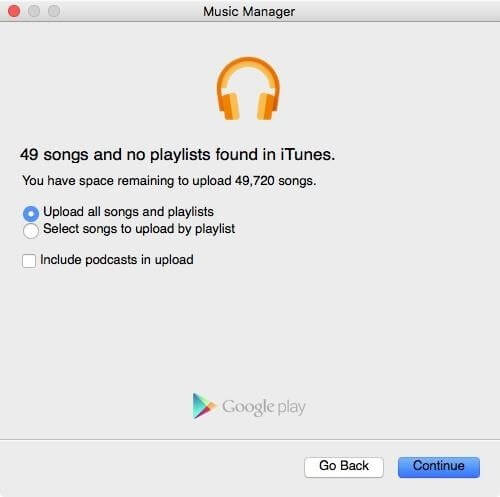
Follow this step-by-step guide on how to sync your iTunes music with Google Play Music:
- Launch the Music Manager after successful installation
- Sign in to your account
- Choose iTunes as “Where to Select” songs and Google Play will locate the folder automatically
- Decide whether to upload songs by playlist or to upload the entire library
- Click Next to begin the Upload
- Wait until the process is completed
- Download the Google Play app on the Android phone
That’s it! Play your tunes anywhere on your Android phone, tablet, and the web. Google Play offers a good alternative to iTunes especially to those who are not Apple users.
However, you have to take note of the limitations:
- Wi-Fi connection
- Download Limit - Downloading through the web interface is limited to 100 songs only.
- Cloud Storage- Because it syncs your iTunes music, it forces you to upgrade for bigger storage
- The number of songs to upload - As of now, you can only upload over 50,000 songs and if you are a certified music lover, perhaps you need more than that.
Method 3. Export iTunes Music to Android with the Third-Party Software
If you have synced your iTunes music compilation to Android using the Apple Music app, then you are probably enjoying the best moments of your life listening to exclusive songs and artists.
Your iTunes may be full of playlists that you can't let go of. But then, the songs are synced and not really transferred due to DRM restrictions.
What you can do is download the songs for offline listening and convert iTunes M4P to MP3.
To strip off the DRM you need to use professional software to handle this just like TunesFun Apple Music Converter.
This software is known to offer the following features:
- Convert iTunes M4P, Apple Music, and Audiobooks
- Download over 50 million Apple Music
- Keeps the original quality of the songs
- Retains ID3 tags and metadata
- 16x conversion speed
- And ideal to use on Windows and Mac computers
Now that you have unlocked iTunes music collection, you can transfer them on any device including your Android phone, tablet, Xbox, Zune, Apple Watch, PSP, and many more.
Using TunesFun Apple Music Converter is pretty simple too, it only takes a few clicks on your computer then you are good to go! Here is the full guide:
1. Download TunesFun Apple Music Converter and install it on your computer.
2. Open the program and select the iTunes music that you want to convert.

3. Choose your Output settings. Select the output format, quality, and folder of the converted files.

4. Click the Convert button and wait.

Unlike using the tedious USB transfer, TunesFun Apple Music Converter gives you the freedom to get your ears on songs you have purchased from Apple Music in just a few steps.
Part 3. FAQs about iTunes Music to Android
The focus is now shifted from iTunes to Apple Music and many users are confused about this. Some users are asking if iTunes is gone for good, while some are concerned about the playlists they have collected over the years.
Well, here are two of the most frequently asked questions, and here are our answers:
#1. Is Apple Music and iTunes the Same?
The Apple Music app is basically ad-free music streaming subscription and iTunes is still the most comprehensive media player and library. With the recent update to macOS Catalina, iTunes was ditched and replaced by Finder. But hey, iTunes is still and alive and kicking on older versions.
All the playlists and smart playlists that you created in iTunes, including the music you have imported into iTunes, purchased from the iTunes Store are accessible in the Apple Music app. Apple Music app and iTunes are interconnected in some ways especially regarding media management.
It became the one-stop-shop on the recent upgrade but its most outstanding feature that sets it apart from iTunes is the online streaming capability and exclusivity. Apple Music offers DRM songs and albums, which they so-called claim to protect the artist from illegal distribution.
With this, you have to pay a subscription in order to listen to these songs. You can pay $10 per month for a single subscription, $15 a month for family (up to 6 members), or $5 per month for college students.
#2. Can You Put iTunes Music on Any MP3 Player?
Yes. However, you need to convert the songs to MP3 file format. iTunes on the other hand uses AAC format. According to Apple, the AAC format generates files that take up less than 1MB for every minute of music.
To transfer your iTunes music on any MP3 player, you need TunesFun Apple Music Converter to process the conversion at a very fast speed of up to 16x .
Part 4. Summary
There are plenty of ways on how to export iTunes music to Android. In this article, you were given three of the most efficient methods, the first is to use a USB cable for file transfer, the next is to utilize Google Play Music, and lastly, convert songs with the help of TunesFun Apple Music Converter.
The last method seems to work better than the rest because you can do more than just exporting, you can convert songs that are DRM-protected and transform them into other commonly-used file formats like MP3 and more.
Have you tried any of the methods above? Which one is the best for you?
 Home
Home
Leave a comment