Solved: Export iTunes Playlists To USB As MP3 Files!
“Can I really export iTunes playlists to USB as MP3 files?” Are you also one of those who are thinking about this problem? When subscribed to one of iTunes or Apple Music’s paid plans, you are surely enjoying all the perks being offered by the app – high-quality audio streaming, offline listening, a wide variety of song choices, and more.
However, though iTunes or Apple Music gives you several advantages when it comes to music streaming, you should be well aware of the restrictions the app has. Know that you can only access your iTunes and Apple Music favorites on devices that are considered authorized, the downloaded files will all be gone once the Apple Music subscription ended, and you aren’t allowed to keep the songs forever or transfer and save them to external drives like USB or online clouds like Google Drive or Dropbox.
You can’t proceed with the above because the tracks are protected by this DRM technology. There are, though, some iTunes files that are free from the protection that can easily be exported to USB drives as MP3 files. However, most are encrypted. So, how will you be dealing with this case? How will you be able to export playlists to USB as MP3 files?
You don’t have to worry that much because the detailed information when it comes to how you would be able to export iTunes playlists to USB as MP3 files will be explained further in this article. Let us now get into each section of this post.
Article Content Part 1. Export iTunes Playlist to USB via iTunes ItselfPart 2. The Best Way to Export Playlists from iTunes to USB As MP3Part 3. Summary
Part 1. Export iTunes Playlist to USB via iTunes Itself
iTunes, being one of the most reliable apps as this can serve as both a file manager and media player, is indeed loved by many. You should know that iTunes itself, can help you export playlists from iTunes to USB as MP3 files. There are actually two ways to do that.
Convert iTunes Playlists to MP3
The first thing that you have to do before you can finally export iTunes playlists to USB as MP3 files via the iTunes app itself is to convert your chosen iTunes playlists first to MP3 format. Here is a detailed guide to how you can do the conversion through the iTunes app. Make sure that you are using the latest version of the app. If you aren’t sure if yours is updated, you can always check on the Store if an update is available and just install it. Ensure that your computer is also connected to a stable network.
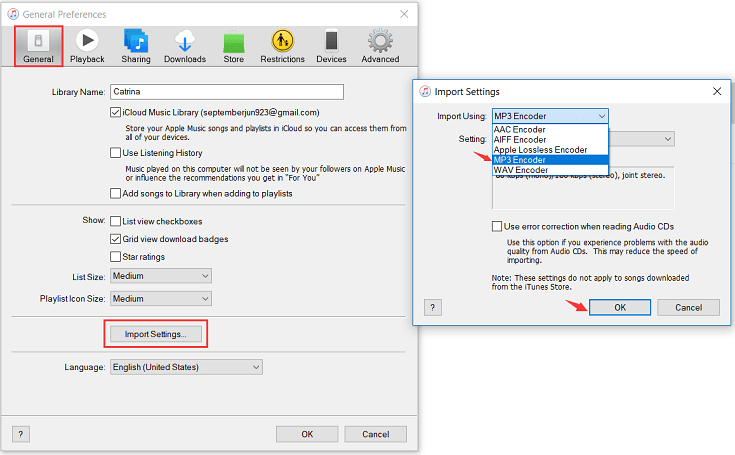
Step #1. Launch the iTunes app. Once you are on the main page, tap the “Edit” button then choose “Preferences”. Tap “General” next, then the “Import Settings” option.
Step #2. A window shall pop up wherein you will see the “Import Using” option. You have to select “MP3 Encoder” next. Tap “OK”, then choose “OK” again to finally get back to your iTunes library.
Copying iTunes Playlists to USB Drive
Now that you already have the MP3 versions of the iTunes songs, you can now copy the playlists to your USB drive directly to complete the process of how to export playlists from iTunes to USB as MP3 files. Here are two options for you.
Option #1. The Direct Method
Below is the direct method of copying your iTunes playlists (MP3 version) to your USB drive.
Step #1. Make sure to plug the USB drive into your PC. Once opened, proceed to create a new folder.
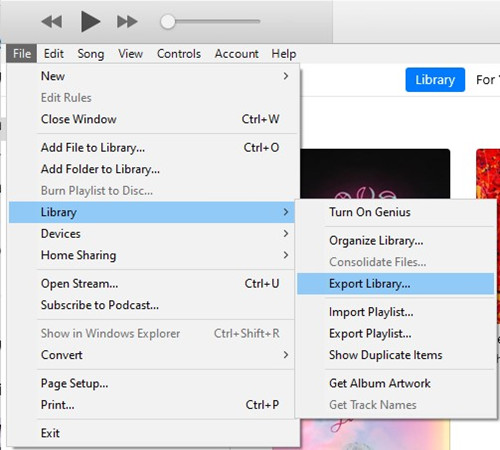
Step #2. Launch “iTunes”, choose a playlist to transfer, tap the “File” button, “Library”, and finally the “Export Library” option.
Step #3. On the file browser, you have to choose your USB as the destination to where the chosen iTunes playlists in MP3 format will be saved.
Option #2. Exporting Through from the iTunes Media Folder
Exporting from the iTunes Media folder can also be done easily. You may refer on the below detail.
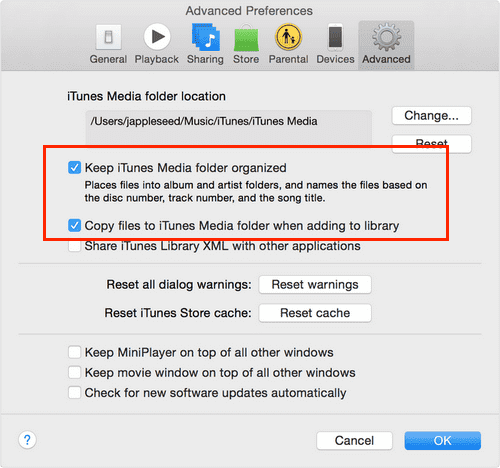
Step #1. Launch your iTunes app. Tap the “Edit” button and then select “Preference”. After doing so, a new window shall pop up.
Step #2. These two options – the “Keep iTunes Media folder organized” and “Copy files to iTunes Media folder when adding to library” must be ticked off. Afterward, tap the “OK” button. In case you’d like to change the iTunes Media folder location, you can do that by clicking the “Change…” button.
Step #3. Tap the “File” button, “Library”, “Organize Library...”, then “Consolidate files” before tapping the “OK” menu.
Once you are done with the above, the media files will then be saved in the iTunes Media folder. You can simply head to that folder and just drag and drop the converted playlists to your USB drive. Finally, you are now done with the process of how to export iTunes playlists to USB as MP3 files.
However, you need to keep in mind that the above will only work if you have iTunes files that are free from DRM protection. The case will be different if you are to deal with the protected ones. The best method to export playlists from iTunes to USB as MP3 files will be explained in detail as you jump into the next part of this article.
Part 2. The Best Way to Export Playlists from iTunes to USB As MP3
As stated in the previous part, the process of how to export iTunes playlists to USB as MP3 files will be different if you are to deal with iTunes or Apple Music songs that are encrypted with Digital Rights Management protection.
The DRM protection of the tracks totally hinders one from getting the songs saved and transferred to unauthorized devices or external drives like USB for playing on other media players such as on one’s car stereo. To export playlists from iTunes to USB as MP3 files as well as your Apple Music favorites without issues or problems, you have to get rid of the songs’ DRM protection first.
To do the iTunes DRM protection removal, you should choose a professional tool that can help you out. We’ll recommend the best to use – the TunesFun Apple Music Converter. This professional tool is an app that can help you remove the Apple Music and iTunes songs’ DRM protection.
This is also capable of getting the songs and playlists saved as MP3 files. Apart from supporting MP3, it also supports other output formats such as WAV, FLAC, AAC, M4A, and AC3. Now you can listen to songs offline from Apple Music or iTunes on any media player or device easily.
With its fast conversion speed, you can surely save time while still keeping the songs’ ID tags and metadata details as well as their 100% original quality. If you are worried if this app works totally fine on your PC, you don’t have to think about that. This works perfectly on Windows and Mac computers. Thus, it can be said that compatibility is not an issue at all!
Of course, this professional tool was designed to have an interface that’s easy to handle and navigate. For your reference, here is a quick guide to how you can export iTunes playlists to USB as MP3 files with the help of the TunesFun Apple Music Converter.
Step #1. There are a few things that you have to check before you can finally install the TunesFun Apple Music Converter on your computer. Check those out and accomplish to finally have this app installed on your computer.
Step #2. Once launched, you can start to preview and select the iTunes or Apple Music songs to be converted. It is fascinating that you can even select bunches of songs as this supports batch conversion.

Step #3. Since our goal here is to export playlists from iTunes to USB as MP3 files, the output format that must then be set is MP3. The other output parameter settings at the bottom of the screen can then be modified as you wish.

Step #4. Tap the “Convert” button that is at the bottom of the screen once the setup is done. This will finally trigger the app to start the conversion and the DRM removal procedure.

Since the app does its job pretty fast, you can then have the converted iTunes and Apple Music songs saved and readily accessible on the output folder that was defined in step 2. Now, all you have to do is to save them to your USB drive. You just have to ensure that the USB drive has been plugged into your PC, once recognized, just copy the converted playlists or drag and drop them to one of the folders in your USB drive
Part 3. Summary
It is just easy to export iTunes playlists to USB as MP3 files. It is also relieving that you can actually use the iTunes app itself during the conversion procedure. But, take note that when converting protected tracks, always rely on using professional tools like this TunesFun Apple Music Converter.
 Home
Home
Leave a comment