The Ways of How to Remove Music From iPhones is Here!
“How can I remove music from my iPhone?” Mobile devices such as iPhones are indeed great gadgets to use especially when streaming the songs we love. When traveling or if away from home, just having the tracks downloaded or saved on our iPhones makes it so portable and convenient.
However, being so in love with good songs would mean saving a lot of them on our iPhones. Thus, accumulating some storage space. If you are looking at freeing up some space on your iPhone or you just wanted to remove some good old tracks that you no longer wish to listen to, then identifying guides on how to remove music from your iPhone is a must.
When performing the procedures of how to remove music from your iPhone, there is nothing to worry about on your end even if this will be your first time doing the activity. Each procedure that we’ll highlight here is surely simple that even beginners won’t find hard to perform or accomplish. If you are now excited to get to know these processes, hop on and start by reading what the first part of this article contains!
Article Content Part 1. How to Remove Music from your iPhone via the “Settings” MenuPart 2. How to Remove Music from your iPhone via the “Music” AppPart 3. How to Remove Music from Your iPhone via the iTunes App ItselfPart 4. Keep Apple Music Songs Accessible After Removing from your iPhonePart 5. Summary
Part 1. How to Remove Music from your iPhone via the “Settings” Menu?
The easiest and most basic method of how to remove music from your iPhone is by doing it via the “Settings” menu. Through “Settings”, you even have the option of deleting the tracks one by one or removing them all. If you wish to try using this method, these are the steps that must be followed.
Step #1. Open your iPhone and just simply tap the “Settings” menu. From the options provided, select the “General” option.
Step #2. Look for the “iPhone Storage” menu and click it. Scroll down until you see the “Music” menu.
Step #3. You shall now see the list of the songs you have on your device. Hit the “Edit” option that is at the top area of your screen. A “red minus” sign shall be seen before each song. Deleting a single track can be done just by tapping this sign. Alternatively, if you have decided to get rid of all the songs you have, you can just simply tap the sign before the “All Songs” menu at the top. Additionally, you also have the option to hit the “Delete App” button to just remove all the accumulated data as well as the app itself.

That is how simple it is to perform this first method of how to remove music from your iPhone. Let’s see the other options that we have as we move into the next sections of this post.
Part 2. How to Remove Music from your iPhone via the “Music” App?
As previously mentioned, we aim to share with you bunches of ways of how to remove music from your iPhone. After finishing off the discussion about the first way, we will now move into presenting the second one. With the help of the “Music” app itself, you can remove songs based on genre or album. In fact, in this method, you only have to accomplish two easy steps. Here are those.
Step #1. Open your iPhone and then head over to the “Music” app right away. Launch it. Look for the specific song you’d like to remove from your device and just simply press and hold it.
Step #2. There will be options shown on your iPhone’s screen. From the list, make sure you select the “Remove” button. By doing so, the chosen song shall be deleted from your iPhone.
The good thing about performing this method of how to remove music from your iPhone is that even after doing the above, you will still have the removed songs present in your iTunes library. However, this way is a bit time-consuming as you can only do the deletion manually (or one by one).
Part 3. How to Remove Music from Your iPhone via the iTunes App Itself?
When using the iTunes app as a way how to remove music from your iPhone, you will be able to remove the tracks by album, playlist, genre, or artist. Deleting one at a time isn’t possible. If you would wish to try executing this procedure, you are, of course, free to do so. All you need is to follow these simple steps and you should be good to go.
Step #1. You must have your iPhone connected to your PC first via a USB cable. Upon making sure that your device has been recognized, you now need to launch the iTunes app. Of course, it is a must that you install the latest version of the app. Visiting the Apple Store or Apple website shall help you see if an update is ready to be installed on your iTunes app. Just make sure that your PC is connected to a stable network as well.
Step #2. Once you are on the main page of iTunes, look for your device’s icon. Afterward, just move to the “Music” tab.
Step #3. There are checkboxes next to each song that you have in your library. Just simply choose the tracks and albums that you wish to remove. Afterward, hit the “Apply” button.
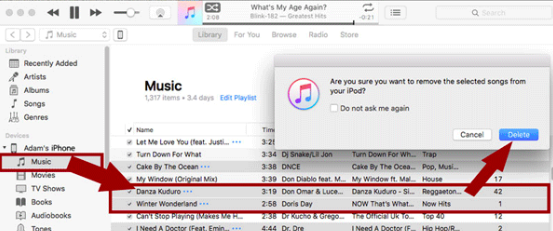
As simple as following the above, you will be able to get rid of the selected songs from your iPhone through the help of the iTunes app. Apart from the three methods of how to remove music from your iPhone that were shared in the previous three parts of this article, there could still be other known ways of removing songs from your iPhone. However, if you are someone who would wish not to totally remove them (specifically, your Apple Music favorites) but save them on other devices that you own, then you must know that there’s an easy way to do that. As you head over to the next part, you’ll be exposed to this information. If you wish to find out more about this, then all you have to do is read on!
Part 4. Keep Apple Music Songs Accessible After Removing from your iPhone
It is definitely helpful to learn the several methods of how to remove music from your iPhone that were explained in the previous sections of this article. But, if you are looking at still making your favorite songs, specifically Apple Music tracks, playable anywhere you want to, then the information highlighted in this section must be learned well!
Though Apple Music tracks are encrypted with DRM protection, you should be aware that there are trusted software applications like the TunesFun Apple Music Converter that can help you remove that protection easily! Apart from having this great power, it is an app that even supports the conversion of songs to formats like MP3, FLAC, AAC, WAV, AC3, and M4A. The app’s conversion speed is actually 16x compared to other tools. Indeed, an amazing app that promotes efficiency! By using this tool, you can rest assured that the songs’ original quality shall be maintained together with the metadata details they have. When it comes to installing the app, you also don’t have to worry as it is supported by both Windows and Mac OS.
What is even surprising about using the TunesFun Apple Music Converter is that it can also work as an audiobook converter. So, if you happen to also be an audiobook fanatic and you’d like to your favorites be transformed, using this app shall work! If you wish to try how good the TunesFun Apple Music Converter is, you just have to take a quick look at how conversion and downloading work via this app. You only got three steps to perform and here are those.
Step #1. Install and open the TunesFun Apple Music Converter on your computer. On the main page, you may start previewing and choosing which Apple Music song to convert or process. Take note that selecting several tracks is fine as batch conversion is possible.

Step #2. Choose an output format to use and just modify the other output parameter settings if you’d like to. Setting up the output folder location is important as well so don’t forget to do so.

Step #3. Hit the “Convert” button once you’re all good with the setup. This way, the selected songs will be transformed. Additionally, the removal of the songs’ DRM protection shall also happen.

Within a few minutes, you shall have the converted and “free from protection” tracks which you can now save on any device that you have (even on external drives or online storage platforms).
Part 5. Summary
Luckily, there are various ways how to remove music from your iPhone. You have the option to do it via your iPhone’s “Settings” menu, using the “Music” app, or utilizing the “iTunes” app. But, if you are looking at the best way to remove but still keep the songs accessible anytime you wish to go back and listen to them, downloading the tracks through the TunesFun Apple Music Converter is what you must do!
 Home
Home
Leave a comment