

Apple Music FAQ: How Do I Check My Apple Music Subscription?
It is best that you do some ways to learn how you can manage your online music platform subscriptions. This is also best if you wanted to make sure that you conduct proper monitoring of the tools and platforms you used most of the time, like Apple Music. This is also a good thing especially if you have some thoughts about canceling or renewing your Apple Music subscription. It can also serve as a reference in case you wanted to have some changes to your current subscription.
Whatever reason you may have, it is a great thing that you have answers to this common question that Apple Music users usually ask, “how do I check my Apple Music subscription?” The reason why we are here is to discuss some of the things that we can use as guides to be able to properly manage your Apple Music account.
Article Content Part 1. Deal With Your Apple Music SubscriptionPart 2. An Easier Way to Access the Songs You Love from Apple MusicPart 3. To Summarize It All
Part 1. Deal With Your Apple Music Subscription
Apple Music plan allows users to access Apple Music on all of their devices for a monthly fee. Subscribers of Apple Music can use the app, download songs, see the fun Lyrics View, or access Apple's full Lossless audio and Dolby Atmos catalog. Its plans also grant ad-free music listening, ad-free video watching, offline listening, and access to Apple Music radio. The student plan also comes with a limited-time offer of free access to Apple TV+.
How do I check my Apple Music subscription on mobile devices? One of the basic ways to check your Apple Music subscription is through the use of your device like an iPhone or iPad. If you want to access, cancel, or do some changes to your Apple Music subscription, using your iPad or iPhone, we have the steps that you can follow below.
- On your iPhone or iPad, go to the Settings icon and open it. Then look for iTunes & App Store, and hover over it.
- You will see your Apple ID, tap it. It can be seen at the top part of the screen, and then select the View Apple ID option.
- Then you have to scroll down, and then when you see Subscriptions, tap it. Then you have to choose the Apple Music Membership option.
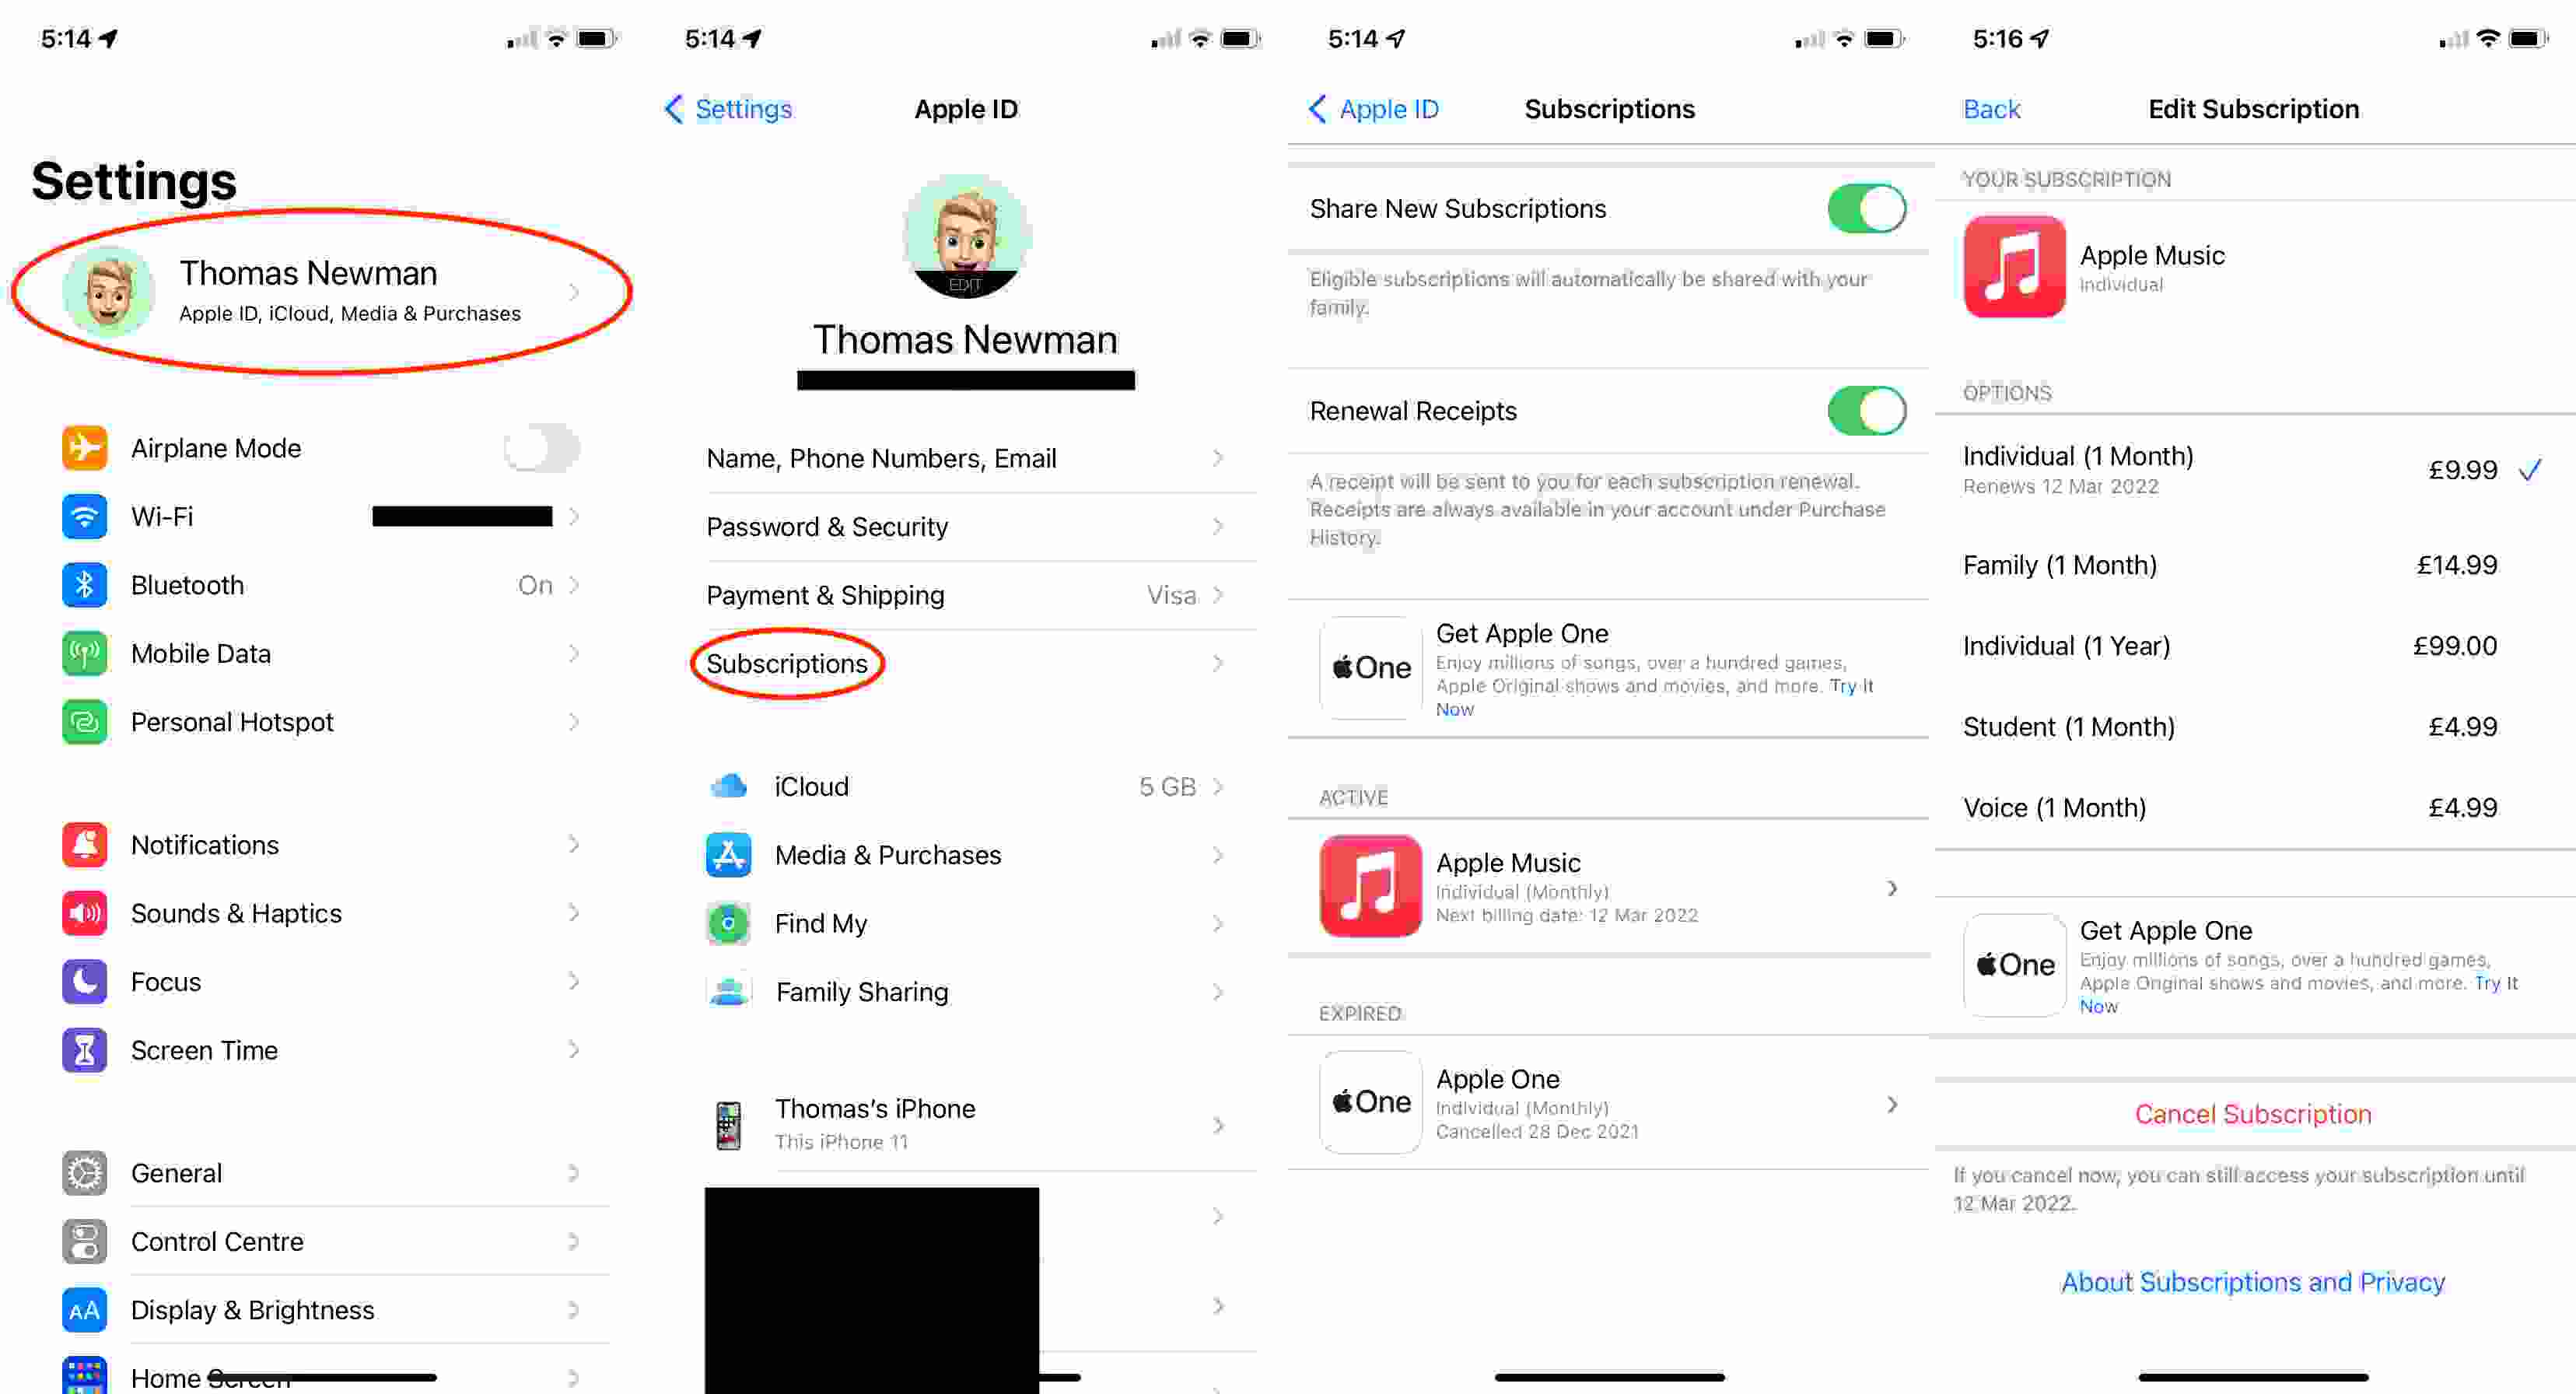
Once you are there you can now choose whether you wanted to modify the plan that you have or you wanted to cancel your membership. If you have decided to cancel your membership, you can choose to tap the Cancel Membership option which can be found at the lower end part of the screen.
You can also use your iTunes app in accessing your Apple Music subscription. How do I check my Apple Music subscription via iTunes? Let's see below.
- On your Mac or PC open the iTunes app, and then go to Account, and then from the menu, choose View My Account.
- In case needed, you will be asked to provide the username and password to your account.
- Then under Settings, you are expected to see the Subscriptions Section. This is where you will see the number of subscriptions that you have and then tap the Manage option.
- In case you have more than an Apple Music subscription, you have to select it, and then tap Edit.
You can now choose a different plan if you wanted. Or you can also tap the Cancel Subscription option if you have finally decided to cancel.
How do I check my Apple Music subscription on my Mac? We have another way to share it with you, and this time you are about to utilize the Mac App Store.
- Open your Mac computer, and then tap Store.
- Once you are in the Store, tap the View My Account option, or you can also tap your Apple ID which can be found at the lower left part of the window, and then choose View Information which is seen on the top.
- Type in your Apple ID and password if asked or needed.
- And then go to the Manage option, and under it, you must see the Subscriptions section, and there you will see your Apple Music subscription. Then tap Manage.
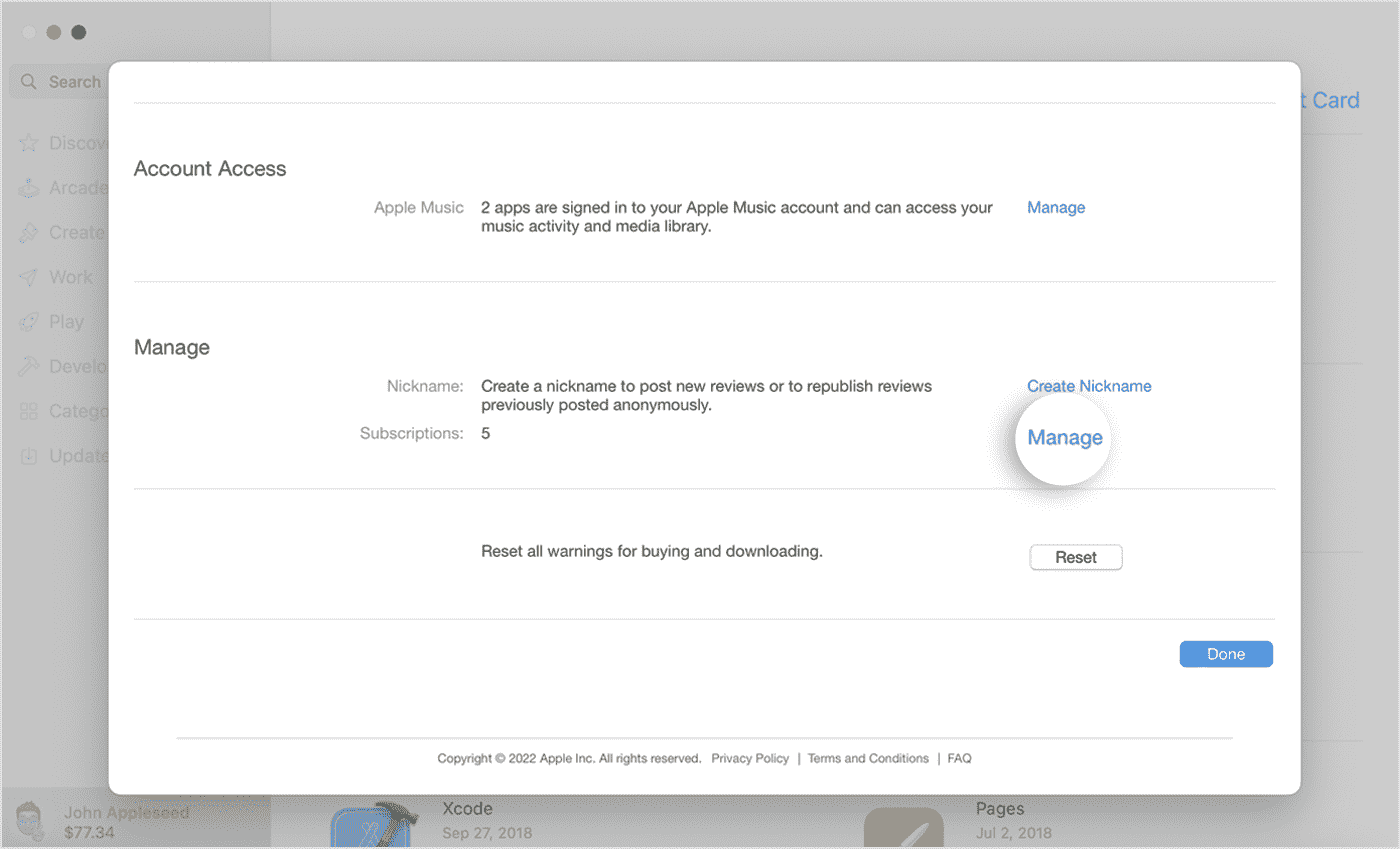
- Click on Edit next to the Apple Music Subscription. You may check your active Apple Music subscriptions. You can choose a different plan by clicking on it and confirming the change. Or to cancel, click Cancel Subscription and confirm that you wish to cancel.
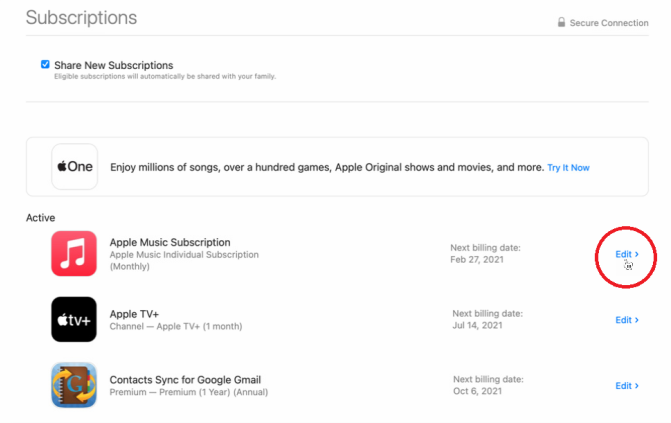
And like the ones that we have discussed above, you can also change your plan by tapping the option and then confirming the change that you wanted to have. You can also cancel your subscription here. And here are some of the ways that you can get through all the things that you have to be aware of in case you wanted to do some changes to your list of songs.
Part 2. An Easier Way to Access the Songs You Love from Apple Music
How do I check my Apple Music subscription? And whilst everything might be well taken care of with the facts that we have shared above, searching the web for other possible ways can also be helpful.
In order for you to enjoy Apple Music, it is a must that you avail of one of Apple monthly music plan. It is also needed that you have a stable internet connection, to begin with. While all of these can be easily obtained, some people might not have the luxury to avail of any of these from the head start. This can be a lonely thing to deal with if you loved to listen to Apple Music. So, is there any other way to have them?
This could be possible through the use of a tool called the TunesFun Apple Music Converter. Simple as it is, this tool can be amazing in so many ways. From the reason that it can help you efficiently convert any Apple Music songs to MP3, AAC, or WAV format at 16X faster speed with lossless quality, to getting rid of the DRM encryption to access the songs without the hassle and the long wait, TunesFun Apple Music Converter is on the groove.
And not only that! The tool is also capable of having you more time to reflect on the other things that you wanted to do. It can convert your music files fast, and it is faster than you have ever imagined! You also get to keep other necessary details like ID tags and metadata!
Imagine having a tool like this one on your side! It is also not that complicated to use and the steps that you have to follow step by step are simple. Even beginners using the app would be so amazed at how versatile this tool can be. To help us know how to use the Apple Music Converter we have provided a guide below.
Step 1. Download all the needed data to install the TunesFun Apple Music Converter on your Mac or Windows computer. Once the tool has been installed properly, open it and then start adding the music files for conversion.

Step 2. Once all the files are added, choose the format that you need from what the professional tool offers, and then create a folder where are you going to save all the music files once the conversion process is finally successful.

Step 3. Then hit the Convert tab! You just have to wait for a few minutes until the TunesFun Apple Music Converter has completed the process.

Then you can now access the songs that you have converted on the folder that you have created in Step 2. When it comes to these things, TunesFun Apple Music Converter is really the best tool!
Part 3. To Summarize It All
It is never simple to deal with the right things to do if you wanted to subscribe to online music platforms to listen to songs you love. The article provides a comprehensive guide on how do I check my Apple Music subscription on various devices. On the other hand, in case that you did not want to go over the hassle of creating or using one, it is very recommendable that you use professional tools like the TunesFun Apple Music Converter, the best converter that you will ever have!
 Home
Home
Leave a comment