How Do You Share an Apple Music Playlist?
“How do you share an Apple Music playlist?” We won’t blame you if you have been so addicted to streaming songs on Apple Music. Among the many music streaming service providers, it can really be said that Apple Music is one of the best. With millions of subscribers around the world who are enjoying the perks provided by the platform, there is no doubt why it consistently maintains its spot as one of the top music-listening apps.
One of the best things about using Apple Music is that it also has varieties of content that its subscribers can access and enjoy. Listeners can also create their own playlists to consolidate the tracks they love. Do you know that you can even share your created or liked Apple Music playlists with others? The only question will just be “How do you share an Apple Music playlist?”. And, that is what we will be dealing with in this post.
As you finish reading this article, we aim to help you learn the fundamental steps of how to share an Apple Music playlist with others. Of course, there is an official method of how it can be done and an even better way! We shall be discussing both here! Are you excited? Well then, jump into the first part!
Article Content Part 1. The Process of Sharing Apple Music PlaylistsPart 2. Why Can’t I Share Apple Music Playlists?Part 3. The Best Method to Share Apple Music PlaylistsPart 4. Summary
Part 1. The Process of Sharing Apple Music Playlists
They say sharing is caring. Well, it totally is! This even applies to digital content such as songs from Apple Music! Being a fanatic surely made you love bunches of tracks and artists especially if you have been an avid user for quite a long time already. Before we go and present the process of how to share an Apple Music playlist, let’s first check out how creating a playlist can be done. This is totally easy as well!
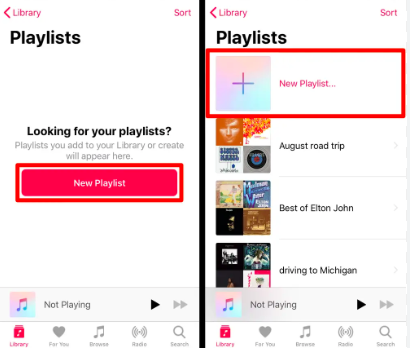
Creating an Apple Music Playlist
Step #1. Open your Apple Music account and head to the “Library” section. This is where you shall tap the “New Playlist” option.
Step #2. Name the newly created playlist as you like. Putting a description is also recommended.
Step #3. Adding a photo can also be done. You just have to click the camera option. If you wish an album covert to be added, you can definitely do that as well!
Step #4. After creating a playlist, you may now start adding the songs you like. You may look for the specific songs, albums, or artists that you wish to be added. Adding songs will be successful upon tapping the “+” sign button. Once done, click the “Done” option.
After completing the abovementioned process of creating an Apple Music playlist, it is now time to check the procedure of how to share an Apple Music playlist. You can do that on your portable devices such as your iPhone or iPad and on your Windows or Mac computers.
Sharing Apple Music Playlists Using iPads or iPhones
Step #1. On your portable gadget, launch the Apple Music app. At the bottom of the screen, you will see the “Library” menu which you need to tap next. Afterward, choose the “Playlists” button.
Step #2. Look for the playlist you’d like to share and click it. At the top of the screen, hit the “three-dot” icon. From the menu that would pop up or be displayed, choose the “Share Playlist” option.
Step #3. Several options when it comes to sharing an Apple Music playlist shall show up. You can either choose the “Copy” option to get the link of the selected playlist or choose from the other available methods – via email, text message, or other messaging apps.
And, that’s it! The abovementioned is the process of how to share an Apple Music playlist if you are to use your handy devices! Let’s get to see how it can be done in case you wish to use your desktop PCs.
Sharing Apple Music Playlists Using Mac or Windows Computers
Of course, we are also to present the detailed method of how to share an Apple Music playlist for those users who would want to accomplish it using their PCs.
Step #1. Launch the Apple Music app on Mac or the iTunes app on Windows PC. Start by looking for the Apple Music playlist to be shared.
Step #2. Upon identifying which Apple Music playlist you would like to share, just simply tap the “three-dot” icon located on the right side of the screen (just above the tracks in the playlist).
Step #3. Hit the “Share” option. From the available options that would be shown, select the method you prefer to use – using the link of the playlist or sharing it via messaging apps or email.
Just take note that the recipients of the shared Apple Music playlists must have existing and active Apple Music accounts.
Part 2. Why Can’t I Share Apple Music Playlists?
Upon discussing how to share an Apple Music playlist, you might also want to know some details relative to instances when you can’t share playlists even after performing the exact same steps mentioned above. There are common reasons. Those are as follows.
- You might have forgotten to create an Apple Music profile. Creating one is required.
- You might not have merged your local music library with your Apple iCloud one.
Creation of Apple Music Profile
When creating an Apple Music profile to finally be able to share an Apple Music playlist, having an active Apple Music subscription is a must. You can do it on your iPhone or iPad as well as on your Mac or Windows PC.
On iPhones and iPads
Step #1. Launch the Apple Music app and then hit the “Listen Now” button. Press the icon that’s on the top right area of your screen.
Step #2. You should see the “Set up Profile” option. Tap this to proceed.
Step #3. There will be on-screen instructions that you must follow to continue – setting up a username and even following some friends.

On Windows and Mac PCs
Step #1. Open the Apple Music app if you’re using Mac and the iTunes app if you’re a Windows user. Choose the “Music” option and then select “For You” next.
Step #2. Tap the “Listen Now” option and then the “My Account” button.
Step #3. Hit the “Get Started” button next.
In the same case as with portable devices, you’ll be guided by the app through the on-screen instructions that would be shown.
Part 3. The Best Method to Share Apple Music Playlists
Though the mentioned process of how to share an Apple Music playlist in the first part seems good enough, this would require Apple Music subscriptions for both the person to share and the receiver. Additionally, keeping the songs forever won’t be possible as those will disappear the moment the subscription ended or had expired. In this instance, we will be sharing the best way possible to share Apple Music songs and playlists without limitations. The good thing with this method is that it will allow users to keep the tracks forever accessible!
All you need is to use apps like the TunesFun Apple Music Converter. With the help of this professional tool, you can remove the protection of Apple Music songs and even have them converted to formats like MP3. With its fast conversion rate, you can efficiently manage your time. Plus, worrying about losing the songs’ original quality and information isn’t something to worry about! It’s easy to use and installing it on your computer can be done even by first-time users! Check out how effective the TunesFun Apple Music Converter is when it comes to converting and downloading Apple Music songs and playlists.
Step #1. Install the TunesFun Apple Music Converter on your computer and on the main page, start previewing and choosing which song to process.

Step #2. Select your desired output format and modify the settings (located in the below part of the screen) as you like. Of course, setting up the output folder to use is vital! Don’t forget to do this.

Step #3. Tick off the “Convert” option once you’re all good with the setup made. This will finally get the TunesFun Apple Music Converter to begin the transformation of your chosen Apple Music songs. The removal of the protection they have shall also happen at the same time!

Now that you have the DRM-free and transformed Apple Music songs, sharing them with others is now an easy thing to do!
Part 4. Summary
“How do you share an Apple Music playlist?” Well, this shouldn’t be something to bother you! At this point, you must know already what the answer to this is! Don’t forget that using apps like the TunesFun Apple Music Converter is always a good option when downloading your Apple Music favorites and making them forever accessible!
 Home
Home
Leave a comment