Solved: How To Add Someone To Apple Music?
It can be said that Apple Music is one of the go-to music streaming platforms that actually hosts millions of subscribers around the globe and features millions of different tracks from various artists.
If you wish to try Apple Music, you can take advantage of its free trial offer before subscribing to one of its paid plans. Some users say the fee for an individual plan is good enough but others are saying it’s quite too much. If you’re looking at saving some penny, getting the Apple Music Family Plan would surely suit you best as it costs 14.99 USD per month and can accommodate up to 6 members already.
Being interested in the Apple Music Family plan, specifically on the main topic of this post – “how to add someone to Apple Music Family subscription?”, is already a given if you’re on a tight budget. Don’t worry, as this article progresses, you’ll get to learn a lot about this topic. First off, we’ll teach you how you can set up an Apple Music Family Sharing account before we head to the process of how to add friends or family members to Apple Music family plan.
Article Content Part 1. Defining Family Sharing and the Process of Setting it UpPart 2. Adding Someone to Apple Music’s Family SubscriptionPart 3. Bonus: Stream Apple Music the Best WayPart 4. Summary
Part 1. Defining Family Sharing and the Process of Setting it Up
Apple Music’s Family Plan gives a way for family members to enjoy Apple Music’s perks at a relatively lower fee per month compared to when getting an individual plan. Up to 6 members can be accommodated by this plan and what makes this good is that they can share content including Apple TV, Apple Arcade, and 200GB of iCloud storage.
The privacy of each member should not be an issue at all since they can choose not to share content they wish to keep by themselves. More so, since they are using individual Apple IDs so each of them should be getting their own recommendations and preferences. Basically, they can still use the account as individual users.
How to Set Up an Apple Music Family Sharing Account?
For you to finally enjoy Apple Music’s Family Plan’s perks, it is also important that you know how you can set up the Family Sharing account. This will be discussed here before we finally head into the process of how to add someone to Apple Music Family subscription using different gadgets. We have here the tutorial for setting it up on iOS, and Mac.
Setting up Family Sharing Account Using an iOS Device
If you are a fan of using a handy iOS device like your iPad or your iPhone, you can actually use them to set up a Family Sharing account. You may refer on the below for the guide.
Step #1. You have to look for the Family Sharing settings. Do it by heading to your device’s “Settings”, and then tapping your name at the top.
Step #2. Tap the “Set up Family Sharing” option. Afterward, click “Get Started”. To finally complete setting up, just follow the on-screen instructions to set up your family and invite your family members.

Setting up a Family Sharing Account Using Mac
It is actually easier to set up a Family Sharing account on Mac rather than on handy iOS devices. Here is how to do it.
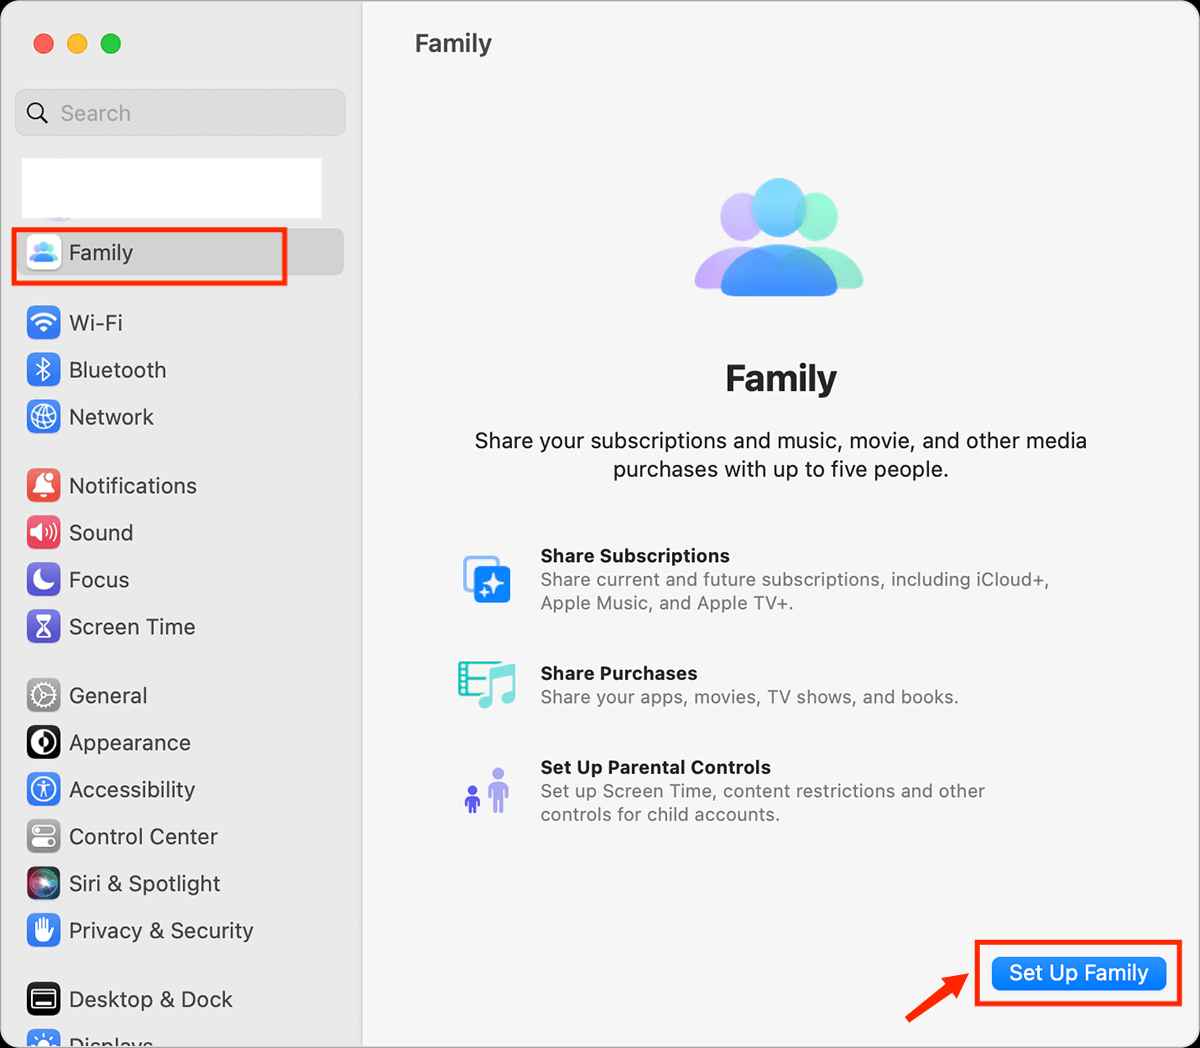
Step #1. Tap the “Apple logo” at the top of the screen and choose “System Settings”. Once this has been launched, tick “Family Sharing”.
Step #2. All you have to do next is to click the “Set Up Family” button and just follow the on-screen instructions to continue with the setup process.
Part 2. Adding Someone to Apple Music’s Family Subscription
Now that we have finished discussing and sharing how one can easily set up a Family Sharing account using an iOS or Mac, we will now finally deal with the process of how to add someone to Apple Music Family subscription.
Adding a Family Member on Apple Music Family Plan on iPhone
You have to ensure first that you have created a Family Sharing account as explained in the first part of this post. During the setting up process, you have to make sure that the device has also verified the Family membership subscription. You can follow the below guide as a reference.
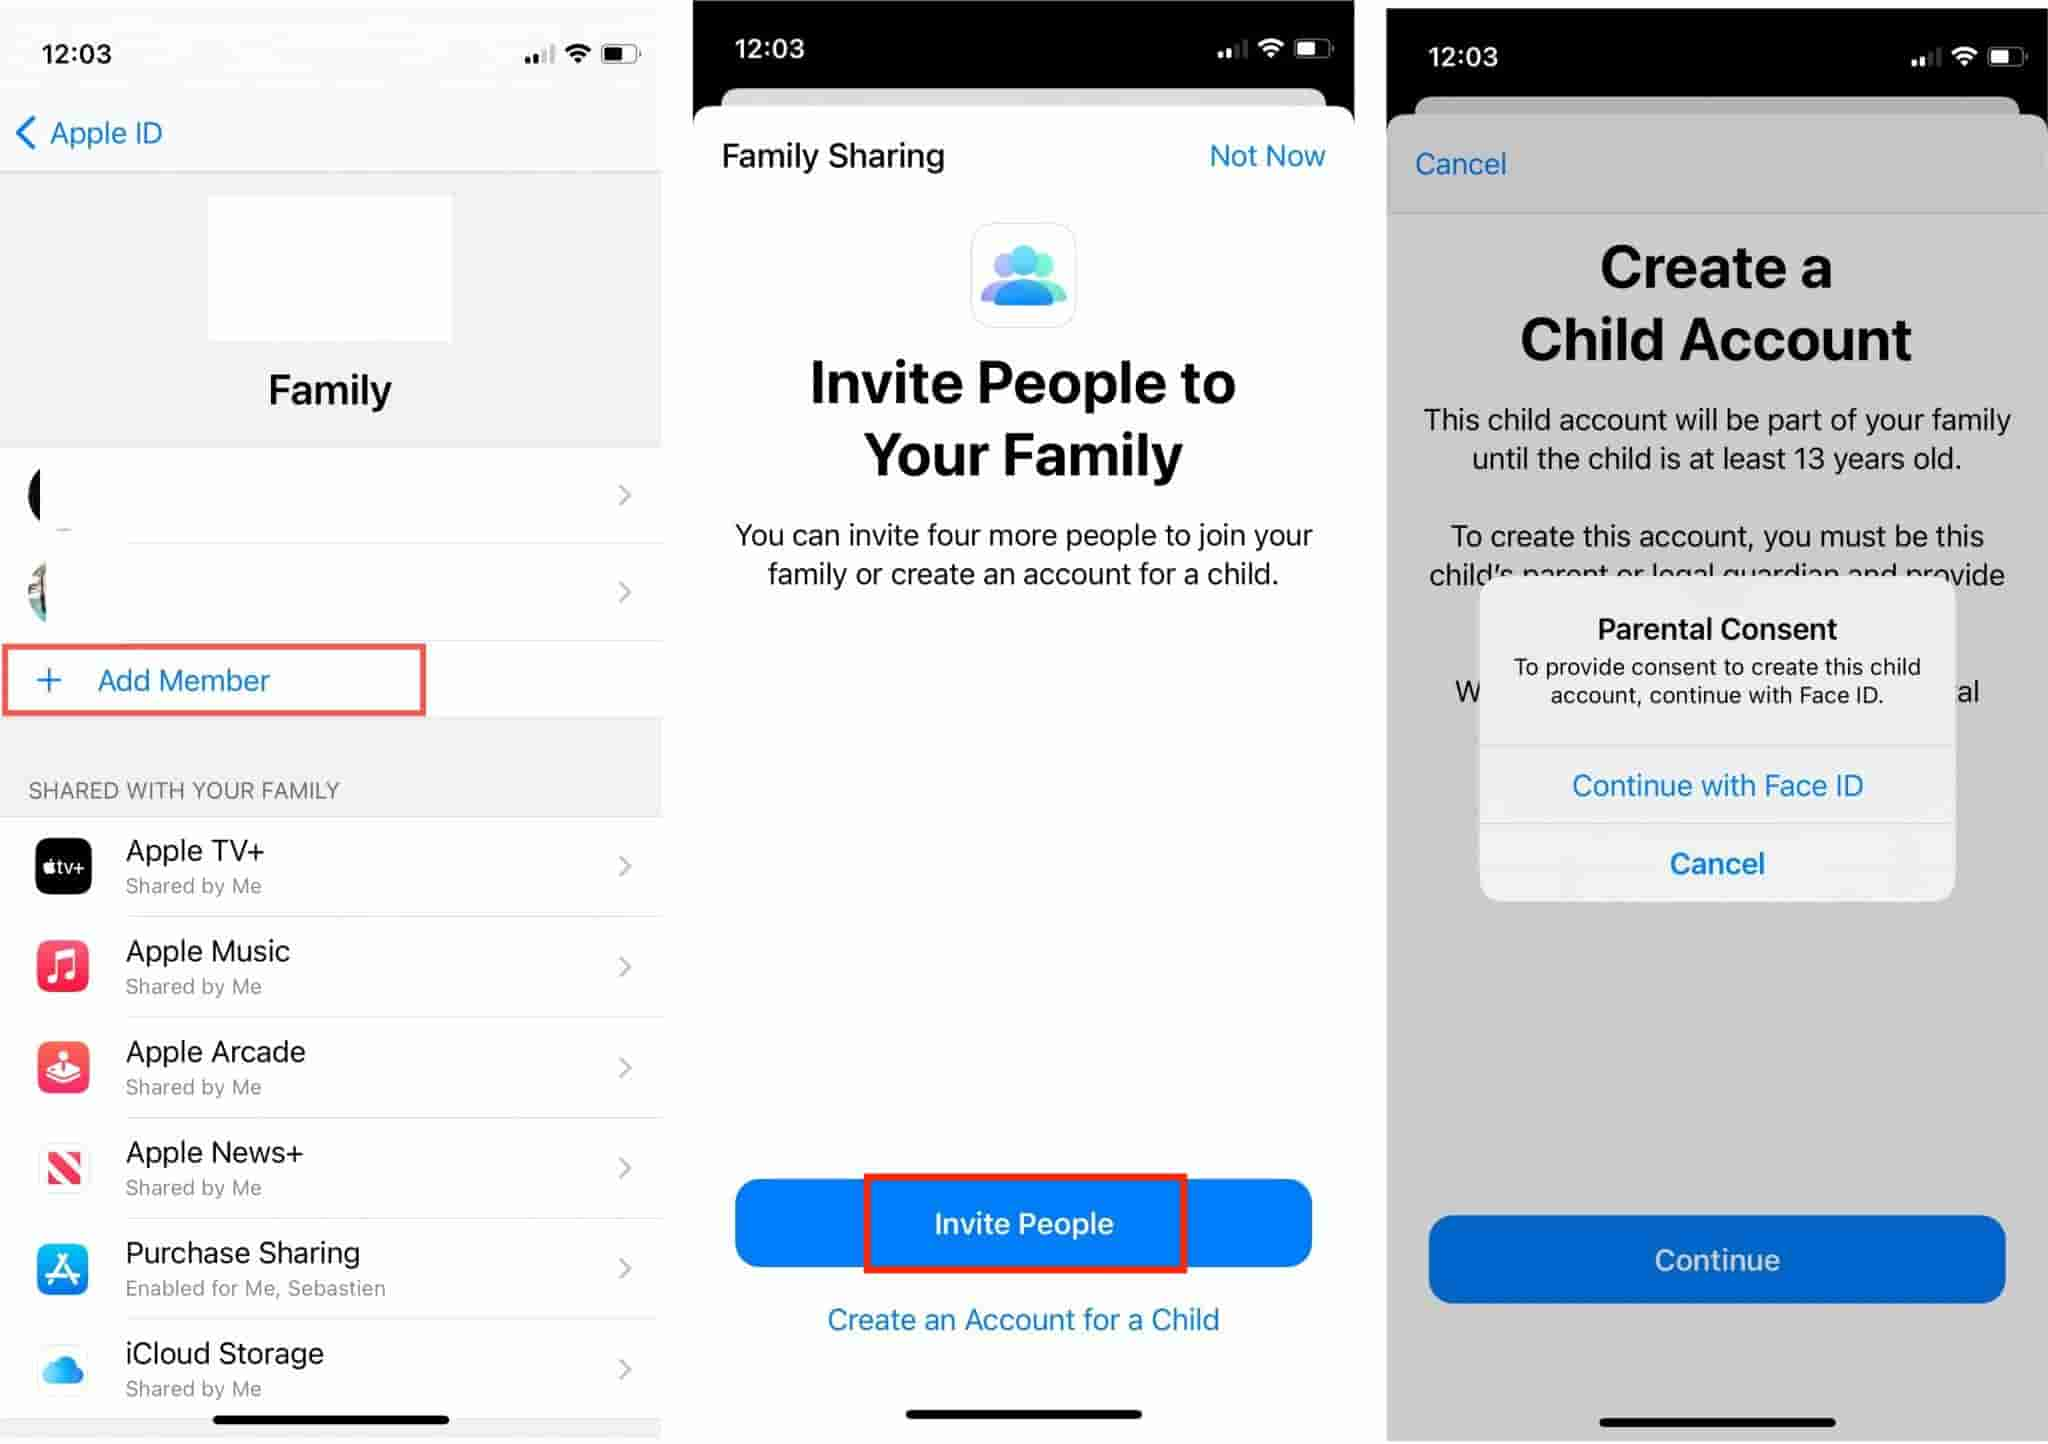
Step #1. On your device, head to “Settings” and then click on your account name.
Step #2. Move to “Family Sharing” and then select the “Add Member” option.
Step #3. If your child doesn't have an Apple ID, tap Create an Account for a Child. But if your child already has an Apple ID, tap Invite People. They can enter their Apple ID password on their device to accept the invitation.
Adding a Family Member on Apple Music Family Plan on Android
Since we shared how to add someone to Apple Music Family subscription using an iPhone, we will also present here the detailed process if you are to use an Android device.
Step #1. On your Android device, power up the Apple Music app.
Step #2. To open the options menu, just click the “three-dot” icon that is on the top area of the screen.
Step #3. You shall see your username or photo. Tap on it. From "Account Settings", choose "Upgrade to Family". Choose the Family plan.
Step #4. Tap Join Apple Music. Follow the onscreen steps to sign in with your Apple ID and verify your billing information.
Step #5. Back to "Account Settings". Tap "Add Family Member" under the "Manage Family" menu. Enter a name or email address. Tap Send.

Adding a Family Member on Apple Music Family Plan on Mac
We also have here a tutorial on how to add someone to Apple Music Family subscription when using a Mac computer.
Step #1. On your Mac, tap the “Apple” menu then choose “System Preferences”.
Step #2. Tap the “Family Sharing” menu.
Step #3. Choose the “Add Family Member” option and just add the username and email address of the new member!
If you are a Windows PC user, it is unfortunate to tell you that you can’t use Family Sharing. So, there is no guide that we can share when it comes to the process of adding someone to Apple Music Family subscription using a Windows PC. If an invitation is received, you can use the iCloud for Windows app.
Part 3. Bonus: Stream Apple Music the Best Way
Now that you've learned how to add someone to Apple Music Family subscription, we will now be giving you bonus information – the best way to listen to apple music offline – downloading them! Apple Music songs are protected files. Due to this, the tracks can’t be accessed on just any other devices or media players. To do so, the protection needs to be removed first.
Not all apps can do this so we are recommending here the best app to use – the TunesFun Apple Music Converter. This TunesFun Apple Music Converter can easily remove the DRM protection of Apple Music songs and can even convert the tracks to common formats like MP3, FLAC, WAV, AAC, and more. So you can save them to any device, and it is easy to restore your Apple Music library if you have lost your songs.
With its 16x conversion rate, you can save time while ensuring that ID tags and metadata information will all be kept. It’s perfectly compatible with Windows and Mac PCs making the downloading process easy to do.
This is also easy to use because of its interface that’s designed to be very simple. Here’s a guide on how to use TunesFun Apple Music Converter to convert and download your Apple Music favorites.
Step #1. Once installed, launch the app and then start by previewing or selecting the Apple Music songs to be converted and downloaded.

Step #2. Define an output format to use and modify other settings as intended.

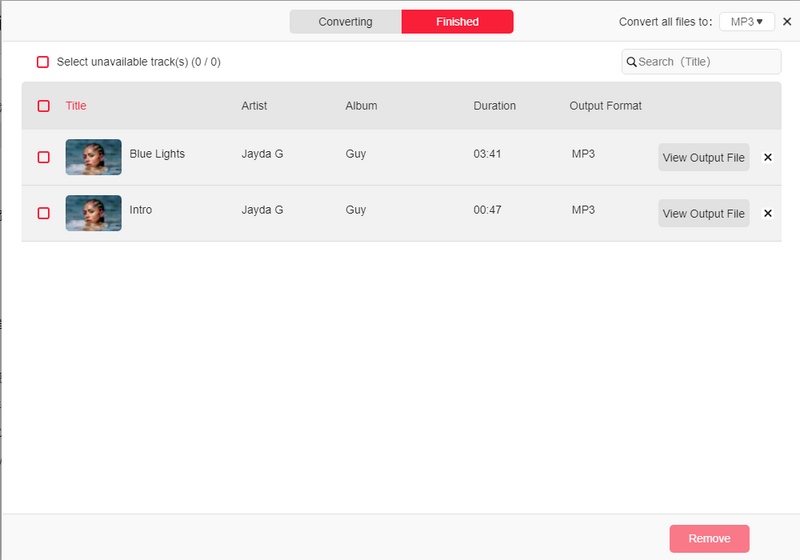
Step #3. Tap the “Convert” button once the setup is done. The app shall start the conversion and DRM removal right away.

Step #4. Once the process has been completed, you shall have the converted and DRM-free Apple Music songs ready for offline streaming!
Part 4. Summary
We are glad to have shared the detailed process of how to add someone to Apple Music Family subscription using different devices. If you have queries or clarifications relating to the topic of this post, you can always leave those in the section below. Also, when it comes to streaming in offline mode and keeping copies of your Apple Music favorites, don’t forget that there are great apps like this TunesFun Apple Music Converter.
 Home
Home
Leave a comment