How To Backup Itunes Music (2023 Update)
If you are a digital media user, it is essential to backup your media files. No matter what service it would be, may it be Apple Music, Spotify, Uber, and other media. In iTunes, you can re-download your tracks if they are lost. However, isn’t it an exhausting and time-consuming download again?
That is why we are going to show you how to backup iTunes music and consolidate the iTunes library. So that you will be saved from this dilemma. Also, we will teach you how to transfer the iTunes library to another computer.
So settle in and read on to learn how to backup iTunes music data.
Article Content Part 1. Why Do We Need to Backup iTunes Music? Part 2. How to Backup iTunes Music on PC? Part 3. Backup iTunes Music Using TunesFun Part 4. Summary
Part 1. Why Do We Need to Backup iTunes Music?
Backing up your files at all times is critical, especially for your music. Because we can’t predict when our music collection will be stolen or mistakenly wiped from our devices. It's an unpleasant event that no one wants to go through.
As a result, you should always back up all of your files, including music and media files. Fortunately, we’ll help you with how to backup iTunes Music in this article.
The benefit of backing up your iTunes is that you’ll get extra storage for your device. Also, you’ll have the chance to retrieve your stolen or lost files.
If you need to replace your device, iTunes' backup system will assist you in retrieving your media tracks.
However, if you want to learn how to backup iTunes Music, you must first condense your iTunes collection.
This is because iTunes files may be stored in multiple locations. You may effortlessly export the files to a new machine by consolidating the iTunes library.

But remember, that you can only stream your music tracks or files in an Apple application. The main cause of this is the Digital Rights Management (DRM) license of iTunes. It restricts the iTunes users to use the tracks to non-apple devices.
Moreover, there are lots of iTunes clients who are having trouble with iTunes. That is because it consumes a large space of RAM from your device. This slows down your device and might result in issues to your desktop such as Windows 10 or smartphone gadgets.
That is why you have to back up iTunes to an External hard drive or other storage spaces.
To help you with that, the next sections will discuss how to backup iTunes Music, how to backup iTunes music to iCloud, and transfer the iTunes library to another computer
Part 2. How to Backup iTunes Music on PC?
Now, here’s how to backup iTunes Music on your computer.
#1. Consolidate Your iTunes Library
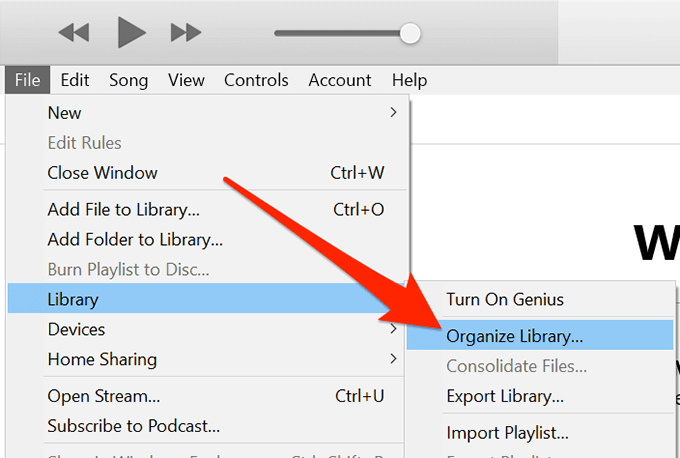
Then, from the top screen's selection bar, go to the "File" menu and pick "library." Look for the option "Consolidate Files" in the drop-down menu and select it. When you're done, click "Ok" to bring everything together.
Then go to the "File" menu and select "library." After that, select "Organize Library" from the top screen's selection bar. You'll be brought to a drop-down menu; look for the option "Consolidate Files" and pick it. When you're finished, click the "Ok" button to consolidate everything.
Additionally, you may choose to remove the original files to free up disk space. This should happen after you've verified that the copies are in your iTunes Media folder. Because whatever files that were outside of your iTunes Media folder are copied and added to your iTunes data when you consolidate.
#2. Find the iTunes Media folder
When you have consolidate iTunes library, the next method in how to backup iTunes music is to locate your iTunes Media Folder.
Generally, the iTunes Media folder is located in the iTunes folder by default. To check for it, you need to go to “User” and select “ Music”. A menu will show on your screen, so select “iTunes” and then proceed with “iTunes Media”. This is where you'll locate your consolidated iTunes library.
Here's how to find the folder if you can't find it in the first place." Select "Edit" from the iTunes menu. Then, on the upper-left selection bar of iTunes, pick "Preferences." The Advanced tab will be visible. So, under the box labeled "iTunes Media folder location," find the location of your iTunes Media folder.

#3. Backup iTunes to the External Hard Drive
Now that you are done consolidating and locating your iTunes Media folder. The Last thing to do on how to backup iTunes Music is to backup iTunes music to an external hard drive from your desktop such as Windows 10. In doing so, you need to follow these steps.
The first is to turn off your iTunes by closing it. Then, locate the iTunes folder and import your iTunes folder by right-clicking on it. After that, right-click on your external hard disk and select Paste. Now you backup iTunes music to the external hard drive.
In addition, you can also back up your files in the iCloud. The ways on how to backup iTunes music to iCloud are very easy. Activate your settings (or in browser for Windows 10) and select iCloud, then fill out your iCloud account or name. From there, select "iCloud Backup" and change it to "On" if it’s not activated. Now, you can manually back up your iPhone by selecting "Back Up Now" from this menu.
Part 3. Backup iTunes Music Using TunesFun
Now that you have backup your iTunes files using your hard drive or iCloud. You can also back up your iTunes files and keep them forever through TunesFun Apple Music Converter. This app is known as the best converter for people who wish to do the conversion.
TunesFun Apple Music Converter supports and is compatible with both Mac and Windows 10 software. This removes the DRM protection and restrictions from the tracks so you won’t need to worry about them. It allows its customers to download series and batches of music to listen to them offline.
You can keep your iTunes tunes in lossless quality using TunesFun Apple Music Converter. It will also save you the trouble of continuously backing up your iTunes music because it will be preserved indefinitely on your computer or other devices.
To do the conversion, TunesFun Apple Music Converter must be downloaded and installed on your computer. Then select the iTunes media files you want to convert from your iTunes library. From there, choose the best output format for your tracks which is Mp3. Then, make a file location to save your iTunes songs by selecting an output folder.
To convert, press the convert button and then go to the Converted tab to see the songs that have been converted. Once you have located them, you can store them on your computer by importing the files and saving them to your computer’s music folder. You've now not only backed up but also stored your iTunes files on your computer indefinitely.
Part 4. Summary
Using digital services necessitates the backup of our digital media files. Even though those services are based on cutting-edge technology, they will likely encounter issues. Our data or files will be affected as well if this occurs. As a result, we must remember to back them up.
However, we cannot deny that we occasionally fail to back up our files, which causes us concern. TunesFun Apple Music Converter can help you avoid this by backing up your iTunes files. This converter is ideal for saving your tunes and enjoying the convenience of offline listening.
 Home
Home
Leave a comment