How To Burn A DVD On An iMac In 2025 (Stepwise Guide)
While Apple wipes off the hard drive from MacBook Pro and MacBook Air, it doesn't mean that burning DVDs on Mac will become obsolete soon. In fact, there are still large numbers of users who use CDs/DVDs to record their important memories, and backup videos, photo or music, so that they can share this data with friends.
But how to burn a DVD on an iMac? In this article, you’ll learn about Macs. Part 1 will focus on the history of Macs, Part 2 will go on further with using the Music app on a Mac to rip DVDs. Part 3 will introduce you to a tool that can help you burn protected Apple Music songs on a Mac into a DVD. Without further ado, let’s get started.
Article Content Part 1. The Evolution of the MacBookPart 2. How Can Burn a DVD on a MacPart 3. How to Burn Apple Music Songs for Free on a MacPart 4. Summary
Part 1. The Evolution of the MacBook
The MacBook line debuted in 1991 — though there have been a variety of different naming conventions and models over the years. From the original PowerBook to the newest MacBook Pro and the Air, Apple's famous Notebook computers have massively evolved over a 32-year timeline.
PowerBook 100 is Apple’s first-ever laptop, it featured a setback keyboard, which made room for palm rests, and a front-and-center trackball for both left/right-handed users. Although it was criticized for lacking a floppy disk drive, it went on to become a huge success.
In 2006, the first true MacBook was released. It still weighed in at over five pounds and was one inch thick, but it was the first to have the signature backlit keyboard. The 17-inch model was up to four times faster than the PowerBook G4 and included a number of impressive new features including 512MB RAM, a MagSafe power adapter, a scrolling TrackPad, a built-in iSight camera, and an 80GB hard drive.
Just a few years after the MacBook Pro, Apple released their thinnest option yet - the MacBook Air. Since 2019, Apple has continued to release updated versions of the MacBook Air and Pro. Though Apple has opened up its architecture, its motto remained the same: To provide quality computing and provide neat aesthetics to its users. On the iMac, you’ll see every peripheral integrated inside a neat computer casing. This includes the DVD drive. With this, we’ll focus on how to burn a DVD on an iMac.
But Mac was no longer to install internal DVD and CD-RW drives since the introduction of MacBook Air in 1st 2008. The last Apple Mac to ship with an optical DVD drive was a 13-inch MacBook Pro (originally released in June 2012), but Apple has discontinued this model since October 2016. After that, none of the latter Macs comes with optical drives. If you're running on MacBook Pro/Air without a built-in DVD drive, you may need an external DVD drive for Mac to burn a DVD on Mac.
Part 2. How Can Burn a DVD on a Mac
The steps on how to burn a DVD on an iMac are easy. This is most especially true if you have Apple Music installed on your Mac OS. With this, you can easily create Audio or MP3 CDs or DVDs.
What You'll Need Before Burning DVD:
- A music playlist to burn. If you wanna burn DVD music into a new DVD, rip protected DVD music to MP3 format first with a professional DRM removal tool like TunesFun Apple Music Converter.
- A blank disc. There are two types of blank DVDs: DVD+R and DVD-R. DVD+R supports both single-layer discs and dual-layer discs while DVD-R is typically cheaper than DVD+R.
- A DVD burner drive: Mac was no longer to install internal DVD and CD-RW drives since the introduction of MacBook Air in 1st 2008. You can use the external USB solution- the Apple SuperDrive instead.
Do you know how many files can burn on a disc? The number of songs a disc can hold depends on the format of the song files and the capacity of the disc. You can fit about 74 minutes of music on a 650MB audio CD, or about 150 MP3 files on the same size disc. A DVD can hold 4.7 gigabytes (GB), almost five times as many songs as a CD. So we recommend choosing a DVD instead of a CD. How to burn a DVD on an iMac? If interested, check the simple steps to burn your playlist to DVD.
Use Music App to Burn Songs to DVD on Mac:
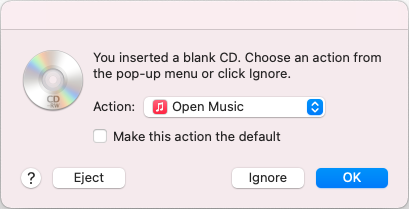
- Insert a blank DVD-R or DVD-RW disc into the drive and a dialog will pop up. Select Open Music in the action list to launch the Music app, and click the OK button to apply.

- On your Mac, launch the Music app and proceed to create a new playlist. Now, in your Library, choose the songs you want to add to your playlist.

- Select the added playlist and right-click it. From the ensuing dropdown, select Burn Playlist to Disc.
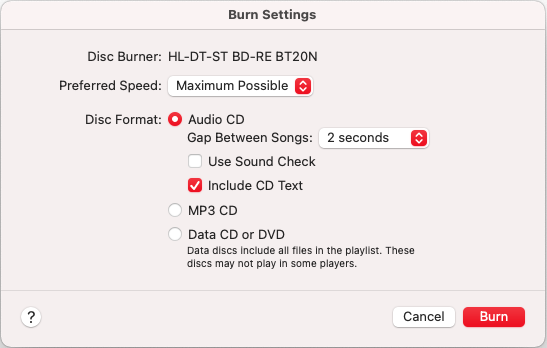
- Choose the Data CD or DVD option depending on your need and click the "Burn" button to start burning Apple Music songs to DVD.

All is good now that you can burn a CD or DVD using your iMac. However, have you ever wondered how you could burn those protected Apple Music Songs? Yes, you cannot easily burn these protected songs because of Apple FairPlay’s Protection. You may have already tried this but failed. The next part will teach you a way through this.
Part 3. How to Burn Apple Music Songs for Free on a Mac
In Part 2, we discussed how to burn a DVD on an iMac. It’s straightforward to burn your own copies of digital files and media, but is it legal? It became legal to make copies for the personal use of our media, but that didn’t mean it was legal for people to break the DRM which makes it difficult to rip DVDs.
Since Apple Music tracks are in .m4p format, which is DRM protected, so we are only allowed to enjoy Apple Music with authorized iTunes and Apple Music app, even though you have downloaded songs to your iOS devices or computer, you can’t copy the downloaded Apple Music songs to your MP3 players such as SanDisk, Sony Walkman, PSP, etc. Worse, if we unsubscribe Apple Music service, all songs become unplayable. Don't worry, in this case, you’ll need a reliable Apple Music Converter in order to copy protected Apple Music songs.
Due to DRM restrictions, TunesFun Apple Music Converter not only can help you remove DRM from Apple Music but also enables you to convert Apple Music M4P songs to common audio formats like MP3, M4A and FLAC. So, you can listen to Apple Music songs on alternatives to iTunes or any devices you like.
Plus, its conversion rate is fast enough to process bunches of tracks in one go. It also has its way to preserve the songs’ ID tags and original quality since the process is totally lossless. If you are looking for the best Apple Music Converter, the most important thing you consider is its stability, output music quality, conversion speed, and simple operation, TunesFun is the best choice. It’s so easy to use this tool. Simply follow the steps below.
- Download the TunesFun Apple Music Converter installer. This app is perfectly compatible with both Windows and Mac so compatibility during installation is not an issue at all.
- Open the program, and start adding the songs to be processed.

- Set up the output format and folder and the other output options that can be modified.

- Tick the “Convert All” button once everything has been set up.

- After the conversion, go to the Finished tab and view your output files.
After finishing your conversions, you can now play those converted songs with most media players. You don’t have to worry now about the limiting features of DRM. You can transfer these songs to different kinds of portable players. You can even burn them on a CD or DVD on an iMac.
Part 4. Summary
You’ve just learned how to burn a DVD on an iMac. Along with this, you’ve got a glimpse into the history of Mac computers. You’ve learned how to burn music on CDs and DVDs in Apple Music by moving your songs to a playlist first. After that, proceed to burn the playlist.
You’ve also known a tool that can convert Apple Music songs into a standard format and at the same time, remove DRM. This tool is called TunesFun Apple Music Converter. TunesFun Apple Music Converter is available as an installable app on both Macs and PCs alike.
Leave a comment