The Methods Of How To Burn Music From iTunes To A CD
Are you also an avid user of the iTunes app? Have you been wondering as well how to burn music from iTunes to a CD? The iTunes app has been a great help to many users since this is not only a media player but also a media manager where you can store and keep videos, images, music files, TV shows, and more. If you are one of those who are into using iTunes and are a regular Apple user, you surely have a bunch of media files such as music files that are in your iTunes library.
You might no longer need some of those and maybe, you are thinking about how you can remove them from your library but still keep them with you. Thus, knowing how to burn music from iTunes to a CD will be very vital information. You might find the process of how to burn music from iTunes to a CD a difficult task, but we are here to help. We have here three methods to share. Learn about these three in each part of this post.
Article Content Part 1. Most Helpful Way to Burn Music from iTunes to A CDPart 2. Burn Music from iTunes to A CD Using iTunesPart 3. Burn Music from iTunes to A CD Using Windows Media PlayerPart 4. Summary
Part 1. Most Helpful Way to Burn Music from iTunes to A CD
If you have been using the iTunes app for some time, you surely know that there are tracks in iTunes and Apple Music that are under DRM’s protection policy. With this protection, these tracks can’t be accessed outside these applications unless the mentioned protection is removed. Moreover, the file formats of the iTunes and Apple Music songs are not that playable on almost all devices or media players.
The best method of how to burn music from iTunes to a CD is to find a reliable and trusted software application that can get rid of the limitations mentioned previously. In this case, we are recommending the use of this TunesFun Apple Music Converter.
The TunesFun Apple Music Converter is an app that can help both in the DRM removal procedure and conversion process. It supports flexible output formats including MP3, AAC, FLAC, WAV, and more. Even if the files will undergo processing, you can ensure that 100% original quality of the files will still be maintained as well as their ID tags. You can even customize the output profile settings as you wish.
Apart from being a tool that can aid in the Apple Music conversion process, it can also work as a powerful audiobook converter supporting AA, AAX, and M4B file formats. It is a professional app that works 10x faster compared to other software applications and has an interface that’s easy to navigate. Thus, it is indeed a good tool that can help with the conversion of iTunes or Apple Music files leading to the process of how to burn music from iTunes to a CD.
Here is a guide to converting the protected iTunes and Apple Music songs through this TunesFun Apple Music Converter.
Step #1. You have to ensure that the installation needs of this TunesFun Apple Music Converter will be completed prior to the installation procedure. Launch the app once successfully installed. On the main interface, you can start previewing and selecting the tracks to be converted. This app has the ability to do the batch conversion so choosing a bunch of tracks is possible.
Step #2. Once the tracks are selected, you can start modifying the output profile settings as you like. Make sure that you set up the output format. Still, MP3 is the most recommended format as this is playable on any device or media player. Don’t forget to specify the output folder to use as well. Also, other parameters can be changed as you wish.

Step #3. After setting up, you can now go ahead and tick off the “Convert” button at the bottom area of the screen. This will let the app start the conversion process and the DRM removal process.

After just a few minutes, you will now have the converted and DRM-free iTunes and Apple Music songs. Since those are no longer protected, you can now finally head to the process of how to burn music from iTunes to a CD. You just have to insert the CD on your computer’s CD drive, drag and drop the converted songs, and then start the burning process.
Part 2. Burn Music from iTunes to A CD Using iTunes
Another method of how to burn music from iTunes to a CD is through the help of the iTunes app itself. Of course, we will be sharing the whole procedure of how you can use the iTunes app in the burning process. This part will highlight that. You actually need to perform only three steps. Here are those.
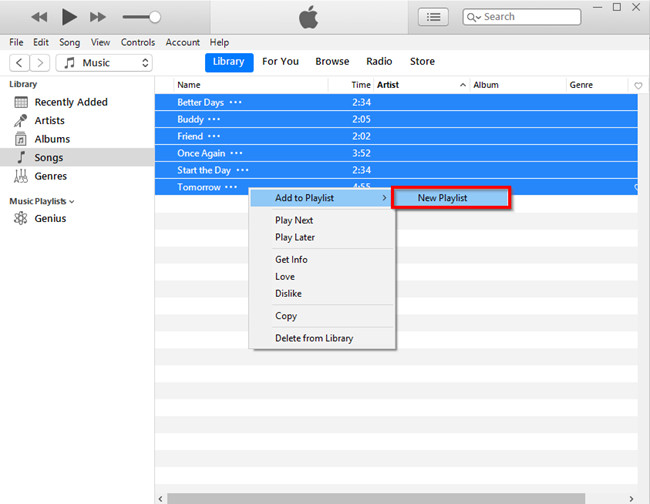
Step #1. You need to create a playlist first under your iTunes library. You can do this by choosing the desired audio files, right-clicking on them, and then from the options shown, choose “Add to Playlist”, then “New Playlist”.
Step #2. Once the created playlist is now okay to go (after adding and removing tracks), choose the “File” tab, then the “Burn Playlist to Disc” option.
Step #3. In the third step, there is some setup that you have to do. You can choose your preferred speed (depending on your preference). However, you must keep in mind that the higher the speed is, there will be possibility of more risk of quality loss. Apart from the speed, you can also select the disc format. You can either choose the Audio CD format or the MP3 CD format (for the permanent discs) or the data disc format if you are using rewritable CDs. After these have been set up, you can now hit the “Burn” button. This will trigger the iTunes app to start the burning process from iTunes to CD.

As simple as performing the above three steps, you can have your chosen iTunes songs copied and stored on a CD. You just have to remember that the use of the iTunes app during the process of how to burn music from iTunes to a CD will only work if the songs are unprotected. Else, you have to use a professional software converter like this TunesFun Apple Music Converter.
Part 3. Burn Music from iTunes to A CD Using Windows Media Player
Another method of how to burn music from iTunes to a CD is through the use of another free app – the Windows Media Player. Actually, the whole procedure isn’t too hard and difficult. It’s just that you would need your iTunes music files to be extracted from your iTunes library first and have them converted to a format that’s compatible and can be played via the Windows Media Player (like MP3, FLAC, or WAV). You only need to do three easy steps.
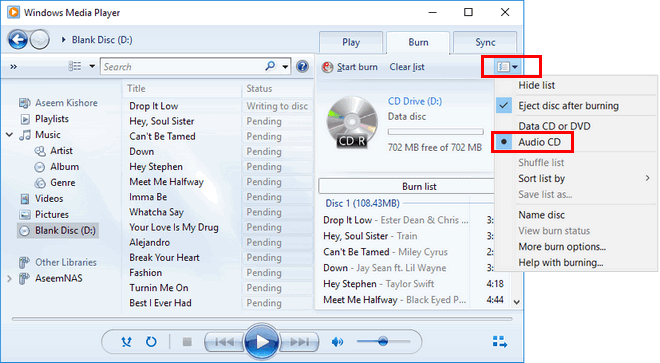
Step #1. Once you had verified that the iTunes songs you are to process are already compatible with the Windows Media Player app, you can just start dragging and dropping the audio files into your library. Once you are done with the dragging and dropping process, you just need to hit the “Burn” button that you can see at the top right area of the screen. This will signify the start of the process.
Step #2. After you had ticked off the “Burn” option, a menu on the side will open. This is where you will be dragging and dropping the iTunes music files to create the burn list. You must also be mindful of how you are to arrange the tracks because this list is what will be copied to the CD disc.
Step #3. Once you have arranged the list as you like, and you are satisfied with how it looks or appears, you can now hit the “Start Burn” button. You will see this option at the top right area of the screen. This will trigger your Windows Media Player app to start the iTunes music to CD burning process.

The whole process of how to burn music from iTunes to a CD using Windows Media Player is very easy as well – the same with iTunes. However, you must also take note that you can only use this if you are to process iTunes songs that are unprotected.
Part 4. Summary
We have shared three methods of how to burn music from iTunes to a CD in this article. You can use these free apps (that might have been installed already on your computer) – the iTunes app and the Windows Media Player in case you are to burn unprotected iTunes songs.
Now, if you have tracks that are protected by DRM, it is best that you first convert the music files and remove their protection through apps like the TunesFun Apple Music Converter.

Leave a comment