

Explained: How To Change Apple Music Plan?
Our likes and wants could change any minute. Indeed, something that works for you today might not work tomorrow or in the coming weeks. This applies to almost all things, of course, including your music streaming preference. If you have been an avid user and subscriber of Apple Music, has it ever come to mind the plan of trying to switch from your current subscription plan to another? Are you curious to know more about the process of how to change Apple Music plan?
Apple Music is indeed a great platform offering amazing music streaming services to its users. However, there could be a case that you might want to move to another subscription plan from your current one. Thus, requiring you need to learn more about how to change the Apple Music plan.
This platform actually offers three subscription tiers. Each of these three is priced differently, in the US, the Apple Music individual plan costs $9.99 per month, and the family plan for up to six people costs $14.99 per month. If you're in full-time education, you can get an Apple Music student discount (for $5.99 per month), the Student Plan is the most affordable, All these plans offer the perks the app offers. It’s just that there are a few differences between them. A good example would be in the case of the Family Plan wherein up to 6 members can use the same account, unlike the other two subscription plans.
Now that we’ve also highlighted brief information about Apple Music subscription plans, we’re now ready to deal with the process of how to change Apple Music plan.
Article Content Part 1. Change Plan from Individual Plan to Family PlanPart 2. Change Plan from Family Plan to Individual PlanPart 3. Switching Apple Music Plan between the Student and Individual PlansPart 4. Bonus Guide: Downloading Apple Music and Keeping Them ForeverPart 5. Summary
Part 1. Change Plan from Individual Plan to Family Plan
How to change Apple Music plan if your family wants to join Apple Music? While subscribing to a Family plan, up to six people can enjoy all of the benefits of Apple Music. So the first thing to do before switching to a family plan is to create a Family Sharing account. This part will be highlighting the procedure of how to change the Apple Music plan from Individual to Family. You actually have to follow a 3-step procedure. Here are the details.
Step #1. On your device, open the Music app. Head to the “For You” section right away.
![]()
Step #2. Move to the upper-right area of the screen and then click the “Account” icon. You shall see the “Upgrade to Family Plan” option right away. Tick this off.
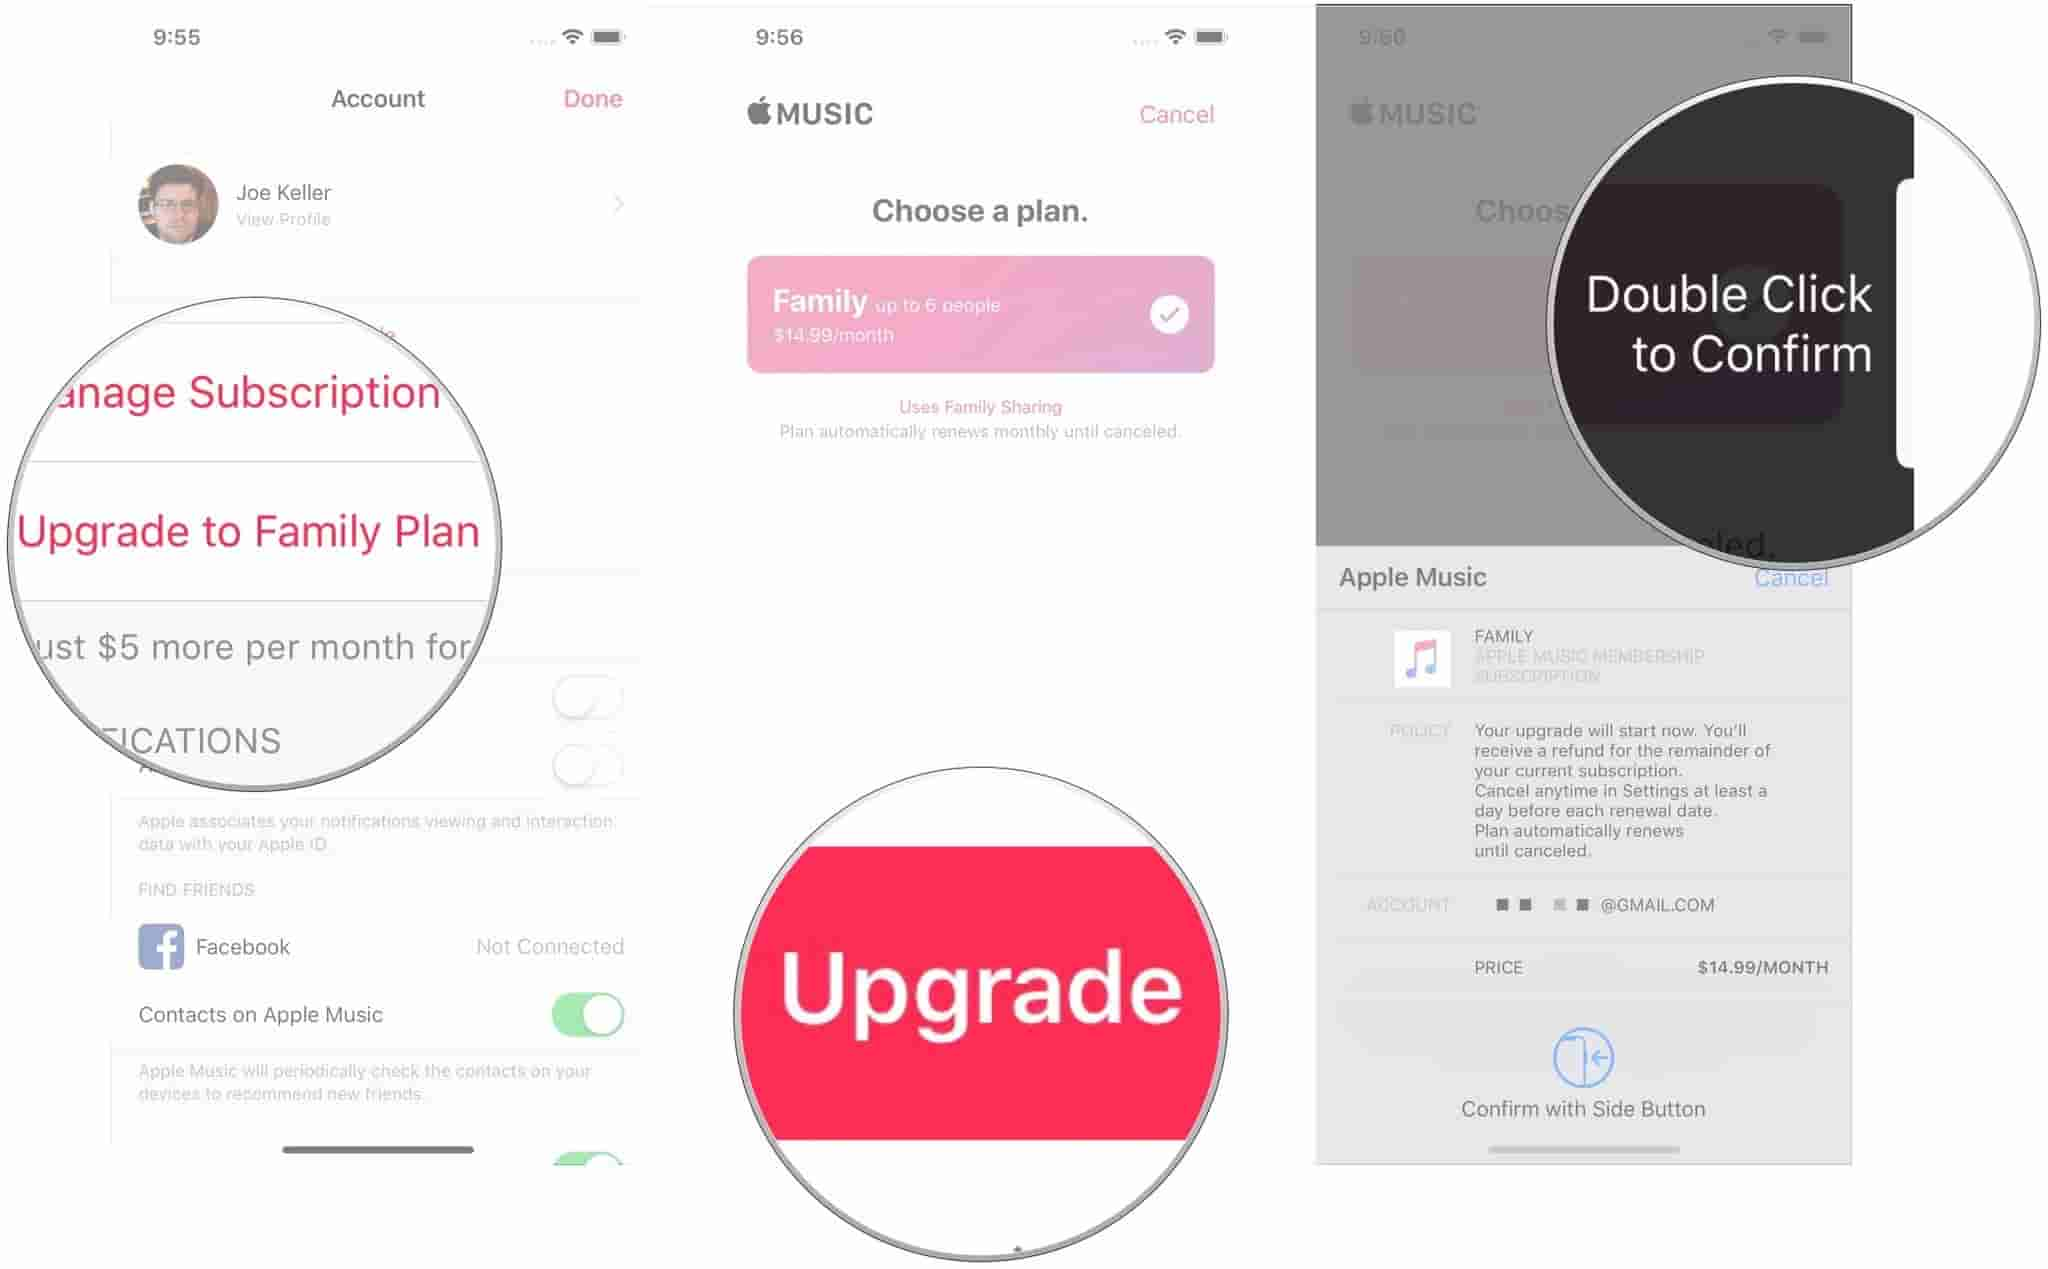
Step #3. Finally, choose the “Upgrade” button and then confirm the new subscription plan chosen.
You must take note that the Family Plan works differently than the Individual Plan. Make sure that before you do the above steps, you must first verify your role as the account organizer. This is just easy to do. You can just head to “Settings” then choose “iCloud”, and finally click “Set Up Family Sharing”.
The above is the simple method of how to change Apple Music plan if you wish to switch from your current Individual plan to a Family plan.
Part 2. Change Plan from Family Plan to Individual Plan
What we have presented in the previous part is how to change Apple Music plan from Individual to Family. Now, we will be dealing with the opposite. Know that you can only switch to the Individual plan in case you had a change of heart. You’ve got two options here.
Option #1.
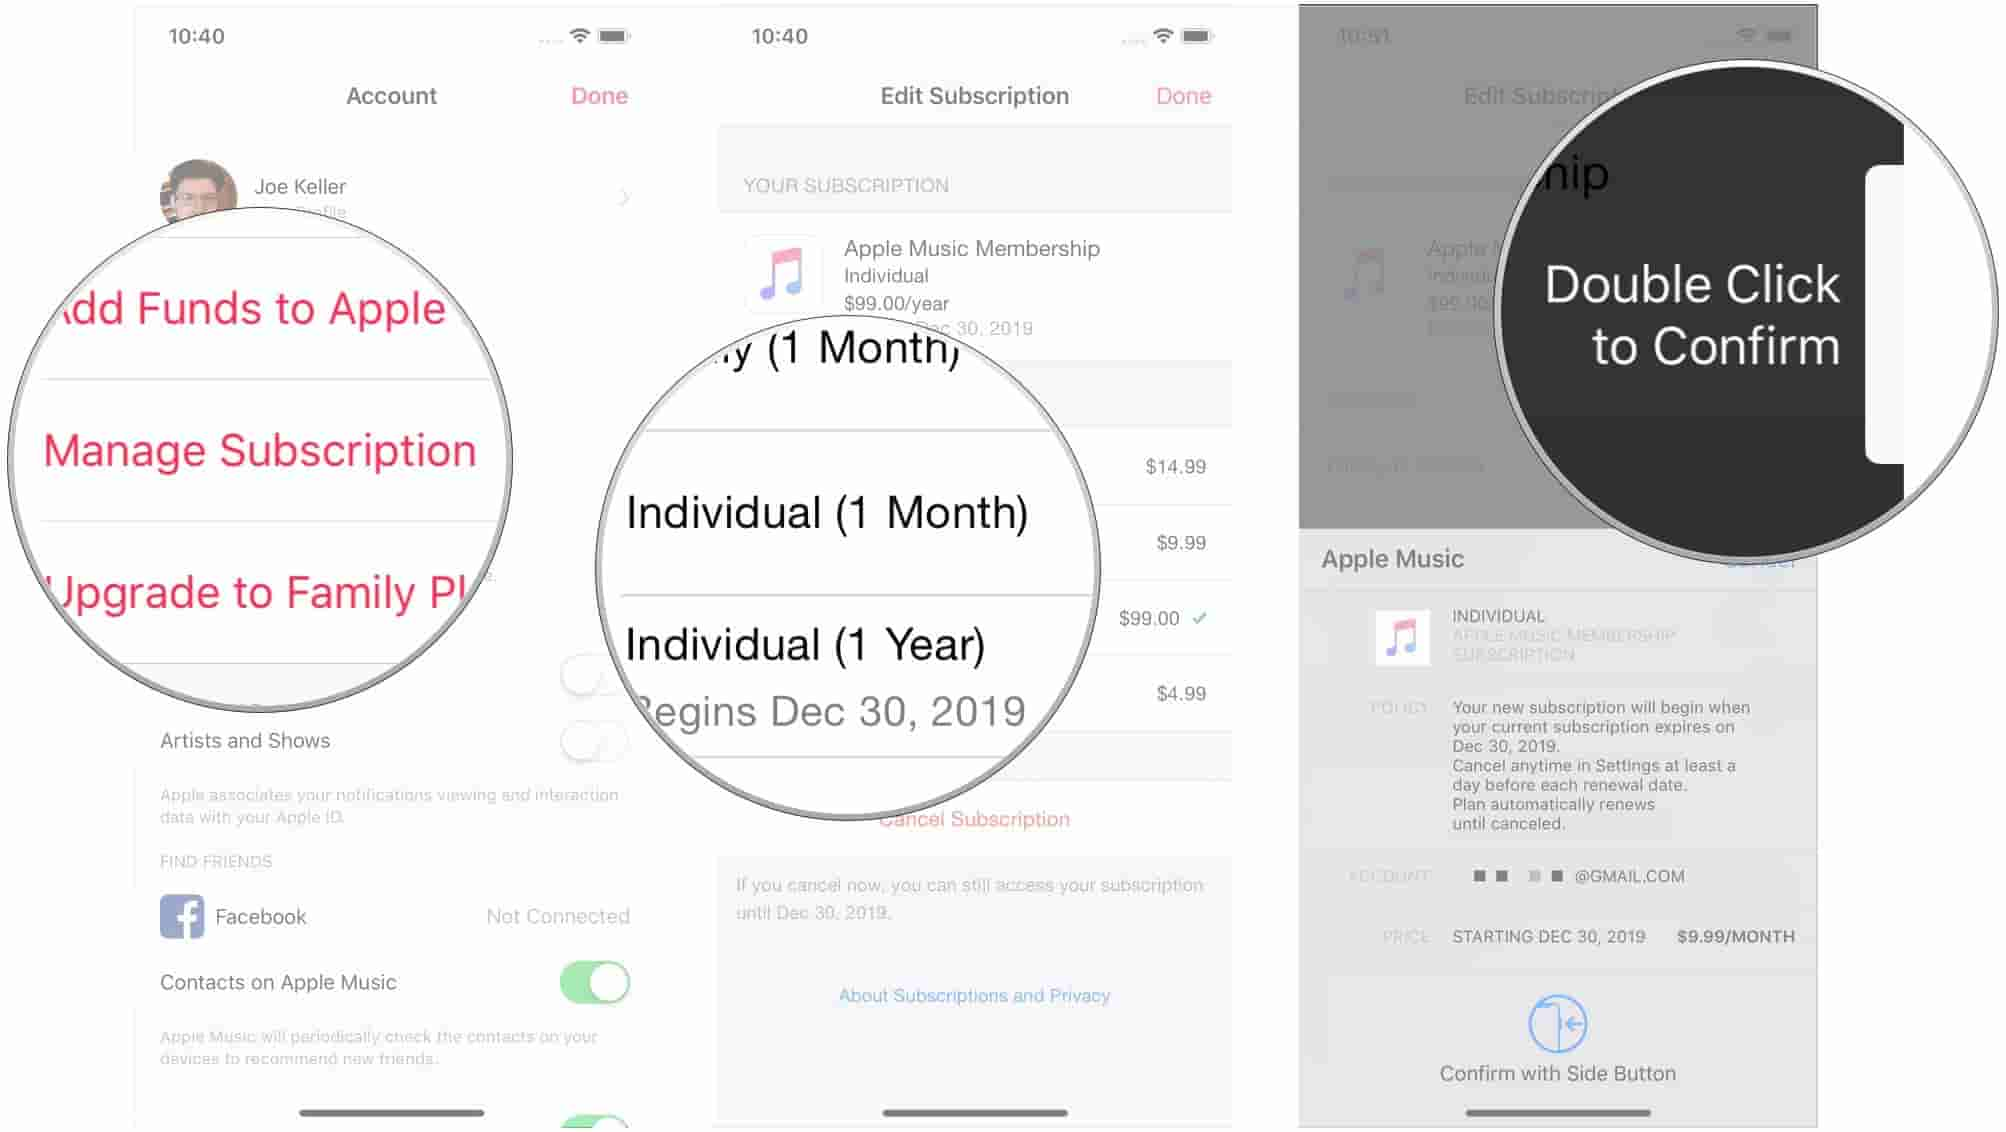
Step #1. On the device you are using, launch the Music app and then move to the “For You” section.
Step #2. You need to tap the “Account” option next (that is just at the top-right area of the page), and then choose the “Manage Subscription” menu.
Step #3. You have an option to select whether to subscribe to Individual (1 Month) or Individual (1 Year). After selecting, just confirm your purchase.
You will be able to do the above if you are the account organizer of your Family plan. Once you do the above, take note that the other members won’t any longer access the Family plan.
Option #2.
Now, here is the case if you are just a member of the Family plan. Unlike the first option, if you ought to switch to an Individual plan, this action of yours won’t affect the other members.
To continue, just tap the “Settings” button, tick the Apple ID banner, click the option for “Family”, and choose “Leave Family Sharing”. After doing this, open your music app and then just select the new subscription plan!
That’s it! The above is how to change Apple Music plan from a Family plan to an Individual plan depending on what position you have in the Family Sharing Account.
Part 3. Switching Apple Music Plan between the Student and Individual Plans
Of course, you should also know that being subscribed to the Student Plan isn’t a disadvantage just in case you’d like to suddenly switch your subscription plan. We have here the detailed guide on how to change Apple Music plan in this case.
If you’d like to upgrade from your current Student plan to the Individual plan, you may follow the below.
Step #1. Head to the “For You” section after launching the music app on your device.
Step #2. From the “Account” option that is at the top-right area of your screen, choose the “Upgrade” button.
Step #3. Now, choose from either subscribing to Individual (1 Month) or Individual (1 Year) before finally confirming.
If you wish to get the Student plan after being an Individual plan subscriber, you can use the below guide as your reference.
Step #1. Launch the music app on your gadget and just head to the “For You” page as usual.
Step #2. Choose “Upgrade” after moving to the “Account” section.
Step #3. You have to tick the “Manage Subscription” button next. Afterward, just select “Student Plan” and then confirm this purchase of yours.
After following the above procedures presented, you can now easily switch between the Individual and Student plans. Of course, you also have to ensure that you’re eligible to get the Student plan so as to avoid issues while switching plans. The Student plan has a discounted rate so there are a few requirements and qualifications before you can get to enjoy it.
Part 4. Bonus Guide: Downloading Apple Music and Keeping Them Forever
If you get sick of paying the monthly subscription fee of Apple Music, as well as learning the thorough process of how to change Apple Music plan, you can always try some workarounds to still enjoy your Apple Music favorites.
Indeed, some users might find it a hassle to learn all the procedures when it comes to switching Apple Music plans. Rather than mastering all those, why not just go ahead and download the Apple Music songs that you like?
It is true that Apple Music songs are protected under Apple’s FairPlay Protection Policy program. With this, users who aren’t aware that this can be handled with ease would just give up. Now, you don’t have to worry about this. In fact, we will be sharing a great app that can help you handle this DRM encryption of Apple Music songs – the TunesFun Apple Music Converter.
There are some apps on the web that functions almost the same as this TunesFun Apple Music Converter. What makes this software application stand out? Well, apart from the given ability that the TunesFun Apple Music Converter can remove the DRM protection of Apple Music songs, it is a great app that can also aid in the conversion of tracks to common formats like MP3, FLAC, AAC, AC3, WAV, and M4A.
With its conversion speed of 16x faster compared to other apps, you will surely experience efficiency without worrying about data and quality loss. This app is even supported by Windows and Mac computers so compatibility when it comes to installation isn’t an issue at all. You can also use this easily because it has an interface that’s too simple that even beginners won’t find it hard to use.
Here is a guide on how to convert and download Apple Music songs using this TunesFun Apple Music Converter.
Step #1. Once the app has been installed on your computer, launch it and then start to select the Apple Music songs to be processed.

Step #2. After uploading the tracks to be converted, you may now set up the output settings. Choose an output format to use as well as modify some parameters.

Step #3. Just tick the “Convert” button at the bottom area of the screen. The app will then start the process of converting the songs as well as removing the DRM protection that they have.

After accomplishing the above, you will then have the DRM-free and transformed Apple Music songs on your PC. You can then stream them offline on any device!
Part 5. Summary
You have now learned how to change Apple Music plan. In case you’d like to proceed with the switching of plans, you can just refer to the previous parts of this article. More so, you learned how easy it is to download and convert your Apple Music favorites through the TunesFun Apple Music Converter. In the future, if you’ll need to do so, you can always get back to this guide!
 Home
Home
Leave a comment