How To Delete All Music From My iPhone: Tips And Guides
One of the best ways to free up a huge space on an iPhone is to know the processes of how to delete all music from my iPhone. This is simply because these media files, particularly music and video take up the largest space on a mobile device compared to anything else. There could be other reasons such as getting tired of a playlist, or a whole album, or a particular song.
Whatever your reasons could be, there are really beneficial effects of getting rid of all the music files that are stored on your mobile devices. Good thing there are a lot of known ways how to delete all songs from my iPhone, and we are going to get into them as we go along the article.
If you have any of the mentioned reasons above, or any other reason than those mentioned, we are going to help you know better. If you are interested, let us begin the discussion.
Article Content Part 1. How to Delete All Songs in Apple Music from iPhone?Part 2. Bonus: How to Enjoy Your Most Loved Music at Your Own Convenience?Part 3. To Summarize It All
Part 1. How to Delete All Songs in Apple Music from iPhone?
“How to delete all music from my iPhone?” Someone who might just have a dilemma dealing with the space storage he or she has on his or her phone might occasionally ask such questions. But, how can this task be rightfully done? What are the methods and tools, and even tips to properly solve the dilemma? Let us get to know these methods below.
Delete All Music From Your iPhone Using the Music App
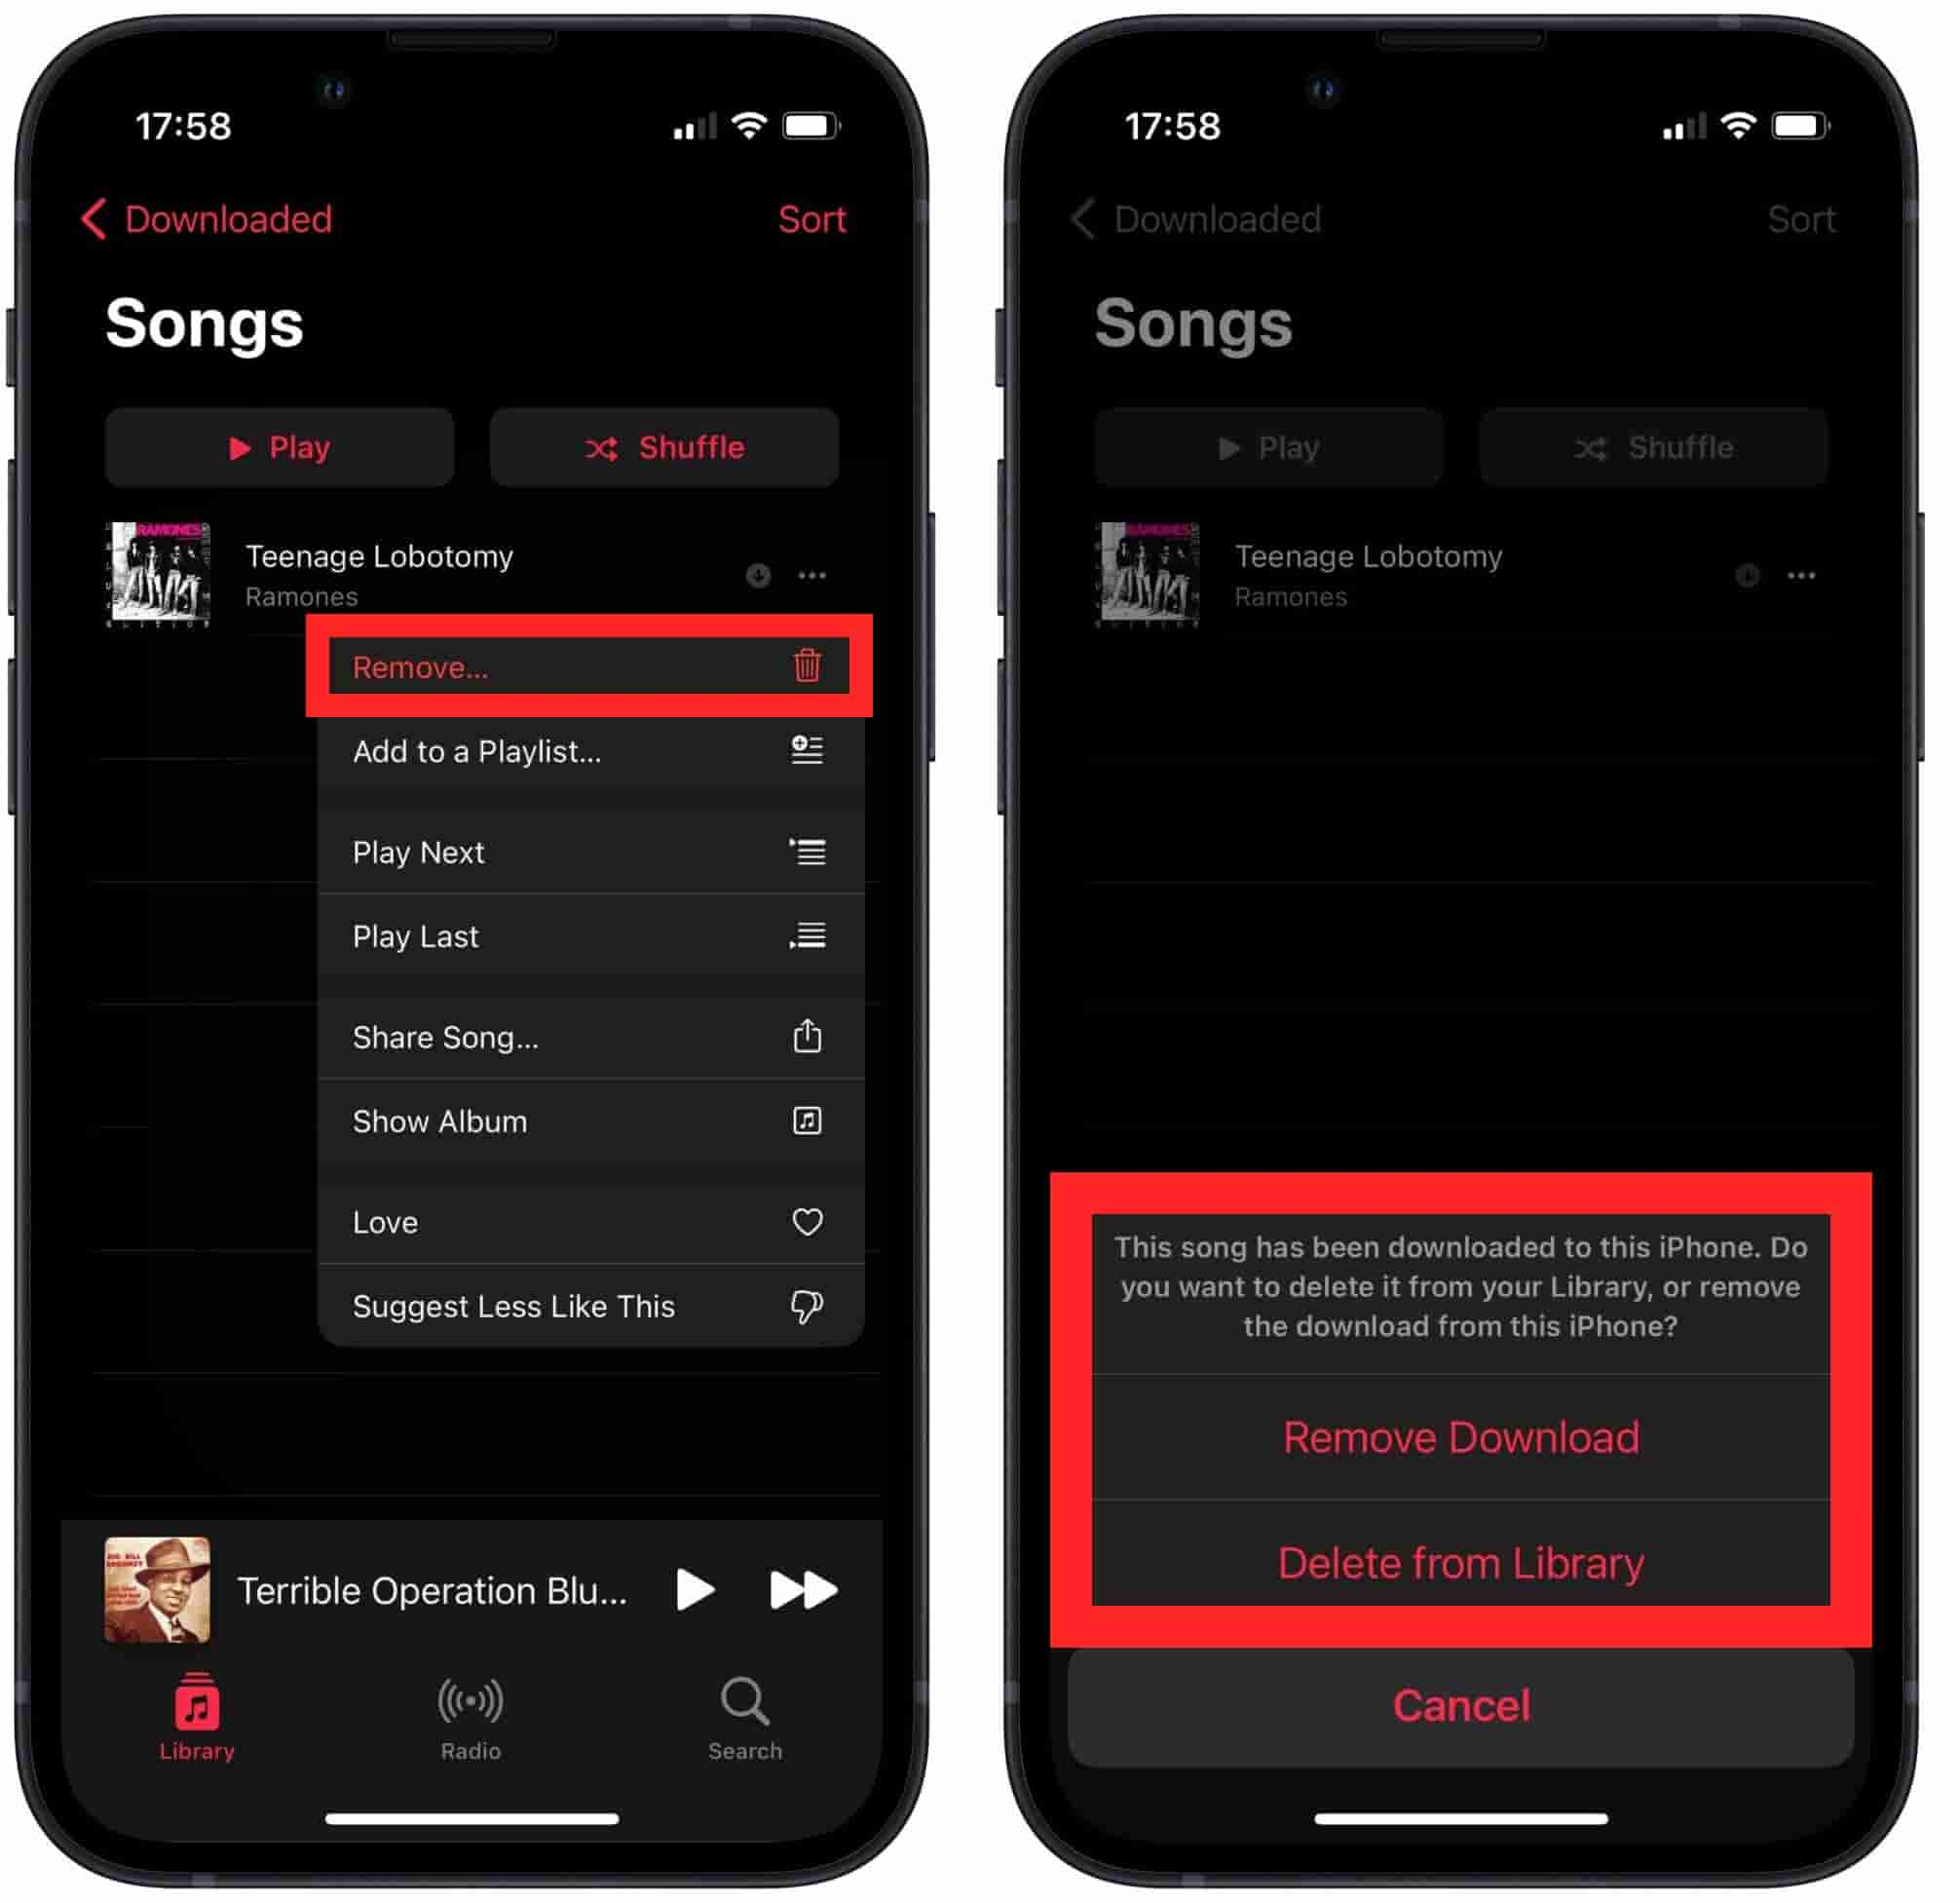
How to delete all music from my iPhone in Apple Music app?
- To begin, launch the Music App on your iPhone.
- Go and tap the Library option, which you will see at the bottom left part of the interface of the app. By doing so, you can be able to see all your music, wherein you can be able to sort all your music tracks depending on the artist, album, playlist, and song.
- Go and look for the specific album or even song that you wanted to delete. In order to delete an album, you have to tap the album and then hit the three dots that you will see at the right part of the screen.
- In order to delete a song, you have to start playing the song and then hit the player so you can see it all over your screen. Then go and click the three dots that you will see in the lower right part of the screen.
- Then, in the window that says option, you have to choose the “Delete from Library” option and then you have to confirm what you want to do by hitting the option “Delete Album”, or the “Delete Song” option.
In case the model of the iPhone you are using is an iPhone 5S or later there is an easier way how to delete all music from my iPhone by tapping the “deep press” option. You have to deep press on the album or track and then another window will appear. In this window, you have to choose the option that says “Delete from Library”.

Delete All Music From iPhone Using the Settings
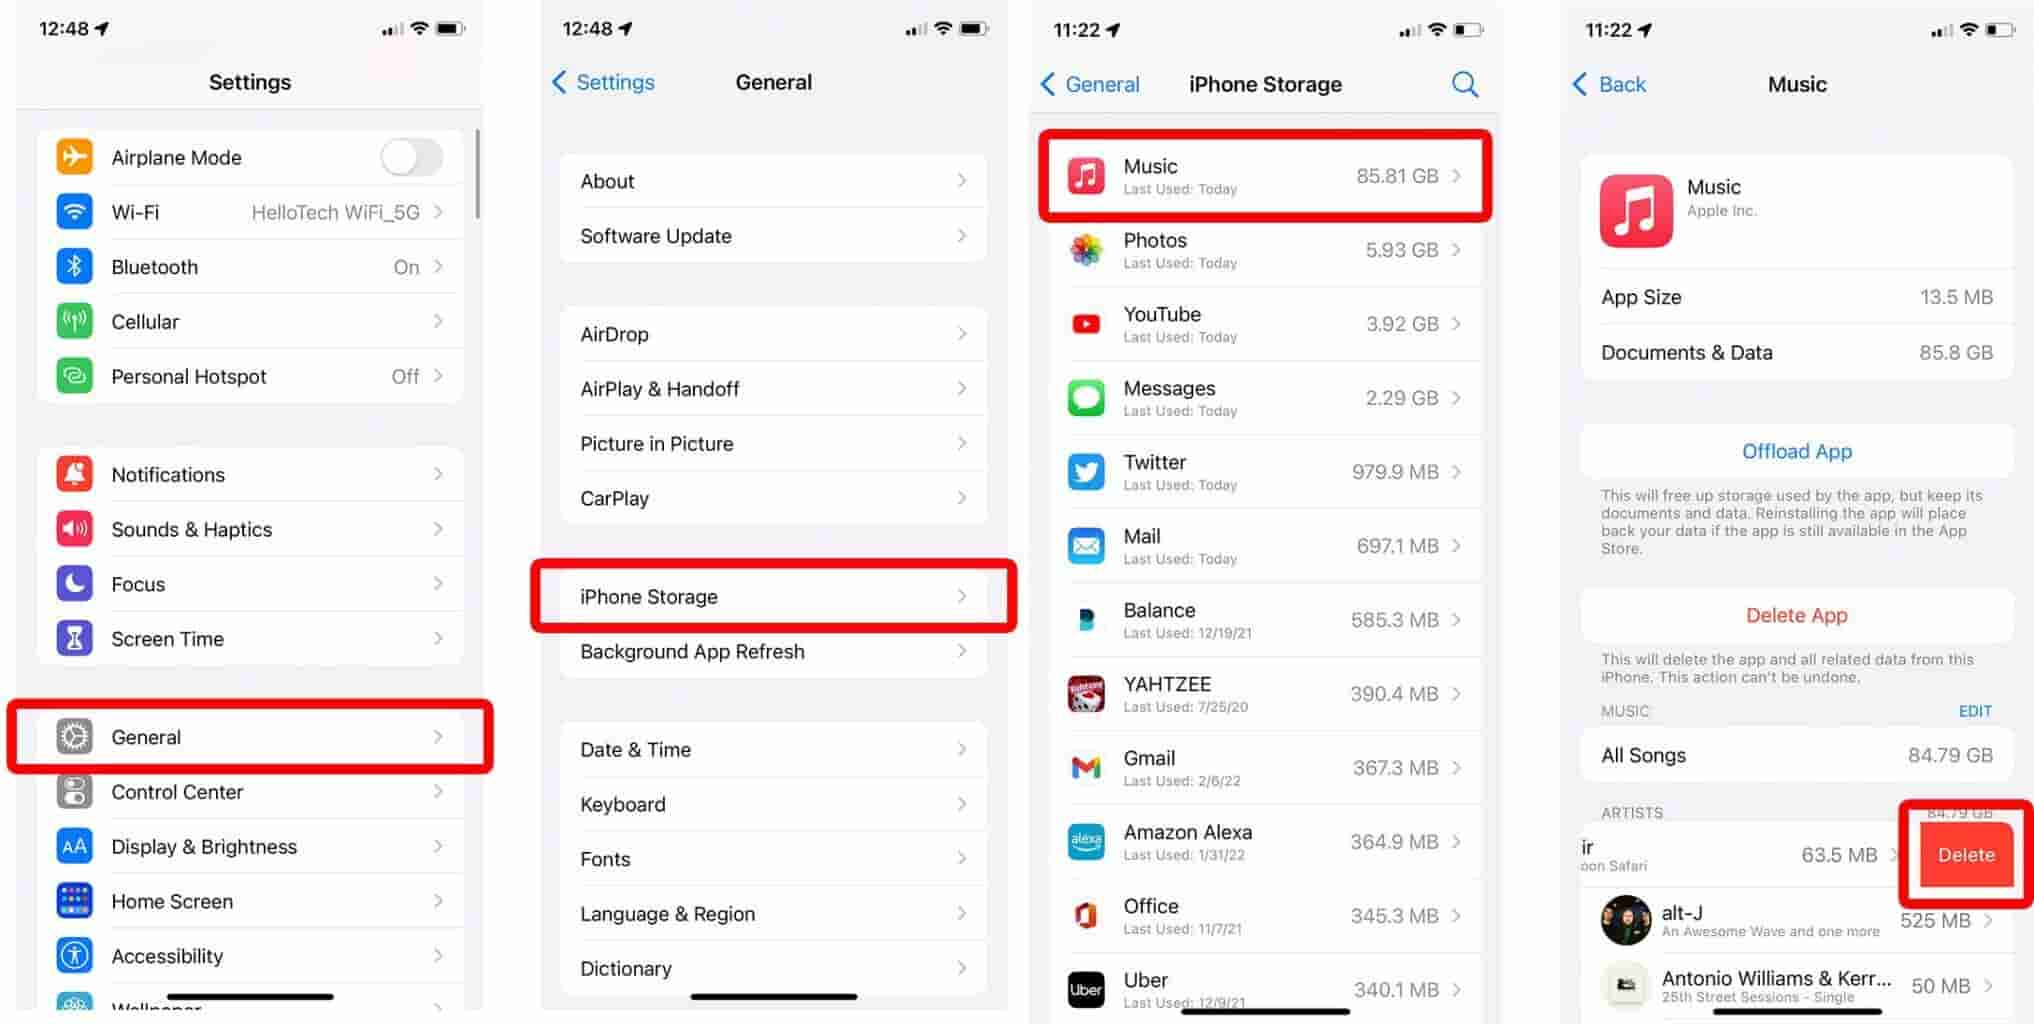
- Tap the “Settings” app.
- Go and choose “General” and then hit the option that says “iPhone Storage”.
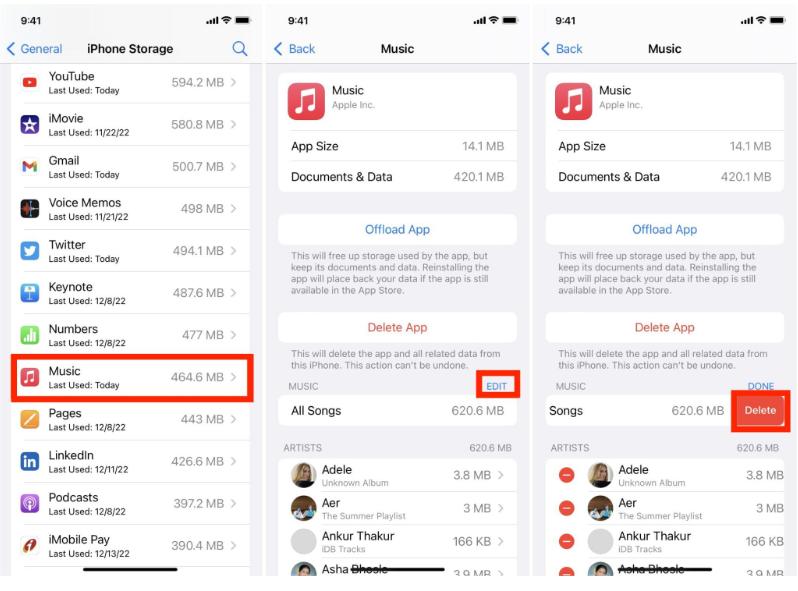
- It may take some moments, and then you will see a graph that reflects the usage of the phone’s storage. You then have to hit the Music option, it has to be noted that all the apps are listed from the largest to the smallest so in case that you are aware that you have a lot of music tracks stored on your phone, then you will see Music at the top part of the list.
Here are the options that you can refer to depending on how many songs you want to prune:
- In order to delete all of your music but you wanted to leave the Music app on your device, you have to choose Edit, and then hit the option that says “All Songs”.

- If you wanted to delete the Music app and all of your music as well you then have to hit the Delete App option and then make sure to confirm the said choice.
- If you wanted to get rid of a single song, you have to find the said song by hitting the artist which is followed by the album. Swipe the song to the left part and then choose the Delete option.
- If you wanted to delete an entire artist, as well as all its songs, you can swipe the artist to the left side, and then choose “Delete”. You have to be reminded that there is no way for you to confirm so you have to make sure that you really wanted to delete all your chosen artists.

- If you wanted to delete an entire album, you have to choose the artist in order to see all the albums by an artist then swipe to the left side and then choose the Delete option.
Part 2. Bonus: How to Enjoy Your Most Loved Music at Your Own Convenience?
You might've accumulated hundreds or thousands of songs now, most of which you don't listen to anymore. At this point, you might be considering the idea of how to delete all music from my iPhone. Thankfully, we have offered the steps that let you follow. But what if you regret removing songs from Apple Music? How to restore your Apple Music library? Would it have more convenient ways to access your music files?
As we all know, tracks from Apple Music cannot be accessed and transferred unless you are using an authorized device or are subscribed to the paid version of the platform. In case you are not, you have to convert your files into formats that are acceptable to the platform, and the transfer and accessibility of the music files will be easier.
Nowadays, there are a lot of technological improvements which can help music enthusiasts for sure. From being able to convert music tracks to accessible formats like MP3, MP4, and AAC, there is also a way to get rid of DRM encryption. These could be possible through the help of the TunesFun Apple Music Converter. After conversion, you can export iTunes playlists or Apple Music library to any device to keep your tracks.
Aside from Apple Music DRM removal and the conversion of files to acceptable file formats, the tool can also help users save time. If you opted to use the TunesFun Apple Music Converter, it can convert your files at a faster conversion rate compared to basic converters in the market. Another thing is you are able to keep the original information of the music tracks like ID tags and metadata, and while you are at it, imagine being able to keep the hundred percent original quality of the files.
You would be also amazed by how easily this tool can be used, you can see the list of steps that we have listed below.
Step 1. Download and install the TunesFun Apple Music Converter on your computer and then once installed, start adding and previewing all the music tracks that you wanted to convert.

Step 2. Once you have made sure that all the files are ready, start selecting the music file formats that you wanted or needed to have. You also have to create a folder where all the converted files will be saved.

Step 3. Tap the Convert button and then wait for a few minutes until all the files that you have chosen have been converted.

And there you are! You are able to now access and transfer your music files anywhere you wanted. It should not be difficult to listen to all your wanted songs at your own convenience!
Part 3. To Summarize It All
It is really important to have an idea of how to delete all music from my iPhone. Given all the procedures and methods discussed above, it will now be easier to let go of the songs that you do not seem to enjoy anymore. Also, it can be a great thing that you will be also saving a huge space, where you can store a lot of music files in case you have a lot in mind.
Well, as we have also discussed, it would be a huge help to have professional tools like the TunesFun Apple Music Converter, to cater to us in the conversion of Apple Music songs so that we can enjoy them as much as we wanted. We hope that we have enlightened you on how to delete all songs from my iPhone, the proper way. Also, be able to acknowledge TunesFun Apple Music Converter as one of the best tools that you can use to process all the conversions of your chosen songs, for unconditional or limitless listening.

Leave a comment