The Process Of How To Download CD To Computer (2025)
Do you have a box containing old CDs with important files that you wish to save to your computer or any other devices? Are you also a curious bee who aims to learn how to download CD to computer, particularly those music files that you have? This post is for you then.
In the present era, you’ll surely find only a few people who are still using CDs to store files. Though the use of such still has perks, many consider more drawbacks given that several advancements in technology have been introduced already including in the digital or music streaming industry.
We have nothing about those who still prefer the use of CDs. It’s just that recently, there are lots of users who are curious about the methods of how to download a CD to a computer and we wish to help out. From discussing the advantages of ripping a CD to checking out the ways to rip them, all these will be presented in this post.
Article Content Part 1. Reasons Why Ripping Music from CDs is BeneficialPart 2. Ways to Download Music from a CD to Your ComputerPart 3. Extra Information: Download Apple Music Songs Without LimitationsPart 4. Summary
Part 1. Reasons Why Ripping Music from CDs is Beneficial
With the birth of handy devices – smartphones, tablets, iOS gadgets, and even media or MP3 players, anyone can easily stream and access their files. On the contrary, CD players can now hardly be found on the market. If your reasons for ripping music from CDs to your PC aren’t enough yet, then reading what this section has will surely add more to your current list!
Before we share how to download CD to computer, specifically music files, let’s get to see these reasons why getting your CDs ripped is beneficial.
- Once your CDs are damaged physically, all the music files that you have will be gone. Learning how to download CDs to your computeris beneficial to keep digital copies of those music files of yours.
- There are only a few devices that support playing CDs.
- Upon ripping CDs, you shall be able to transfer the songs to portable music players or devices. You will be able to listen to them anytime and anywhere you wish to.
- Restoring content through ripping from the CD can be done.
- Your favorites might be saved on different CDs. To combine them all together in one folder, ripping all the CDs you have is then necessary.
- If you wish for a song on your CD to be set as your device’s ringtone, ripping it shall help.
- The collection of old CDs that you have might take up lots of storage space in your place. Upon ripping them, you can get rid of the CDs freeing up some space.
- It is sometimes hard to locate on which CD the songs you like are stored especially if you have bunches of CDs with you.
Apart from these 8 items mentioned, there could still be other reasons that you may consider. Thus, pushing you to find out a way of how to download CDs to your computer. Whatever reason you have in mind, finding out the procedures of how to download CDs to a computer that we have in the next part will surely ease your feeling. Let’s move on then.
Part 2. Ways to Download Music from a CD to Your Computer
Actually, there are two free apps that you can use in the process of how to download CD to computer – the Windows Media Player and the iTunes app. Of course, the detailed guides on how to use them during the process shall be fully explained in this section.
Ripping Music from CDs via the Windows Media Player
If you have the Windows Media Player installed on your computer, you may refer to the below step-by-step procedure.
Step #1. Get your CD inserted into your computer’s CD drive. In the Windows Media Player app, click on the name of the audio CD.
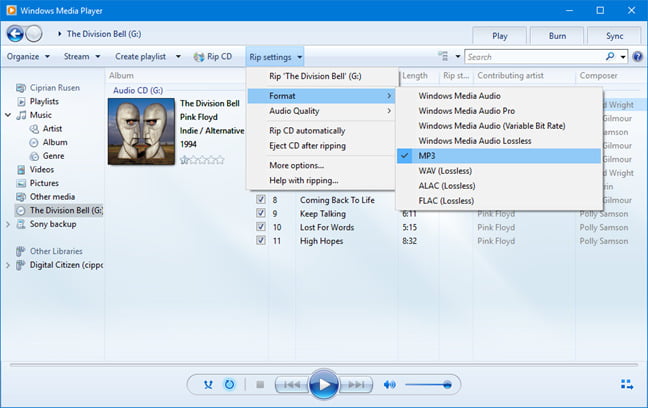
Step #2. By default, Windows Media Player rips your music using the MP3 format with low-quality audio settings. You may not want that. To get to configure how you can rip CDs, tick off the “Rip Settings” option above the track titles.
Step #3. You shall be able to set both the export format desired. If you are an audiophile, we recommend FLAC(Lossless) because it provides the best possible audio quality. For most people, MP3 is going to be the best choice, also because it is compatible with plenty of devices, including car stereos.
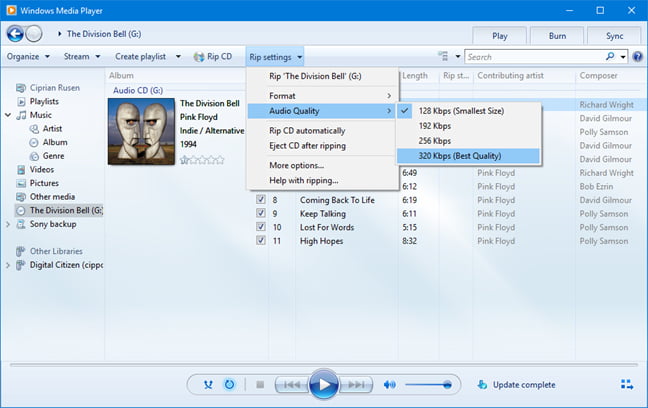
Step #4. In Windows Media Player, click or tap Rip settings, followed by Audio Quality, and the quality you prefer. The options vary from computer to computer but can range from 48 Kbps (which will make files with the smallest size) to as high as 192 Kbps (this is the best quality but produces the largest file sizes). For MP3 audio tracks, we recommend choosing 320 Kbps, as it offers the best sound quality available for this format.
Step #5. Select Rip settings > More options to adjust other settings, such as ripping CDs automatically, ejecting the disc after the CD rip, changing where the music is copied on the computer, and choosing the details to include in file names.
Step #6. Now you have configured the ripping process according to your preferences. Click or tap the Rip CD button. Wait until the process has been completed. You should be able to see the files ripped from the CD on your computer.
Note: If you use Windows 7, the FLAC option is not going to be available as a ripping format in Windows Media Player. This format is available in Windows 10 or later. This format also uses a lot of disk space. And the higher the audio quality you choose, the better the music is going to sound when you listen to it. However, it is also going to occupy more storage space. Therefore, it is best that you choose the audio quality that strikes the best balance between sound quality and storage space.
Ripping Music from CDs via the iTunes App
As always, it is recommended that you use the latest version of the iTunes app. Once ensured, you may then check out the below process of how to download CD to computer via iTunes.
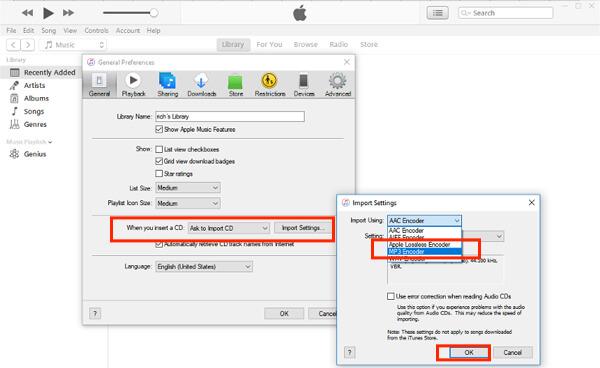
Step #1. For the Windows version of iTunes, select Edit > Preferences at the top of the screen. For the Mac version, select iTunes > Preferences. Select the General tab and navigate to the “When you insert a CD” section. Select Import Settings. (In iTunes 12.7.2, the Import Settings button is still there, but not the When a CD has Inserted menu if you didn't have an optical drive connected to your Mac.)
Step #2. On the new window, you can now select which file type to convert your CD tracks. Choose MP3 Encoder options. Select OK to save your selection, then select OK again to exit the preferences menu.
Step #3. Get the CD inserted into your PC’s CD drive. The iTunes app shall automatically detect it and a pop-up window shall appear. If iTunes asks if you want to import the disc into your iTunes library, select Yes to start the ripping process.

Step #4. Wait for all songs to import by iTunes. When all songs have been imported, all songs have the green checkmark next to them.
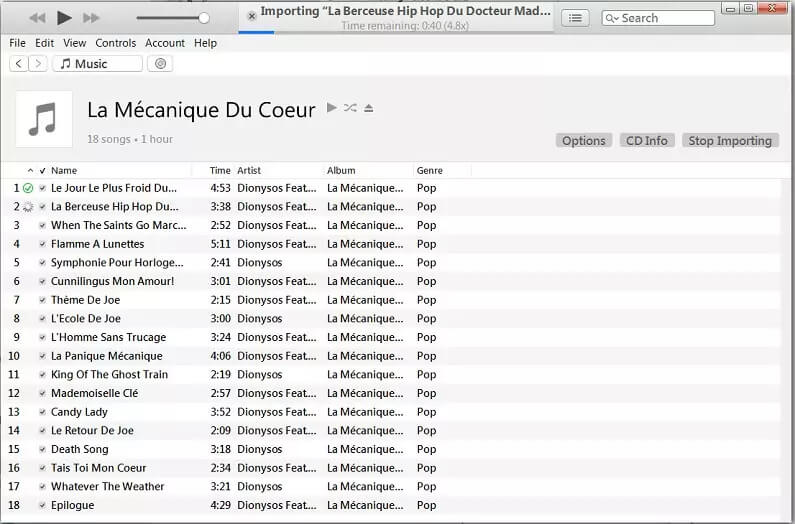
Step #5. Once the importing process is through, you will be able to see and play your CD tracks directly from the iTunes music library. If not, sort your iTunes library by Recently Added. Go to View menu > View Options > Recently Added. Select the Recently Added column and scroll to the top. The new files should be there.
The use of Windows Media Player and iTunes app when it comes to the process of how to download CD to computer is indeed great as they are freeware and installing them on your PC (in case you don’t have them yet) is so easy to do. If you are interested to find out about an extra tip when it comes to downloading Apple Music songs, it is suggested that you move to the next section.
Part 3. Extra Information: Download Apple Music Songs Without Limitations
Though this article’s main goal is to focus on discussing how to download CD to computer, we find it more appealing if we’ll also share extra information when it comes to downloading Apple Music songs without limitations for anyone to be able to get them played on any device or media player.
Since Apple Music songs are protected under Apple FairPlay’s Protection program, the main agenda is to get the protection removed first and have them converted to formats supported by a variety of media players and devices. Apps such as the TunesFun Apple Music Converter is a great tool that can help you out.
With TunesFun Apple Music Converter, you will be capable of experiencing various perks such as these:
- Fast Apple Music or iTunes DRM removal process, you can access the files on any device that you wish to use.
- Convert Apple Music songs to MP3, AAC, and more for playing on any media player.
- Losslessly convert iTunes audiobook or Audible audiobook.
- 16x fast conversion rate.
- Keep all ID tags and metadata information from songs.
- Works amazingly with Windows and Mac computers.
- Simple app interface. Beginners and professionals are welcome to use the app.
It is so simple to use that you can complete the conversion in just a few clicks. So that you can listen to all your Apple Music songs offline without having to open Apple Music again.
- Download and launch TunesFun Apple Music Converter. Start adding the Apple Music songs to be converted.

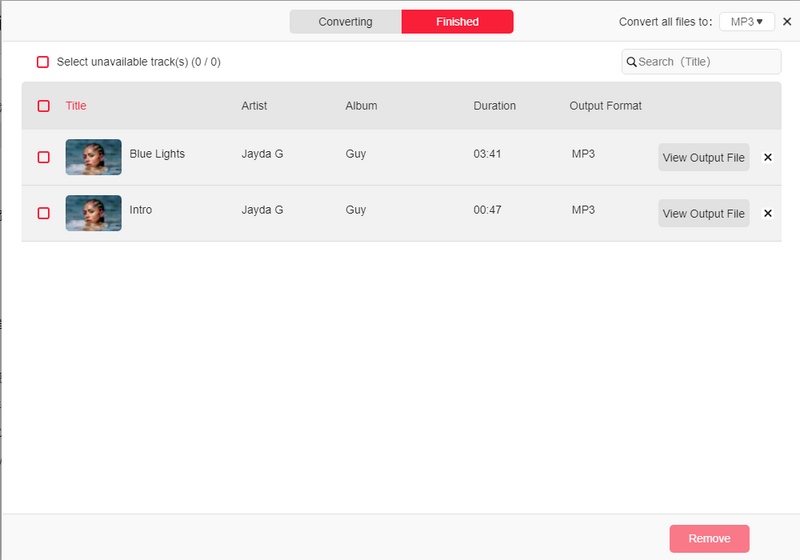
- Choose an output format that is supported by almost all devices (MP3 is the most recommended) and set up all the other output parameter settings.

- Click the 'convert' button to process conversion.

- After finishing, access your converted music in the folder by clicking View Output Files.
Part 4. Summary
To accomplish the process of how to download CD to computer, using freeware such as Windows Media Player and iTunes can be done! The advantage of using them apart from being free of charge is that they are easy to install and use. Additionally, if you are someone who’s interested in finding out a method of keeping your Apple Music favorites, don’t forget how good the TunesFun Apple Music Converter is!
 Home
Home
Leave a comment