

Let Us Know How To Get A Refund On iTunes Music
It can really happen that as you are browsing for deals and promotions or you are still on the verge of making a final decision in buying something and then you suddenly tap the purchase button. It is normal to panic, but it is also best to know how to get a refund on iTunes music. Having all your purchases which gone be reversed is one of the best feelings ever. This is also something that would ease your mind, especially if you are not yet ready to make the said purchase.
And even though we have an idea that when you are about to do a refund when it comes to physical items, the same is not that easy to do with digital purchases. However, we can still make a way to do it, we are going to give you ideas on some precautionary measures before purchasing an item or song, or the things that you can do once you have made the purchase already.
Article Content Part 1. How to Get a Refund for iTunes Purchases on PC?Part 2. How to Get a Refund for iTunes Purchases on iPhone?Part 3. Bonus: Enjoy Songs You Love Anytime!Part 4. To Summarize It All
Part 1. How to Get a Refund for iTunes Purchases on PC?
If you have made a purchase on iTunes Music and you wanted it to have reversed, you do not have to panic completely. There are still ways that we can do to be able to have them canceled. To make this possible, we have to learn how to get a refund on iTunes Music, and we have gathered some of the ways that you can try to execute to make a successful reversal. Let us have a look at these methods.
One of the primary devices that you can use if you wanted to make a refund is your Mac or Windows computer. The steps are also listed below.
Step 1. Access Purchase History
If you're running macOS Catalina or higher, you need to do it on the Apple Music desktop app.
- Tap Music > Settings > General, and then you have to check the box which is next to the Show iTunes Store option. Then you have to choose the iTunes store which can be seen on the left part of the interface.

- From the Account menu at the top of the screen, choose Account Settings. You might be asked to sign in.
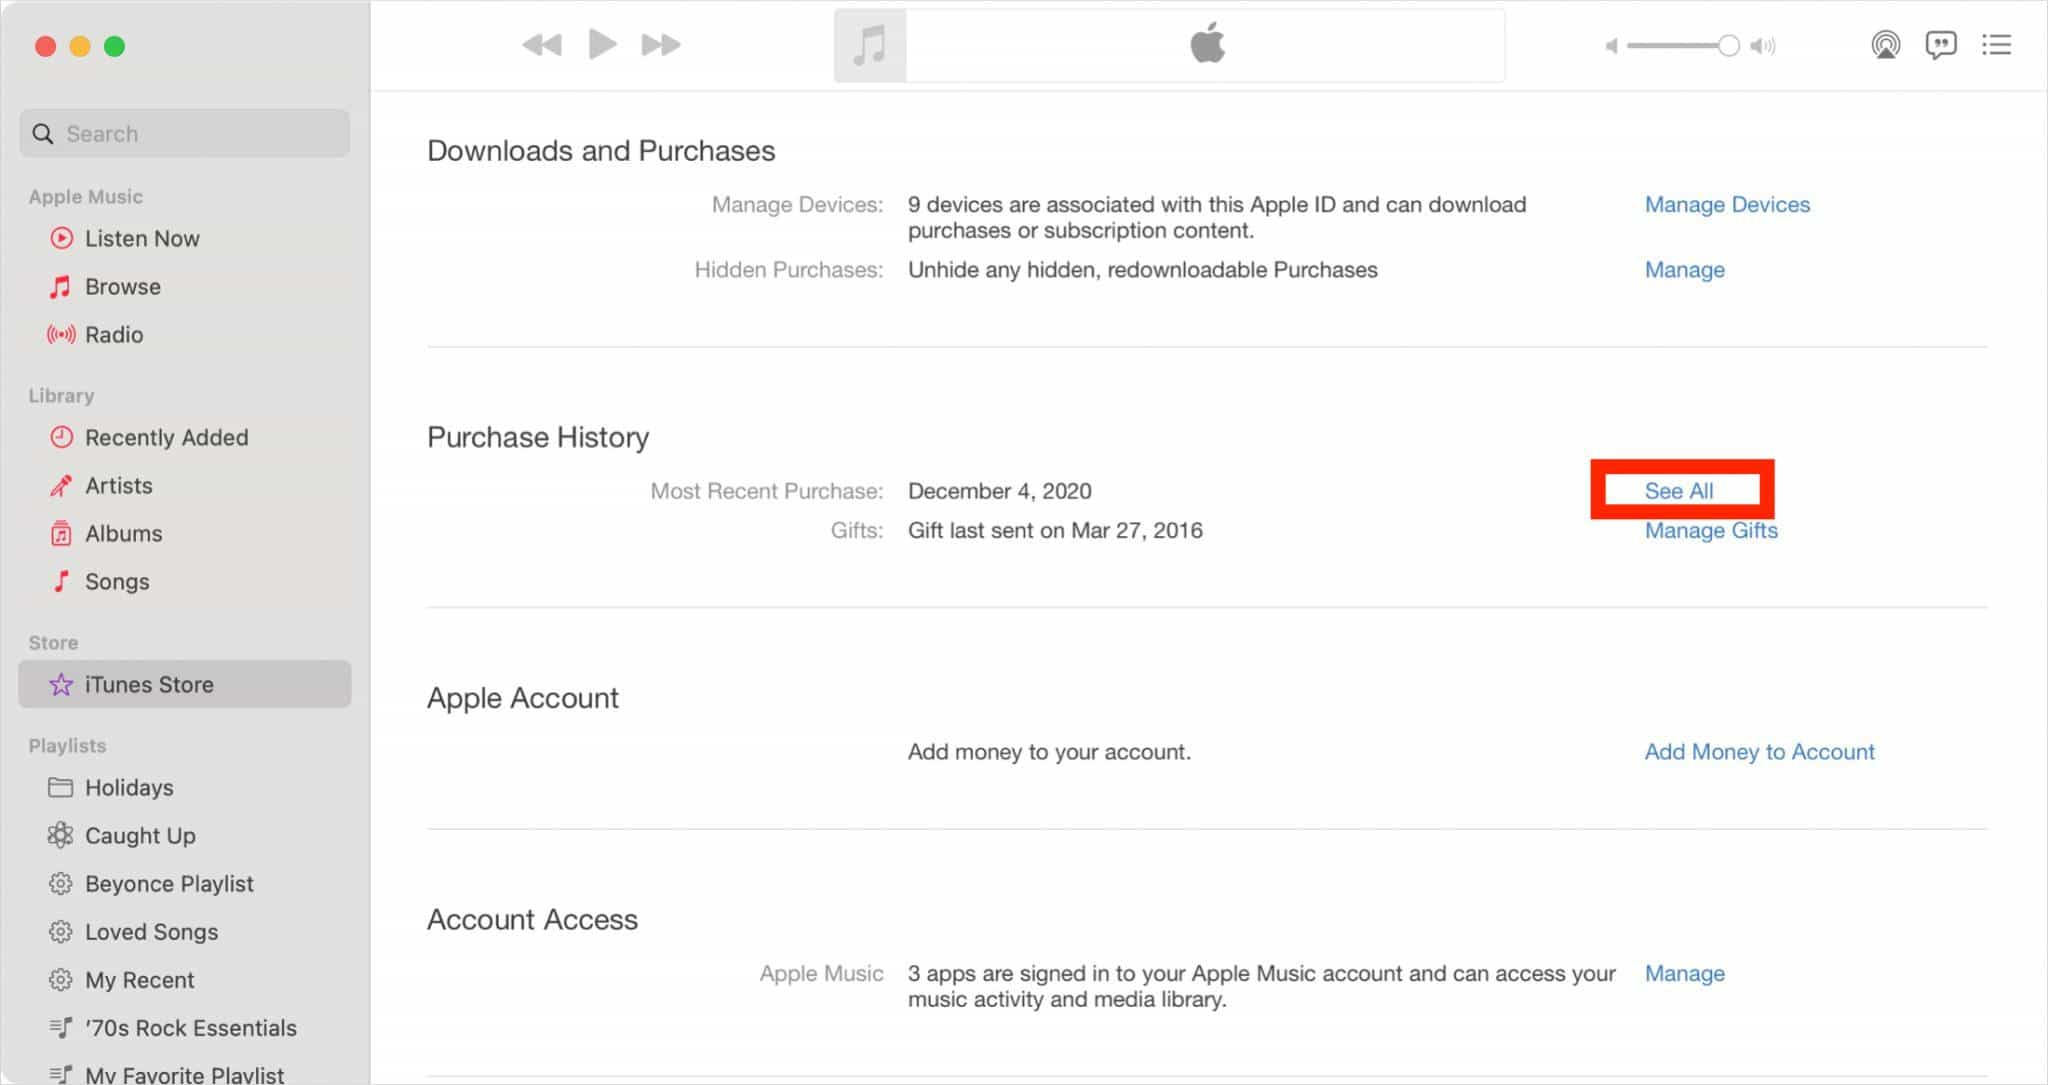
- On the Account Information page, scroll down to Purchase History. Next to Most Recent Purchase, click See All.
On Windows, and Mac with macOS Mojave or earlier, you should launch iTunes to check your purchase history.
- Click Account > View My Account, and then sign in with your Apple ID credentials to proceed.
- Once you are in the Account Information, proceed to the Purchase History section, and then make sure to tap See All.
Step 2. Make A Refund
All Windows and Mac users can do the process of how to get a refund on iTunes Music below.
- Click Select a range. Or choose Last 90 Days, then select a date range. It might take a moment for your Purchase History to appear.
- Search for the items that you wanted to refund and then you have to choose the More option.

- Once More is tapped, you will see a Menu, go and hit the Report a Problem option.
- Once you are on the Apple Report a Problem site, hit the Choose Problem drop-down menu, and then hit the I’d like to request a refund.
- Then you will encounter a Describe this problem text box, you then have to enter the reason why you are requesting for a refund, then tap the Submit option.
You have to take note that it will take a few days before you get an answer but once the pieces of evidence are enough, you will receive a refund, either or, you have to provide additional information to support the claim. It is also possible that your request might be denied.
Part 2. How to Get a Refund for iTunes Purchases on iPhone?
Another method how to get a refund on iTunes Music is through the use of your iPhone. You can also use an iPad if you want. The steps are also pretty simple, let us have a look at them.
- On your iOS device, open Safari. Then go to this site: reportaproblem.apple.com, you also have to get ready with your Apple ID credentials since you are required to sign in.
- Then once you are in the Report a Problem screen, you can hit the I’d like to drop-down menu, and then choose the Request a Refund tab.
- Then hit the Tell us more option, and then tap your reason for the refund that you wanted to make.
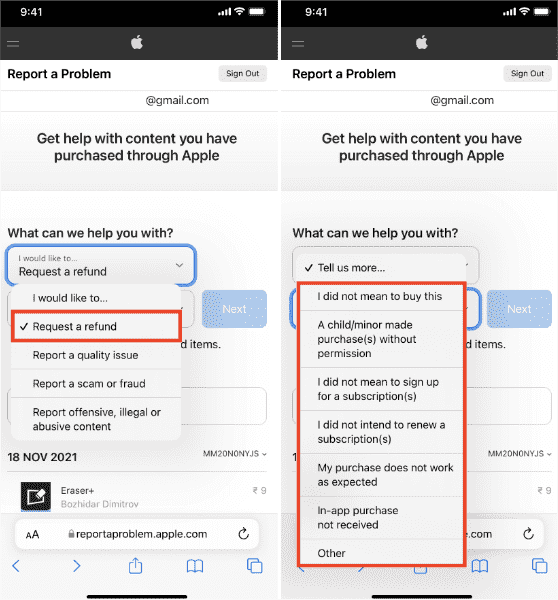
- Hit Next. You can then review the items that can be refunded, and look for the one that you aim to reverse. Hit it.
- Then choose the Submit tab.
You also have to note that all refund requests for iTunes App Store and Store must be made within 90 days after the date of purchase.
Part 3. Bonus: Enjoy Songs You Love Anytime!
With the shared procedure above about how to get a refund on iTunes Music, although the steps are not that complicated, it will still be a hassle to always ask for a refund. If people are to look for ways to enjoy listening to free music conveniently, there can be a lot of them that can be generated on the web. However, it will not be as easy as someone has imagined it to be. There can be a lot of limitations and these limitations can be some kind of hurdles that would make the process a little harder.
One of the best examples when it comes to having a hard time dealing with format compatibility issues is the Apple Music platform. Music tracks from the Apple Music app are protected by Digital Rights Management encryption which hinders people from illegally abusing the use of contents that are not their own. It also means that you cannot easily access the tracks and play them unless you are using an authorized device or are subscribed to the paid version of the platform.
But, there is no need for you to worry, we can do better! This time we are going to share with you one of the best tools that you can use. It is the best professional converter and an ultimate partner which can help you deal with all the compatibility issues which are possibly to occur. This professional converter is called the TunesFun Apple Music Converter.
To be familiar with how good the tool can be we have listed some of its well-noted features below.
- Through the use of the TunesFun Apple Music Converter it is now possible to delete the DRM encryption in songs from Apple Music giving you the freedom to access the song you love at your own convenience and without any restrictions.
- This professional converter can help you convert Apple Music songs to MP3, its supported formats include FLAC, M4A, AAC, WAV, and AC3.
- The TunesFun Apple Music Converter can help you buy all the time you need to do most of your treasured things while listening to music. With the help of this tool, you can enjoy one of the fastest conversion rates!
- If you have opted to use the TunesFun Apple Music Converter you can enjoy a lossless conversion process, all the files after the conversion will have the same quality as the original files while having original data intact such as metadata and ID tags!
- You can enjoy a very user-friendly interface that is also beneficial even for first-time users of the tool! The steps are simple, and you do not have to do a lot of things to have all your music files converted!
In order to prove this, let us have a look at the steps on how to use the TunesFun Apple Music Converter.
Step 1. Download and install the TunesFun Apple Music Converter on your computer, and then once installed begin adding the music files that you wanted to convert.

Step 2. Choose the formats of the files that you needed or wanted to have and then create a folder to save all the files after the conversion process.

Step 3. Hit the Convert button to finally enjoy all the songs that you love in flexible formats for easier access and transfer.

And there you are, with the help of the TunesFun Apple Music Converter, you can now enjoy good quality music that is DRM-free! With this, you can also play converted music files on any device and set up your Apple Music sleep timer with these converted files.
Part 4. To Summarize It All
We hope that we have helped you learn how to get a refund on iTunes Music. It is such a relief to have known all these ideas and methods especially if it will cost you a lot of money if the purchase is going to proceed. It is always better to have a backup method in case you have slipped your hand and mind and made a purchase that you are not ready for.
It is also a good thing to know more about TunesFun Apple Music Converter, this tool might be the answer to all your dilemmas in dealing with music incompatibility and might be the answered prayer of many who wanted to enjoy good music at a low cost.
 Home
Home
Leave a comment