A Detailed Guide: How to Get on Apple Music!
We are well aware of the fact that Apple Music is considered one of the most amazing subscription-based platforms alongside Spotify that’s offering a huge collection of songs (over 90 million). Packed with great features, a lot of music enthusiasts will love the services provided by Apple Music. If you aren’t sure how you can subscribe to one of the app’s paid plans, then you must read on and find out here how to get on Apple Music.
Launched in the year 2015, Apple Music has continuously gained great numbers of subscriber day by day. You can find classic songs as well as newly released and in-demand ones on this platform. Upon successfully finding out how to get on Apple Music, you’ll even get music recommendations that are tailored to your interests and music streaming habits. Additionally, you can get to listen to songs in offline mode and even take advantage of Siri’s assistance. Before we discuss the details relative to how to get on Apple Music, let’s start by presenting basic knowledge about Apple Music in the first part.
Article Content Part 1. Basic Information About Apple MusicPart 2. The Procedure of How to Get on Apple MusicPart 3. Keeping Apple Music Forever AccessiblePart 4. Summary
Part 1. Basic Information About Apple Music
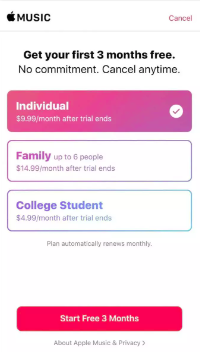
As previously stated, as we think it would also be good to share brief information about Apple Music before we move into checking how to get on Apple Music, we have this section of the article created. Unlike Spotify, Apple Music does not have a free version. But you don’t have to be sad about it. The platform is offering a free trial period that lasts up to 3 months! To enjoy this offer, all you have to do is just select a preferred plan and provide your payment details. After completing the trial period and you decided to continue, you can definitely do that! However, if you wish to opt-out, remember to do it before the cut-off so as to avoid the occurrence of charges on your billing.

At the moment, there are three paid plans that are being offered by Apple Music. It has an individual plan that is priced at 9.99 USD per month, a Family plan that costs 14.99 USD monthly, and a Student plan wherein one has to pay 4.99 USD per month. When subscribing to this Student plan, there are requirements needed to be met to qualify for the offer. If you are open to enjoying other Apple services, you can have them bundled with your Apple Music subscription.
Upon learning how to get on Apple Music (subscribing to one of the app’s paid plans), you’ll get to enjoy all the perks being offered by the platform including the ability to listen to tracks in offline mode as you can download the songs. However, once you cancel your subscription, the downloaded songs will vanish. So far, we believe we captured the basic things about Apple Music in this part of the article. Now, we will be moving into explaining the guide on how to get on Apple Music. Hop into the second part now.
Part 2. The Procedure of How to Get on Apple Music
We are now at the core of this article. In this part, you will finally learn the details of how to get on Apple Music using your iPhone or your computer.
Subscribing to Apple Music Using Your iPhone
If you would want to get an Apple Music subscription by using your iPhone, here are the steps of how to get on Apple Music that you must follow.
Step #1. On your iPhone, open the “Music” app.
Step #2. Sign up for the three-month free trial offer of Apple Music. If you can’t see it right away, head to the “Listen Now” or the “For You” section.
Step #3. Hit the offer and then choose one from the available membership plans. As previously stated, you can select from the Individual plan (9.99 USD monthly), Family plan (14.99 USD per month), or Student plan that’s priced at 4.99 USD upon providing the proof of your qualification to the offer.
Step #4. You now need to provide your Apple ID and password. If you don’t have one yet, creating one is easy. You just have to click the “Create New Apple ID” menu and just follow the on-screen instructions that you’ll see.
Step #5. You will also be required to confirm your billing details and select the payment method that you wish to use.
Step #6. To finally start the free trial, you just need to hit the “Join” option.
As simple as following the above method of how to get on Apple Music, you will be able to successfully subscribe to your chosen Apple Music plan! Now, what if you wish to use your PC? Of course, you can do that as well. Check out the process below.
Subscribing to Apple Music Using Your PC
With your computer, you can use the web or the iTunes app when getting on Apple Music. Both procedures will be presented here.
Using your Web Browser
Step #1. Open your PC and launch your preferred web browser. Head to Apple Music’s official website. A red banner shall be seen at the bottom of the screen.
Step #2. Hit the “Try it Free” button. You should sign in and continue using your Apple ID details.
Step #3. There are on-screen instructions that you have to follow. Simply select your preferred subscription plan.
Using the iTunes App
Here is how to get on Apple Music using the iTunes app on your PC.
Step #1. On your computer, open the iTunes app. Click the “Account” button and just log into your account by providing your Apple ID details.
Step #2. Hit the “Music” option next, then the “For You” button. To start with your free trial, tap the “Try it Now” option. To continue selecting your membership, just follow the instructions that are displayed on your screen.
The processes highlighted in this part of the article are detailed guides on how to get on Apple Music using your mobile gadget (iPhone) and your computer!
If you’re interested in learning how you can be able to keep your Apple Music favorites, you must continue reading the next part of this article.
Part 3. Keeping Apple Music Forever Accessible
Explaining how to get on Apple Music is the main agenda of this post. However, sharing with you how you can keep your Apple Music favorites forever is also a great thing to learn. Thus, we have this section created. If you’re curious about it, then keep on reading.
Though protected with DRM, there is still a great way of keeping your favorite Apple Music songs forever accessible on any device that you own. This is through the help of the TunesFun Apple Music Converter. This professional tool has the power to get rid of this encryption on Apple Music tracks and even aid in the conversion of songs to formats like MP3.
Actually, apart from MP3, there are other supported formats like FLAC, AC3, WAV, AAC, and more. This app’s conversion rate is 16x and ensures that the songs’ ID tags, metadata information, and original quality will be maintained. When it comes to installing the app, you won’t have any issues as it is supported by both Windows and Mac OS.
If you are also an audiobook lover, you should also be aware that this tool even does audiobook conversion! The interface of this app is so simple that first-time users won’t have any issues with using the app. Let’s take a quick look at how the transformation of tracks and downloading can happen with the help of the TunesFun Apple Music Converter.
Step #1. Install the TunesFun Apple Music Converter on your PC. On the main screen, start to preview and choose which Apple Music songs you’d like to process through the app.

Step #2. From the available output formats, choose your desired one. Modifying the output parameter settings at the bottom can also be done as you like.

Step #3. Tap the “Convert” button to finally start the conversion process. While the songs’ transformation is ongoing, the DRM removal process shall also be done at the same time.

Since the TunesFun Apple Music Converter is fast enough, you may expect that the transformed Apple Music songs will be readily available within just a few minutes – all free from protection!
Part 4. Summary
We finally learn how to get on Apple Music. You can do it via your mobile device or your computer. Just by following the procedures highlighted in the second part of this article, you’ll be able to successfully subscribe to your preferred membership plan. When it comes to keeping your Apple Music favorites forever accessible, always remember that you can use great apps like the TunesFun Apple Music Converter!
 Home
Home
Leave a comment