Let Us Discover How To Make Apple Music Shuffle Better
If you want a variety of songs you play and always listen to, it would really be annoying to listen to the same songs being shuffled back and forth. This is why it is necessary to know how to make Apple Music shuffle better, it adds the adventure and even the joy in listening to the music whatever mood you have. Also, listening to the same thread of music all over again for many days, or even months can really be so frustrating, imagine being able to memorize the next song that will automatically hit the play button!
Good thing, there are ways that we can do to make this stop, we just have to simply learn about how to get better shuffling for Apple Music. In this article, we are going to talk about methods and wise ways to stop Apple Music from repeating the same thread of music over and over again. We are also going to go about the possible reasons why such a scenario happened, this way we could learn how to avoid the same situation from happening again. In order to feed our minds, and make our listening experience better, let us hop on the article now.
Article Content Part 1. What Are the Reasons Apple Music Play the Same Song?Part 2. Let Us Find Ways to Make Apple Music Shuffle BetterPart 3. Choose What You Wanted to Play Anytime Anywhere!Part 4. To Summarize It All
Part 1. What Are the Reasons Apple Music Play the Same Song?
In every dilemma, there is a possible reason. And before we get to know how to make Apple Music shuffle better, let us first figure out what causes the issue that we are about to solve. With the help of knowing these things, we could make sure to avoid the same scenario from happening again.
There Are Not Enough Songs In The Library
Of course, one of the main reasons why you can’t have a good shuffle of songs is because there are also not enough songs in your library. If there are not enough songs, the tendency of Apple Music is to repeat the same songs over and over again. If you wanted to have a good mix of the songs, you should have filled your music library with at least 30 songs for Apple Music to shuffle.
Apple Music Had Adopted Your Habits
There are also reasons why the same thread of songs is being played on your music app. It can happen that the scenario has been based on your listening habits. One good example is, once you have skipped a song that you do not feel like listening to on a particular day, the algorithm might choose not to play the same song as often. And this will lead to the playing of the other favorite songs you have on your device.
The Repeat Mode Is Enabled
Another simple reason is that you have enabled your Repeat Mode. To those who are new to using Apple Music, it has playback modes that you might not want to use in case you are shuffling your library and playlist. One of them is the Repeat Mode.
The Algorithm Of Apple Music
For all we know, all streaming services like for example Apple Music do not do a totally random shuffle. It uses an algorithm that determines the songs that the user would likely listen to. Then once they are played, they will be repeated based on your habits of listening to songs.
Part 2. Let Us Find Ways to Make Apple Music Shuffle Better
It is a good thing to have been aware of the reasons why Apple Music keeps playing the same thread of songs all the time. Now, it is a better thing to do to finally identify the methods on how to make Apple Music shuffle better, and we have listed some of the things that you can do if you are tired of your usual music routine all the time.
Try to Mess Up with Apple Music’s Algorithm
One of the reasons why there is not a good thread of songs on your playlist is because of Apple Music’s algorithm, and the best thing that you can do in order to address it is to do some messing up with the algorithm. Well, it is not that complicated to do, you can try to skip some songs that you usually listen to, and by doing this, Apple Music’s algorithm may find ways to relearn your listening habits. It is a way that you are teaching the algorithm of the songs that you would like to listen to at the moment. It is one of the most effective ways that you get to listen to songs that you have not heard in a while and have them on your new listening routine. We also have the steps on how you can do it, below.
- On your phone, go and start launching the Apple Music app.
- Go and choose a playlist, and then you can start playing the songs on shuffle mode.
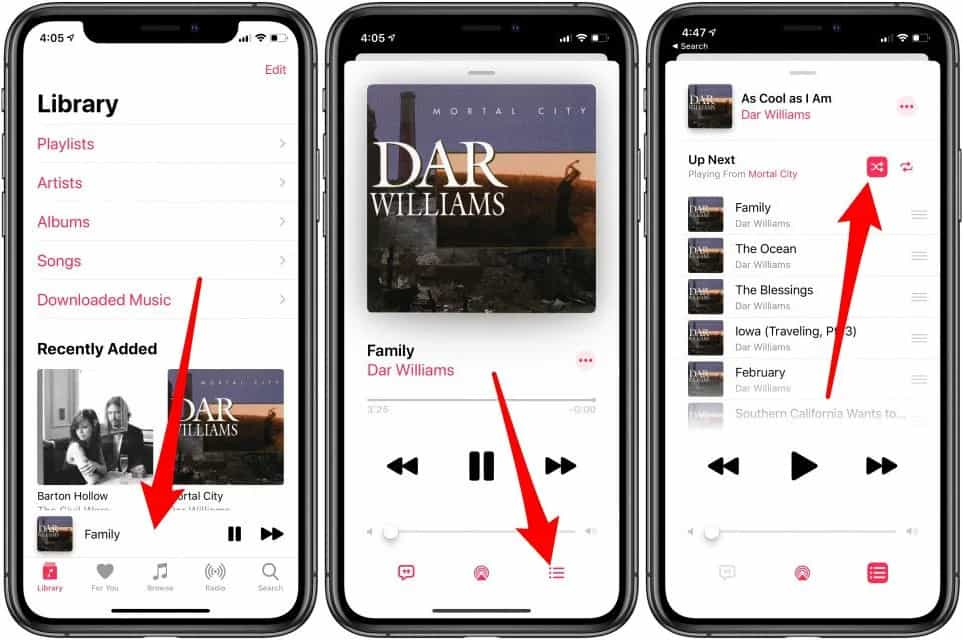
- Once a chosen song is finally playing, you can skip to the next song.
- Then in case you encounter familiar songs along the way, you can skip them again.
- And then you can keep the songs that you seldom listen to and then you are done.
You have to know that this method would not take effect as soon as possible, the said scenarios must be repeatedly done to finally hear different songs playing.
Begin To Change The Playback Order Of The Songs
Another fix that you can do how to make Apple Music shuffle better is to change the playback order of songs. It is also one way to refresh the existing algorithm of Apple Music. Apple Music app is getting a handful of tiny updates with iOS 16 one of which is a playlist sorting feature. In iOS 16, you can now rearrange songs that are present in a playlist on Apple Music according to your preference.
Some may think that there is no sense in changing the playback order of the songs since the mode will be on shuffle, however, once you reorder your songs it will create a prompt and have Apple Music recreate the shuffle list once more, having you enjoy some songs that you do not usually listen to. In order to change the playback order of your songs you have to:
- On your device, begin to open the Apple Music app.
- Once the app is open, go to the Home Screen.
- Go and choose a playlist from your library.
- Tap the option to sort your library by choosing the “Sort By” option.
- Then you can now choose the Playlist Order option.
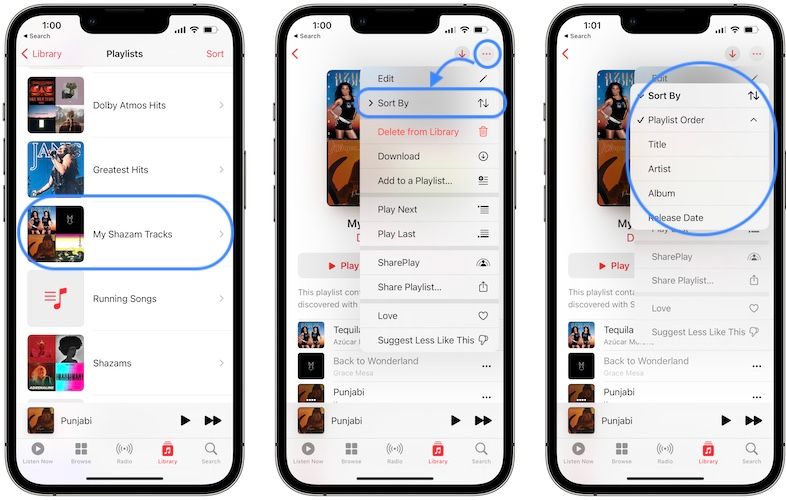
It is also possible to interchange the order of the songs by dragging a couple of these songs around, and by modifying their order on the list.
Make A Smart Playlist
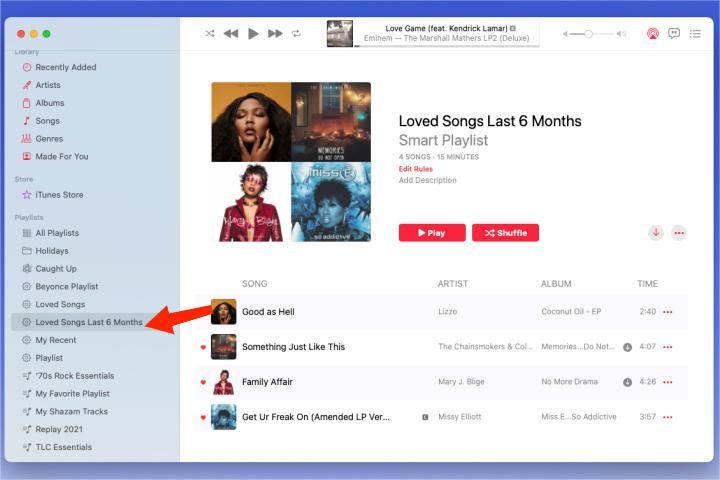
If you are still looking for ways how to make Apple Music shuffle better, you can try to create a smart playlist. It is one of the excellent ways to manage all the songs that you have in your library. Unlike if you have regular ones, which you have to manage manually. In smart playlists, they will be updated automatically if you start adding songs to your library. In order to create a smart playlist on your Apple Music account, here’s what you have to do:
- Open the Apple Music app on your Mac, click File > New > Smart Playlist.
- Once you create the new Smart Playlist, it’s time to figure out what criteria you want to use. To specify the criteria of your Smart Playlist, click the pop-up menus to select Genre, Contains, and Name of the singer.
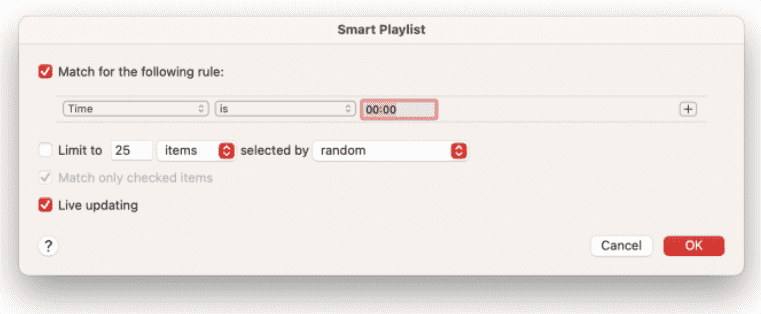
- To set a limit for including the number of songs, click the checkbox next to Limit and select the dropdown menus to choose the number of items.
- Update the playlist on its own, you can click the Live updating feature.
- Once you have entered the rules, tap Ok and then type the name of your new playlist.
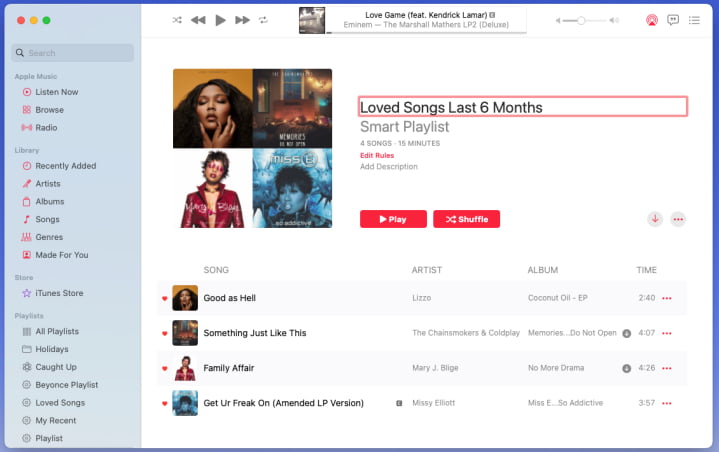
- Your Smart Playlist will be displayed on the left menu under Playlists.
Part 3. Choose What You Wanted to Play Anytime Anywhere!
To many people, music has been a way to release what they feel and express them through musical emotions. This is one of the primary reasons why many people are hooked on accessing music conveniently anywhere they are going to be. But, nothing is free in this world, and even if music helps you, there are restrictions that might be the cause of your hurdles along the way. In addition, if you do not have control over your music, it would be hard to set up the songs that you wanted to play, this is why it is necessary to know how to make Apple Music shuffle better.
One of the common hurdles is DRM. A long-time listener of Apple Music would know that Apple Music tracks are encrypted with Digital Rights Management, which makes the accessing and transferring of music tracks almost impossible unless you are an Apple Music subscriber or you own an Apple-authorized device and are connected to the internet. But, you are still reading this article because we know that you are aiming to look for the most convenient way possible to access these music tracks, and we will not let you down.
We have a professional tool called the TunesFun Apple Music Converter. This professional converter is reliable and one of the very efficient converters in the market. It can do a lot of things that you would not think are still possible to do. To help you understand, we have listed some of the best features of the TunesFun Apple Music Converter that you will love.
- You can convert Apple Music tracks to various file formats like MP3, MP4, AAC, FLAC, WAV, and a lot more. It is now possible to access your favorite music tracks on any device you own without worrying about any file format incompatibility anymore!
- Delete the Digital Rights Management encryption, of your tracks from Apple Music through the use of this tool! Once DRM is deleted, you can now access your most loved songs anytime, even without subscribing to Apple monthly music plans. It must be noted that songs will be used for personal purposes only.
- This professional converter can help you convert your files as fast as possible! Yes! With the use of TunesFun Apple Music Converter, it is possible to enjoy a faster conversion rate that would buy you time to do other essential things that you need. It can even support batch conversion as well.
- Even if the process is at a fast rate, no quality of files will be compromised. The quality will remain good as the original file, and original information like metadata and ID tags will be kept as well.
- The TunesFun Apple Music Converter is easy to use and has a very simple interface. Even beginners in using the professional converter will be so happy using the tool itself. Let us make ourselves familiarized with the steps below.
Step 1. Start downloading and installing the TunesFun Apple Music Converter on your personal computer.
Step 2. Choose the Add Files button to import the files, or you can use the drag-and-drop method to have the files on board. There is also an option to use the URL of the tracks and have it pasted on the TunesFun Apple Music Converter’s interface.

Step 3. Choose the format of the output that you need, and then once you have set the format, make a folder where you are going to save all the files that you need to convert. You can name the tool based on your preferences, you can also use names that are related to the contents of the folder.

Step 4. You now have to hit the Convert tab to finally proceed with the conversion of files.

Step 5. In a few minutes, you will finally have the DRM-free music that you want. You can always look at the status of the conversion process at the main interface of the TunesFun Apple Music Converter.
Part 4. To Summarize It All
These days, it is important that you are aware of the many things that you can do to make your listening experience better. One of which are the methods about how to make Apple Music shuffle better, which we hope have been answered by the previous parts of the article as discussed. Also, we can always use the TunesFun Apple Music Converter to help us enjoy the songs we love in any order we want, at any time we felt the need to listen to them.

Leave a comment