How To Set Custom Ringtone On iPhone (Tutorial Guide)
Ringtones are already a part of our daily lives. They have evolved throughout the years. Gone are the days that you hear a beeping sound ringtone or a Nokia-based tune. Today, in this high-tech world, MP3, AAC, and WAV are the sound format of choice for ringtones. They realistically convey the music or sound you want. Consequently, do you want to know how to set custom ringtone on iPhone?
An iPhone has unique steps in setting their custom ringtone and they will all be discussed here. However, it’s best you know some history about ringtones and how Apple phones are different. With this, you can grasp the idea on setting custom ringtone on iPhone better. Consequently, please note that you can only set custom ringtones using unprotected songs.
With that being said, would you also like to know how to set an Apple ringtone using protected songs? The following parts will lead you to this.
Article Content Part 1. Different Ringtone Formats Throughout the YearsPart 2. How to Set Custom Ringtone on Your iPhonePart 3. How to Set an Apple Ringtone Even for Protected SongsPart 4. Summary
Part 1. Different Ringtone Formats Throughout the Years
Have you seen an analog mobile phone? How about a pager? These communication devices simply use beeps or tone pulses as ringtone. The tone making device is usually a transducer that converts electrical energy to sound. They’re usually simple as they don’t need any kind of file to play their tones.
However, when digital technology arrived, things became different. The old Nokia phones can attest to this. They had their own ringtone composer on their phones. These ringtones can be shared with others. The format was called Ringtone Text Transfer Language.
Fast forward into the future, the MIDI (Music Instrument Digital Interface) file format became more popular on mobile phones. You’re able to simulate musical instruments with this, and this can be used as your ringtone. Some BlackBerry models as well as Japanese phones carry this feature.
Today, you could carry more information and data on your phones. MP3 and WAV files are the file format trend on your phone’s ringtones. The iPhone has their own file extension for this called M4R. M4R is still basically an AAC (Advanced Audio Codec) format which is a more advanced version of MP3.
Now that you know the different ringtone formats, it’s time to know how to set custom ringtone on iPhone.
Part 2. How to Set Custom Ringtone on Your iPhone
Convert Song Files into AAC Via iTunes:
- First, you’ll have to have iTunes if you’re using a PC, or Music if you have a Mac. If you don’t have iTunes, you can download it in the Apple website. Mac users should have Music installed by default if they have Mac OS Catalina or higher.
- Next, have your songs ready. It could be any format that iTunes or Music recognizes. It could be a WAV or an MP3 file for example. DRM’ed music cannot be used.
- Transfer these songs to your Apple Music Library by dragging and dropping them in the iTunes or Music window while you’re in the Library tab.
- Set your Converter settings by going through Edit -> Preferrences (in iTunes) or Music -> Preferences (in Music). In the General Tab, choose Import Settings…
- Choose Import Using AAC Encoder then press OK.

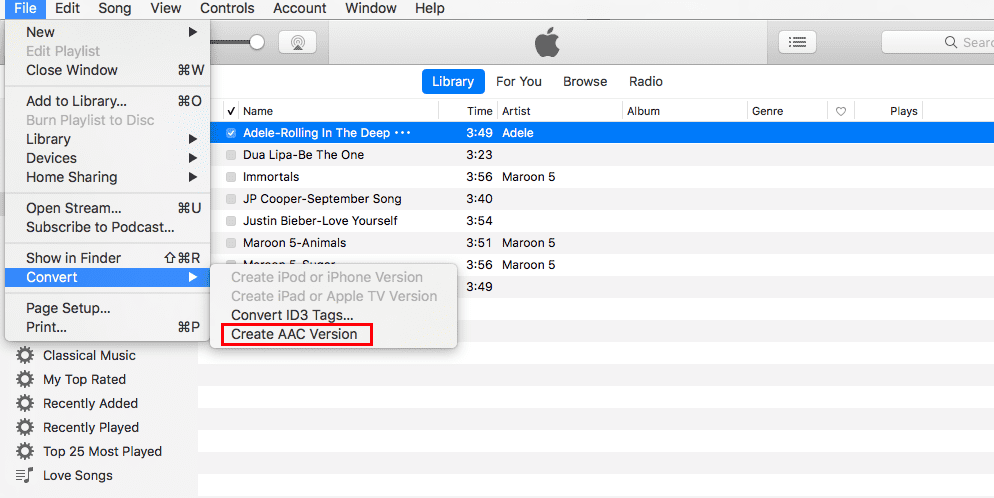
- Proceed to go to your song in your Library. Press the 3-dot menu then choose Get Song Info.
- Go to the Options tab. Set the start and stop time to be only less than or equal to 30 seconds. iPhone ringtones have this limit. Press OK to continue.
- While your song is still selected, go to File -> Convert -> Create AAC version.
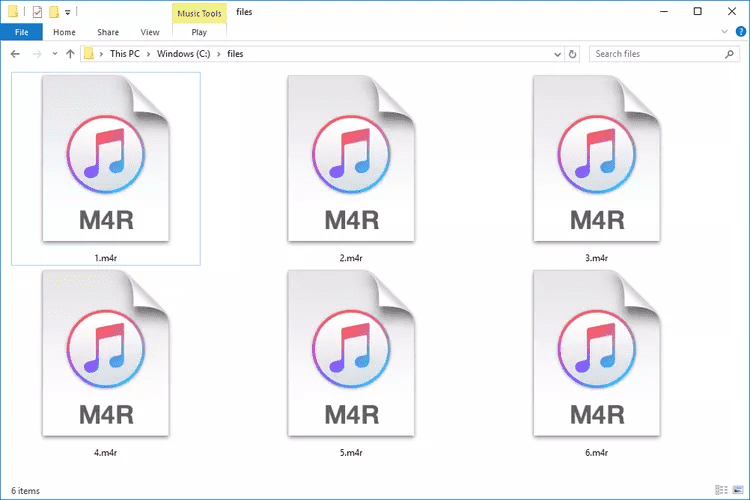
Edit the file extension to be compatible with the iPhone ringtone format.
- Open an Explorer or a Finder window.
- Drag and Drop the converted file from iTunes or Music into the Explorer or Finder window.
- Change the file extension to .m4r.
How to set custom ringtone on iPhone when you have downloaded these M4R music files? Follow the below steps:
Transfer the Ringtone to Your iPhone:
For iTunes:
- Plug-in your iPhone to your PC using your USB cable.
- Click the Devices icon on the upper right.
- Under Devices, go to your phone, then go to Tones.
- Drag & Drop the .m4r file from the Explorer window into Tones .
For Music App:
- Plug-in your iPhone to your Mac using your USB cable.
- Open a new Finder window. On Locations, go to your Phone.
- Drag and drop the .m4r file from Finder to any part of your Phone Finder window.
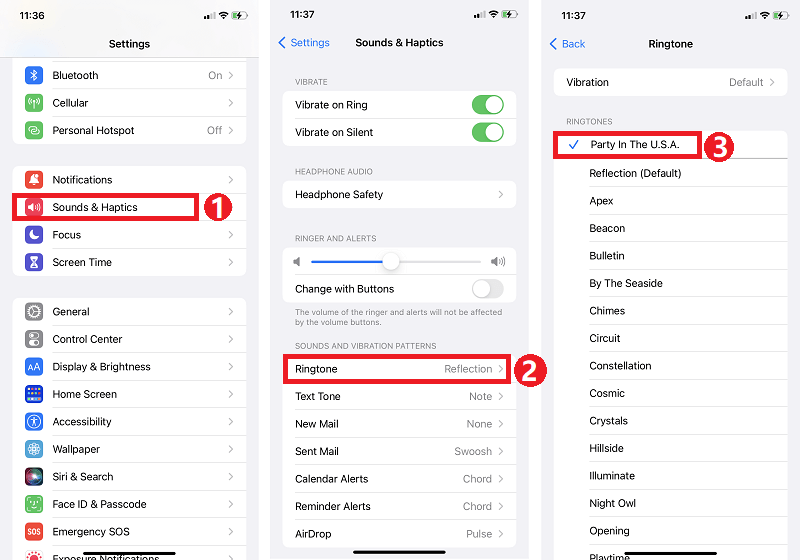
That’s it! Once you’ve saved the file on your iPhone, you just need to select it as a ringtone source. Simply go to Settings -> Sound -> then choose your song from Ringtones.
You’ve just learned how to set custom ringtone on iPhone. The next part will help you how to set custom ringtones even with protected songs.
Part 3. How to Set an Apple Ringtone Even for Protected Songs
After learning how to set custom ringtone on iPhone, it’s time to set ringtones even for protected songs. With this, you’ll need an Apple Music Converter Tool. The tool you’ll need is the TunesFun Apple Music Converter.
Since Apple Music songs are protected, you need an app that can easily deal with the removal of this protection. This TunesFun Apple Music Converter is a very capable app that can do the Apple Music DRM removal procedure with ease. Apart from the DRM removal feature, this app also has the feature that allows its users to convert Apple Music songs to MP3, its supported formats include FLAC, M4A, AAC, WAV, and AC3.
Using this TunesFun to convert and download your Apple Music favorites will lead you to the best output files because the 100% original quality of the songs will be maintained alongside their metadata information and ID tags.
It’s so easy to use TunesFun Apple Music Converter. See the steps below:
- Download and install TunesFun Apple Music Converter. PC and Mac versions are available.
- Launch it right away. On the main screen, you will see the option to add the songs to be converted. Alternatively, you can drag and drop them as this is a more efficient method. This app also supports batch conversion.

- Choose the output format and desired output location. How to set custom ringtone on iPhone? You should choose the MP3 format.

- Next, download the tracks by pressing the software’s “Convert” button on the interface of TunesFun. Wait for the process to complete. After that, you can go to the selected destination folder you have chosen in Step 3 to view the files you have grabbed from Apple Music.

The converted files made by TunesFun can be played with different kinds of media players. You can transfer them to an MP3 player or burn them to a CD. The possibilities are endless in using this converter tool.
Part 4. Summary
You’ve just learned how to set custom ringtone on iPhone. You’ll need iTunes or the Music app for this. You’ll need to cut-down your song into a 30 second sound clip and convert it into AAC. After that, rename the file extension, and then transfer it to your iPhone.
However, this method only works for unprotected songs in Apple Music. Consequently, you’ll need a reliable Apple Music Converter to set protected Apple Music songs into an Apple ringtone. With this, you’ll need the TunesFun Apple Music Converter. TunesFun Apple Music Converter can easily convert your Apple Music songs into standard music format.
 Home
Home
Leave a comment