Start Learning To Make And Set Your iPhone Custom Ringtone!
We can’t deny the fact that using an iPhone as a mobile device will always be a good idea. From its release in the year 2007, it has gained enormous popularity making it considered one of the most used and most popular mobile gadgets in the current generation.
When talking about iPhones’ tones, you are probably in the same situation as the user who feels default ringtones boring that’s why you’re here and are reading this post. We can’t blame you if you are also thinking of finding out how to create and set up your iPhone custom ringtone. Probably, within a crowd of people who are mostly iPhone users, you found it annoying that almost all of you are using the same tones making it confusing every time a notification is received by one device.
Don’t worry, here, you will be learning the easy method of creating and setting iPhone’s custom ringtones. The steps you have to accomplish are actually pretty easy. Let’s finally devour each now.
Article Content Part 1. How to Make or Create iPhone’s Custom Ringtone?Part 2. How to Use DRM-Protected Apple Music Songs as iPhones’ Ringtones?Part 3. Summary
Part 1. How to Make or Create iPhone’s Custom Ringtone?
For you to finally have an iPhone’s custom ringtone, you must accomplish three easy steps. All these will be explained in this part of the article.
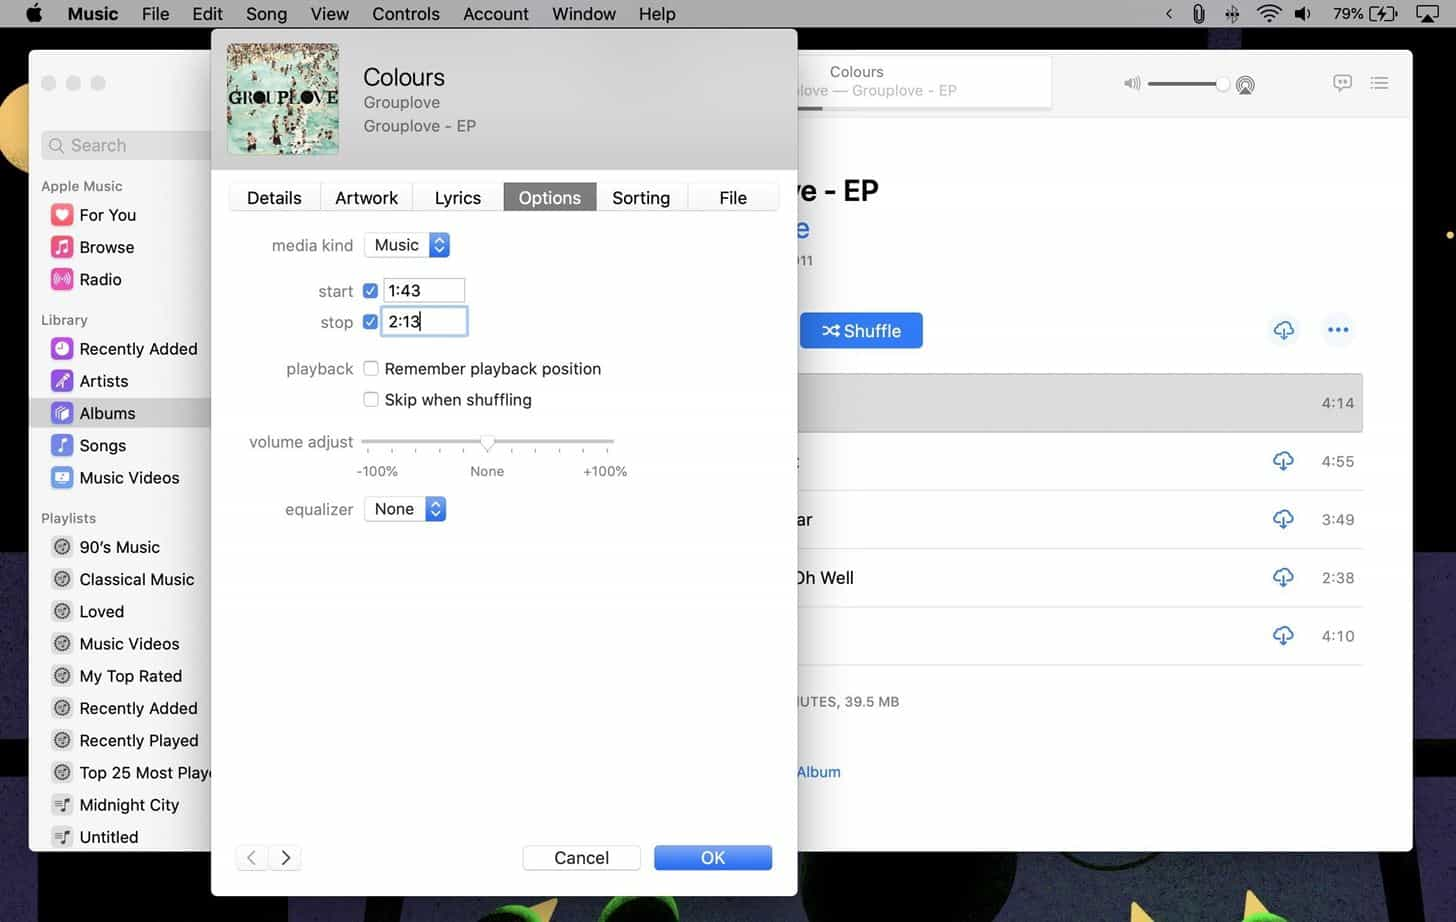
Step #1. Prepare the Track or Tone You Wish to Use
The first vital step of creating your iPhone custom ringtone is to select a certain track or tone that you’d like to use on your device. It could be an MP3 file that you downloaded from the web or a song that’s already available on your iTunes or Apple Music library. Just remember that in this case, you can only use those that are free from DRM protection, else, it won’t work.
- Open iTunes or Apple Music app on your computer.
- Right-click on the song you want, and from the options shown, choose the "Get Info" button. Head over to the "Options" menu.
- Once the file to use has already been made available, it is a must that the audio file is trimmed to 30 seconds. From here, you’ll see the "Start" and "Stop" menus. Choose time parameters for the song. After accomplishing this, just click the "OK" button.
- After finishing the above, tap the "File" button followed by the "Convert" option. Select the "Create AAC Version". This option creates a copy of the ringtone-sized song in AAC.

- The AAC file will be added directly under the original. Just have this dragged to your PC’s desktop or any folder you’d like to use.
- Afterward, delete it from your Apple Music or iTunes library. Also, head back to the original song and remove the time setting.
You can also consider using the GarageBand app instead to customize a song as a ringtone. GarageBand is a great way to quickly create music on your iPhone or iPad. You can download GarageBand for iOS from the App Store.
Step #2. Changing the File Extension
The second step that you have to accomplish when creating your iPhone custom ringtone is to modify the audio files’ extensions. After making sure that they are already in AAC format, it is now time to label them as ringtone files. Just simply look for the files on your PC, and rename it. Their extensions must be changed from M4A to M4R. You can do this by just right-clicking on the file, and selecting “Rename” afterward.
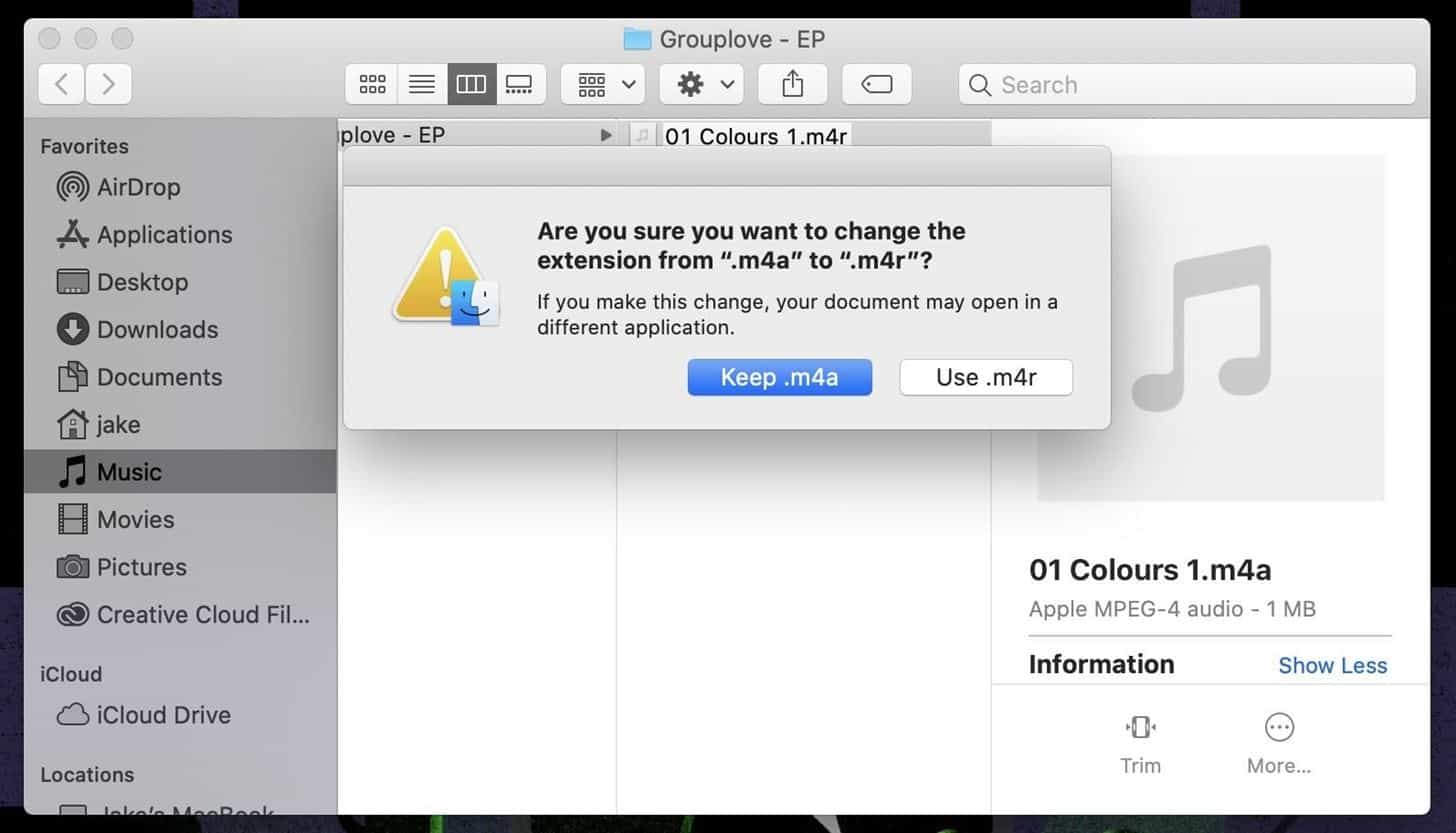
After accomplishing it, the files should display the M4R file extension already. What is now left to do is to sync them to your iPhone.
Step #3. Syncing the Audio File to iPhone
Since the audio file to be used as your iPhone’s custom ringtone has now been made available, what is left to do is get it synced to your iPhone. You must have a USB cable. Connect your iPhone to your PC. On the Music app, drag and drop the audio file into your iPhone under Devices and just hit the "Sync" button. Once it's finished, you'll be able to use your ringtone right away.

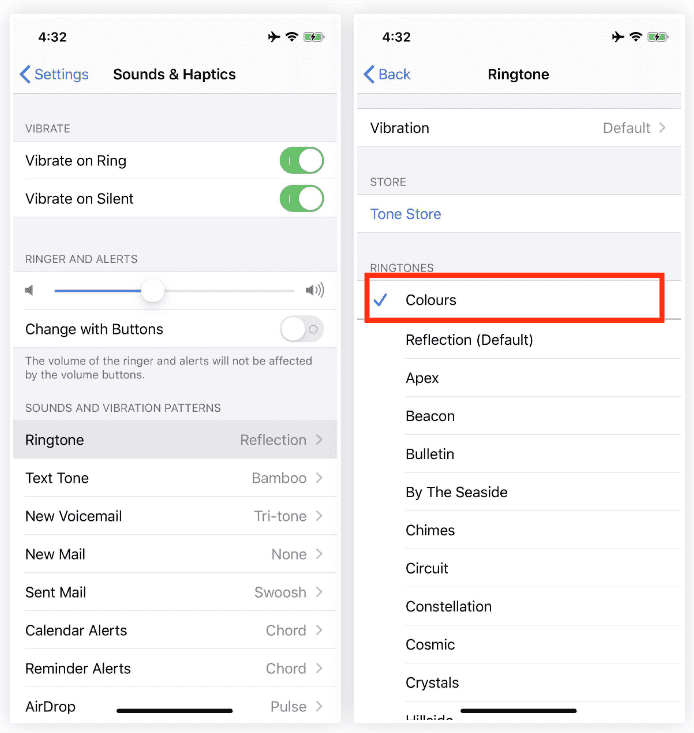
Step #4. Set Your Ringtone on Your iPhone
Once the above has been done successfully, open your iPhone, then head over to "Settings", choose "Sounds & Haptics", and then choose the imported M4R ringtone from the "Ringtones" option.
And, that’s it! That’s the simple process of making an iPhone’s custom ringtone!
Part 2. How to Use DRM-Protected Apple Music Songs as iPhones’ Ringtones?
The method of how to create an iPhone’s custom ringtone is easy if you are to use audio files that are free from DRM protection. However, the most popular and newly released ones are often found on music streaming platforms like Apple Music and thus, are protected. How can you be able to use them as your iPhone’s custom ringtone then? Well, this is also easy!
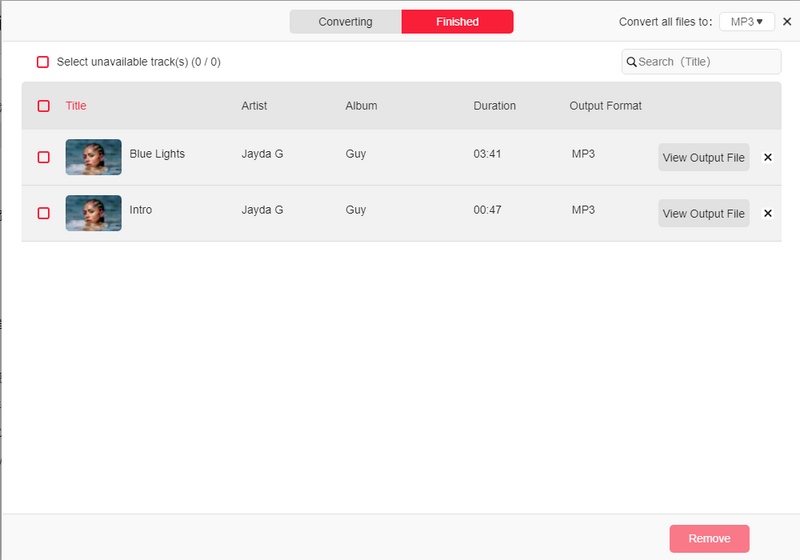
When dealing with DRM-protected Apple Music songs, to be able to use them as your your iPhone custom ringtone, what you need to do is remove the protection they have via professional and trusted tools like TunesFun Apple Music Converter. It is indeed capable of doing that!
This software app supports various output formats – MP3, FLAC, and AAC, just to name a few, making the output files playable on any device and media player. For example, you can stream Apple Music on Roku TV, Apple TV or smart speakers like Alexa.
It works fast enough and even supports converting files in batches. With its 16x conversion rate, one would really feel the efficiency to use this tool over others. All ID tags and metadata details of the songs shall also be kept alongside their original quality. More so, the app is compatible with both Windows and Mac so installing it won’t be an issue at all!
Of course, even beginners would find it easy to navigate the functions of TunesFun Apple Music Converter given that the keys are only simple. Let’s get a quick run-through of the vital steps needed to be performed when using the TunesFun Apple Music Converter to download the Apple Music songs.
Step #1. After installing the TunesFun Apple Music Converter, open it and start to preview and choose the Apple Music songs to be processed.

Step #2. Choose an output format to use and just alter those available output parameter options at the bottom of the screen as you wish.

Step #3. Hit the “Convert” button to begin the conversion of the selected audio files. The DRM removal process shall also happen at the same time.

Step #4. Once the M4A files are available, you can just change the extensions of those files to make them compatible as ringtones for iPhones. Also, make sure to edit them first as you are only allowed to use audio files that are 30 seconds in length.
Part 3. Summary
Whether you are eyeing to use DRM-free or DRM-protected audio files as your iPhone custom ringtone, the steps you have to accomplish are pretty simple. Just remember that in the case of using the protected ones, don’t forget that using tools like TunesFun Apple Music Converter would always be the recommendation!
 Home
Home
Leave a comment