2025 How To Delete A Playlist On iTunes?
There can be a lot of possible reasons why Apple Music users would want to know about iTunes delete playlist. It is possible that you do not like the songs or playlists that you have on your device anymore, it can also happen that there is a dilemma why you cannot delete your playlist, or there are errors encountered in between.
In this article, we are about to discuss iTunes delete playlist, we are also going to talk about the methods and the ways to properly delete the said playlists as well. Let us go into the body of the article and discuss the things that we have to do in the long run.
Article Content Part 1. What Are The Methods To Delete Playlists On iTunes?Part 2. Bonus: Download All Your Most Loved Apple Music Tracks EasilyPart 3. To Summarize It All
Part 1. What Are The Methods To Delete Playlists On iTunes?
Let us start our discussion and talk about iTunes delete playlist, we have different methods to do it. We are going to itemize the steps one by one depending on the applications and devices we have.
Delete the Playlist Using iTunes 12 Or Newer
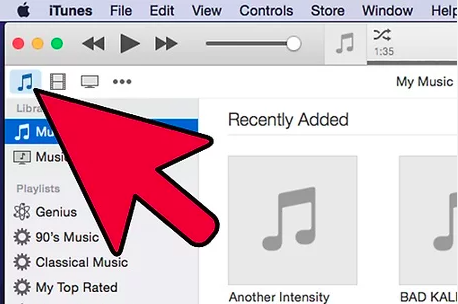
- To begin, once you click the music note it will switch your iTunes app to Music view. This will also reveal all the playlists that you have created same as the ones that Apple provides with the provision of the default setting.
- You will then see the iTunes playlists on the other side of the screen. Once you click one song, it will highlight the said selection and will show all the songs that it contains.
- Then in case you have the Delete button you can now start deleting the playlist by clicking it, and then pressing Delete. Then iTunes will start to ask you to confirm whether you really like to delete the playlist or not. If you go through iTunes delete playlist, it will not delete any song you have stored on your computer. In case you are using a mouse with a single button, hold down the Control button, and then click it. If you have a two-button mouse, you can also use the right-click command.
Delete Playlist Using iTunes 11 Or Older
- On the left side of the screen, search for your playlists.
- Then go on and choose the playlists that you wanted to delete, and then right-click on them, and then choose the option Delete. You can also press the Delete key on your keyboard once you have selected a playlist to delete. Then you have to hold the Control button, and also click if you are using a mouse with one button.
Delete Playlists Using Your iPod
- To start, launch the Apple Music app on your iPod. You can see the music app as a musical note in an orange box icon.
- At the bottom part of the screen, you will see categories like Artists, Songs, Radio, Playlists, and a lot more. Then you have to tap Playlists in order to view the lists of songs that are stored on your iPod.
- Then choose Edit, and then tap the chosen playlist that you wanted to delete.
Delete Songs From Playlists
- To begin, you have to tap the playlists in order to show all the contents. You have to take note that iTunes arranges its songs in alphabetical order, in case you wanted to easily find the playlist that you wanted to delete you can group them by Artist or by Album.
- Go and hold control, and while you are holding it, go and choose the songs that you wanted to delete. If you are using a Mac computer, instead of Control you can use the Command button on Mac.
- To remove the songs, you have to tap the Delete key.
Backup Your Playlist
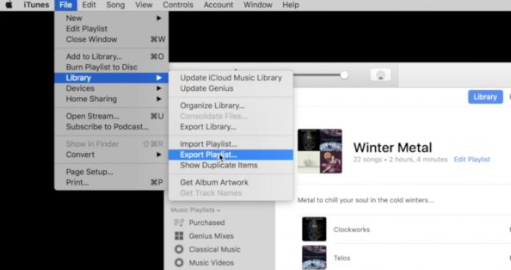
- Go and choose the playlist that you wanted to back up. As we all know iTunes provides a list of commands that will let you duplicate, restore, and backup your playlists. You can do it by finding some of these commands, and by right-clicking on them. You can also see the other ones in the File Menu.
- To back up your playlist, click File, then Library, and then the Export Playlist option. You also have to take note of where you have saved your exported playlist since you will need these files once you start deciding whether you would like to restore your playlist.
- Then to restore your playlist, you have to click File, and then the Library option, and then the Import Playlist option. You have to point iTunes to the location where the exported playlist is there. Choose Playlist, and then tap Open or you can also press the Enter tab.
These are only some of the methods for iTunes delete playlist that you should have known. If you went through the web and search for other methods for iTunes delete playlist, there are a lot of things that you will discover.
Part 2. Bonus: Download All Your Most Loved Apple Music Tracks Easily
It is necessary to know about iTunes delete playlist, or the methods of how to delete a playlist on iTunes. This will help you manage your Apple Music library better as well as help in making sure that you would not have any problems when it comes to the lack of space, in case.
Apple Music has been one of the town talks when it comes to providing a reliable source of music that the common people would love to listen to. It is one of the most successful and popular online music streaming sites a lot of people are engaged in these days. Well, with the features of Apple Music, it has no doubt these things became possible. It has a vast music library a lot of people would want to listen to. But songs or music tracks from Apple Music are not common, they are hard to access because of their file type and because of DRM encryption.
This is one of the primary reasons a lot of Apple Music users would want to look for alternative ways to access Apple Music tracks. And of course, one of the factors that you have to consider in looking for it is the level of difficulty in usage. This is why the use of professional converters like TunesFun Apple Music Converter would be of great help. This tool is amazing in so many ways, and more so when it comes to providing solutions for easy access to Apple Music. The TunesFun Apple Music Converter can be used to:
- Convert Apple Music tracks to more versatile file types like FLAC, MP3, WAV, AIFF, MP4, and a lot more. This will help solve problems with format incompatibility.
- Remove the presence of Digital Right Management or DRM encryption in music files so access to it while using non-Apple devices would be a lot easier.
- Save huge amounts of energy, time, and effort with the fast and convenient way of converting your music files. It can convert your music files at a faster conversion rate helping you be more productive than ever.
- Enjoy the best quality files, with the help of the TunesFun Apple Music Converter. Even if the process is short, and brief, the conversion process will let you enjoy the quality of files that is almost the same as the original one. Also, keep ID tags and metadata if you want.
- Use the very sleek and smooth interface of the TunesFun Apple Music Converter. The interface is simple, and a lot of users would easily understand the procedures they have to take to be able to proceed with the conversion of their music files. We have also listed the steps on how to use the TunesFun Apple Music Converter, and you can see them below.
Step 1. Start to download and install the TunesFun Apple Music Converter on your Windows or Mac computer. Be ready to tap the Add Files option and then import all the music files that you need to convert.

Step 2. Select the file types that you need or want, and then create a folder where you are going to save the files that you have already converted using the TunesFun Apple Music Converter.

Step 3. For the third step, you have to tap the Convert tab and wait for a few minutes until the conversion has fully taken place.

You can also see the status of the conversion of files at the main interface of the TunesFun Apple Music Converter in case you wanted to have it monitored.
Part 3. To Summarize It All
There are lots of places to be when it comes to music. It will bring you peace and will bring you to places you love as well. We hope that we have shared valuable knowledge about iTunes delete playlist and that you can have all of these as your guide in case you have to delete one. Also, it would always be recommended to use the TunesFun Apple Music Converter when it comes to making sure your Apple Music files can be accessible as you have ever imagined.
 Home
Home
Leave a comment