Tips On Using iTunes And How To Create AAC Version
iTunes has been a known platform that specializes not only in being a media player but also an app that does file management and organization functions. Being an app that’s both beneficial to Windows and Mac users, there is no doubt iTunes still plays a big role in our lives.
If you have been using the iTunes app for some time now and you wish to find out more about what it actually offers, it will then be good to discuss iTunes and how to create AAC version in this article. Little did you know, iTunes has this “Create AAC version” option. You shall learn more about this as you read what we have in this post.
It is always recommended that you update all your software applications to their latest system versions. Well, this also applies to the iTunes app. However, you might have noticed that iTunes 12 does not have the option that would let you create the files’ AAC versions. Probably, you’re wondering if this has been removed. Don’t worry, we’ll talk more about how to create AAC version in iTunes in the next sections.
Article Content Part 1. Why is Creating an AAC Version on iTunes Beneficial?Part 2. How to Create AAC Version in iTunes?Part 3. Best Way to Convert Apple Music or iTunes SongsPart 4. Summary
Part 1. Why is Creating an AAC Version on iTunes Beneficial?
AAC is one of those lossless audio compression formats and is considered the iTunes app’s default file format. Based on the comparison, the AAC format has the ability to produce better audio quality compared to MP3. This is why some who are keen on quality prefers using AAC over MP3 or other audio file formats.
With the option to create an AAC version of a track on the iTunes app, one would be able to have an M4A file that has been encoded with AAC. The files, converted M4A, can also be accessed on varieties of devices such as non-Apple ones. More so, these files can be used in case you are looking to have customized ringtones for your iPhone.
Now that you had this brief knowledge, we are now good to head over and check out more information relating to iTunes and how to create AAC version in the next part.
Part 2. How to Create AAC Version in iTunes?
Before we finally dig more into how to create AAC version in iTunes for music files, we will first get the concern from users clarified regarding the disappearance of the “Create an AAC version” on iTunes 12.
A lot of people are actually curious about the above. Some users had mentioned that when trying to create customized audio files for their phones’ ringtones, the iTunes app automatically changes the “Create AAC version” option (that should be the default one) to “Create MP3 version”. Users actually do not need to be bothered as this does not mean that the “Create AAC version” option on iTunes has been gone on iTunes 12. Let us get to see a tutorial relative to this concern and finally see more information about iTunes and how to create AAC version even on iTunes 12.
Step #1. Open the iTunes Application
You have to launch your iTunes app first. Once done, hit the “Help” option and choose “Check for Updates” from the options displayed on the drop-down list. This is what you need to do to check and update your app to the latest version available.
Step #2. Start Importing the Audio File to be Converted to AAC
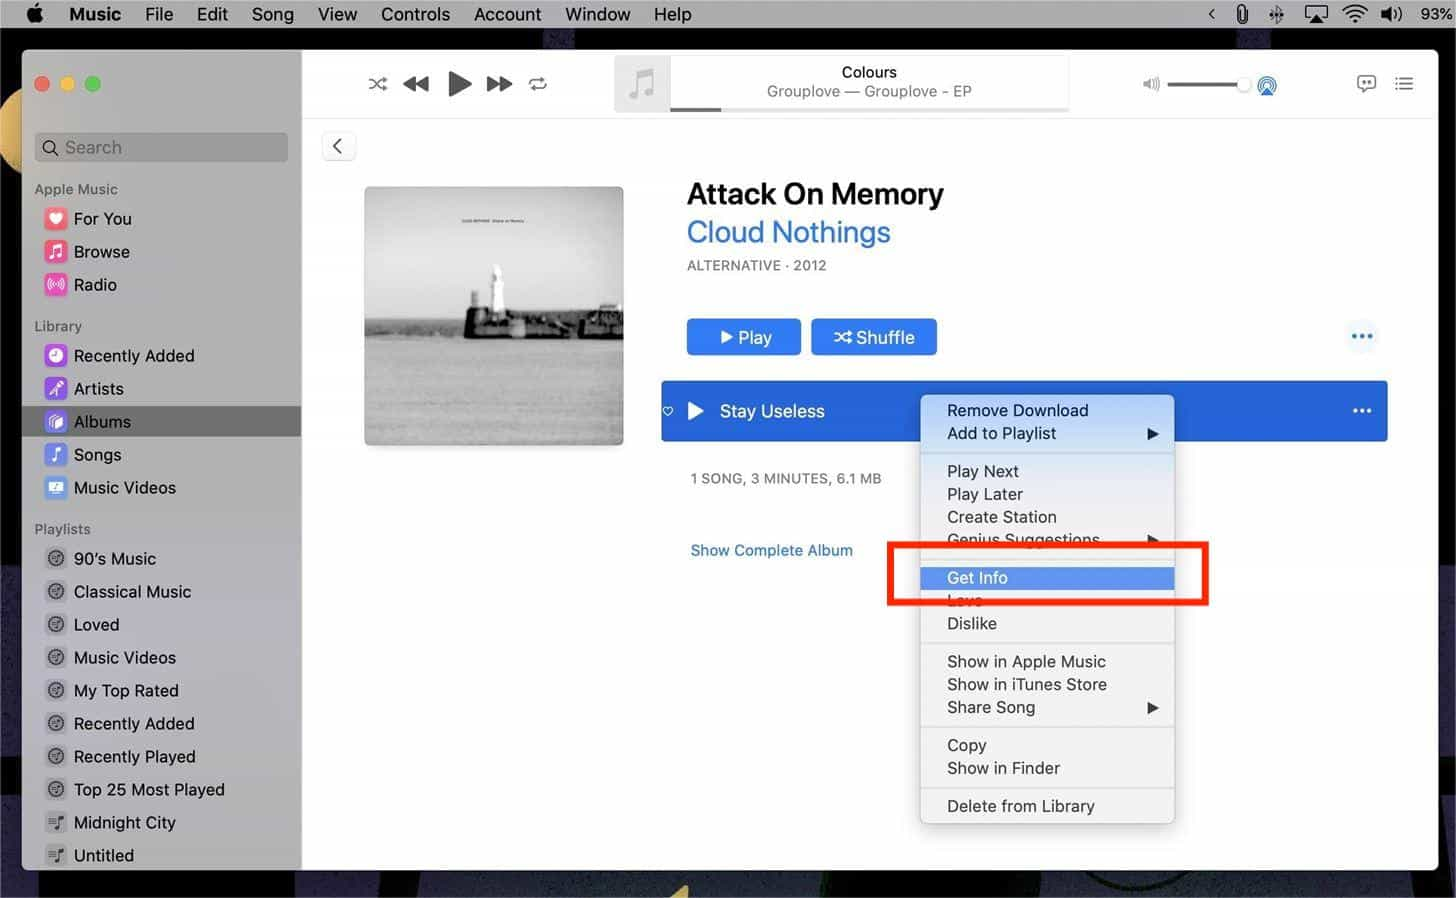
Click the “File” option at the top of the screen and choose the “Add File to Library” option next to finally import the music files to your iTunes library. Right-click the track and choose the “Get Info” menu. Alternatively, you can just select a track that you have in your iTunes library.
Step #3. Cut the Song as you Like
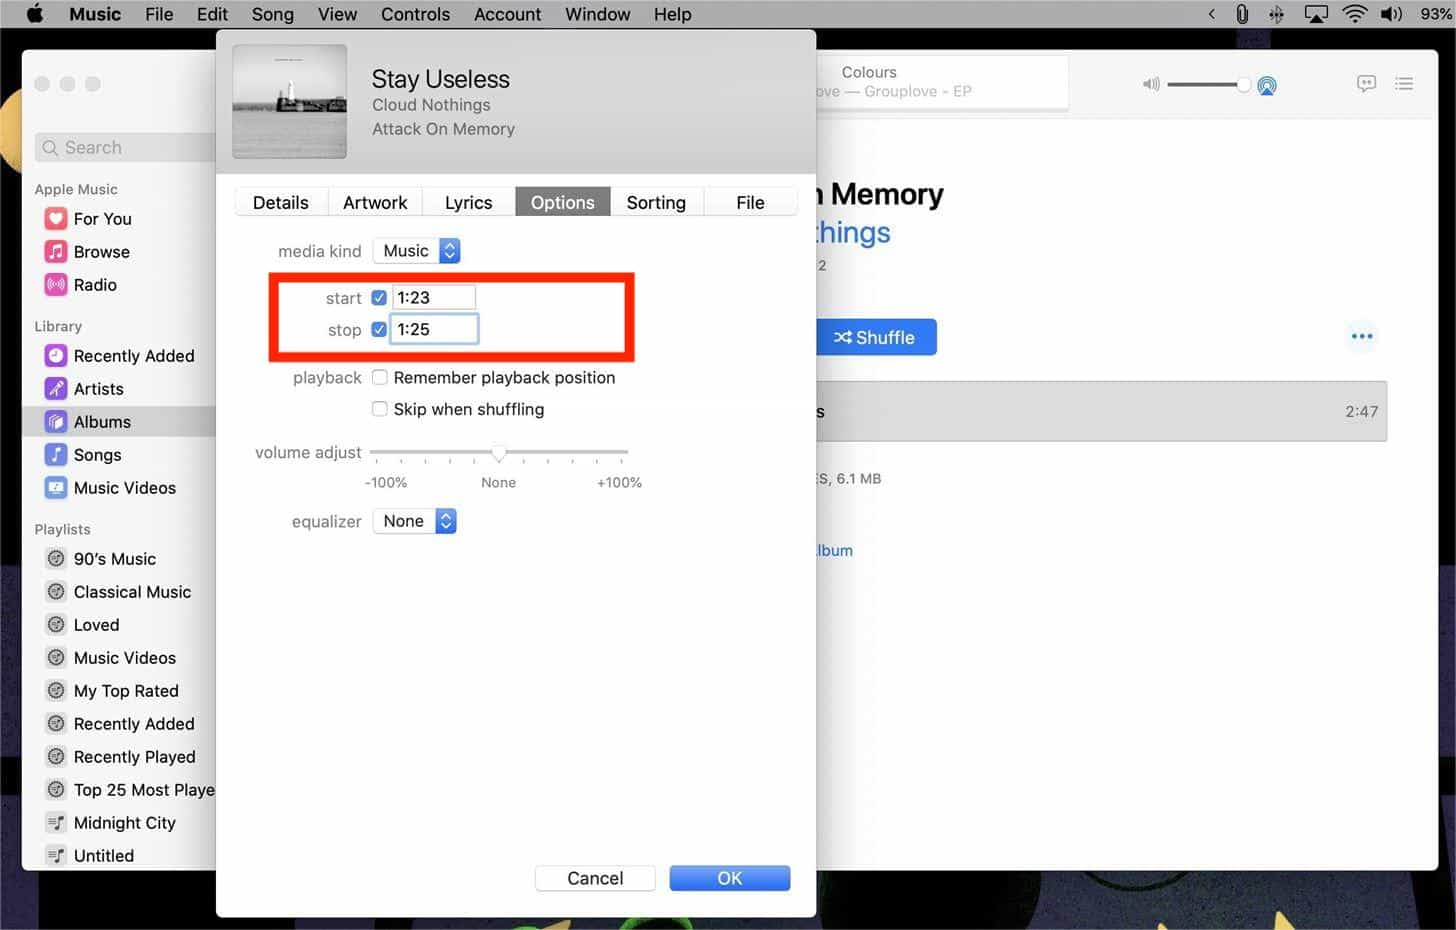
The third step of using iTunes and how to create AAC version is to tap the “Options” tab and put checkmarks on the checkboxes next to the “Start” and “Stop” options in case you wish to cut the track and save it as a new file. Tap “OK” next.
Step #4. Proceed and Create the File’s AAC Version
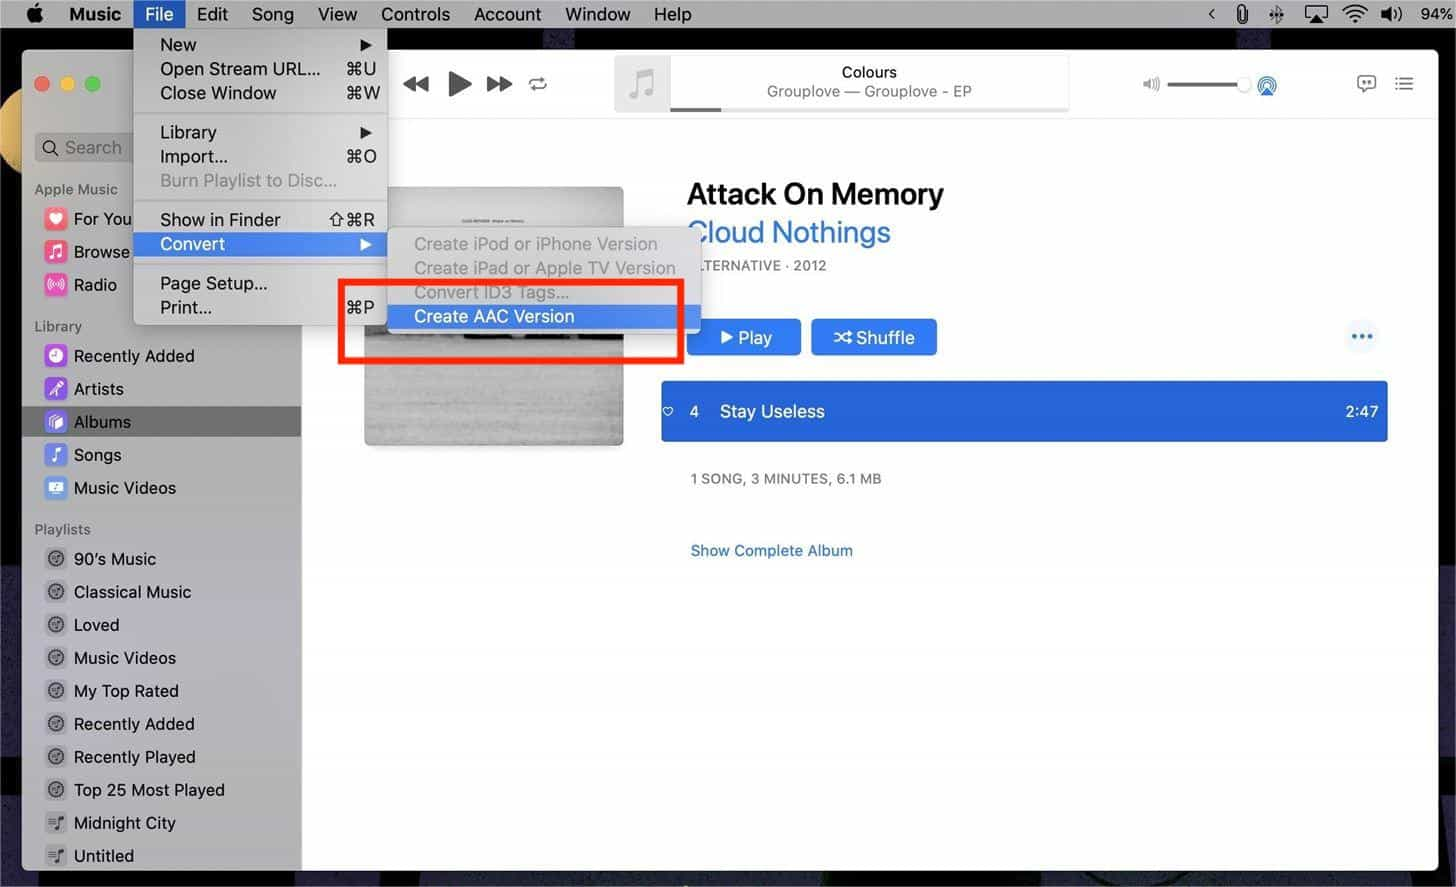
Choose the audio clip, then select the “File” button, tap “Convert”, and finally, you shall see the “Create AAC Version” option. It will then create a new AAC copy. If the song is tied to an album, the copy will appear directly beneath the original sound file. If you're using a standalone sound file, however, you might not see the copy appear. In that case, just check "Recently Added" to find the copy.
Step #5. Get the Extension Changed
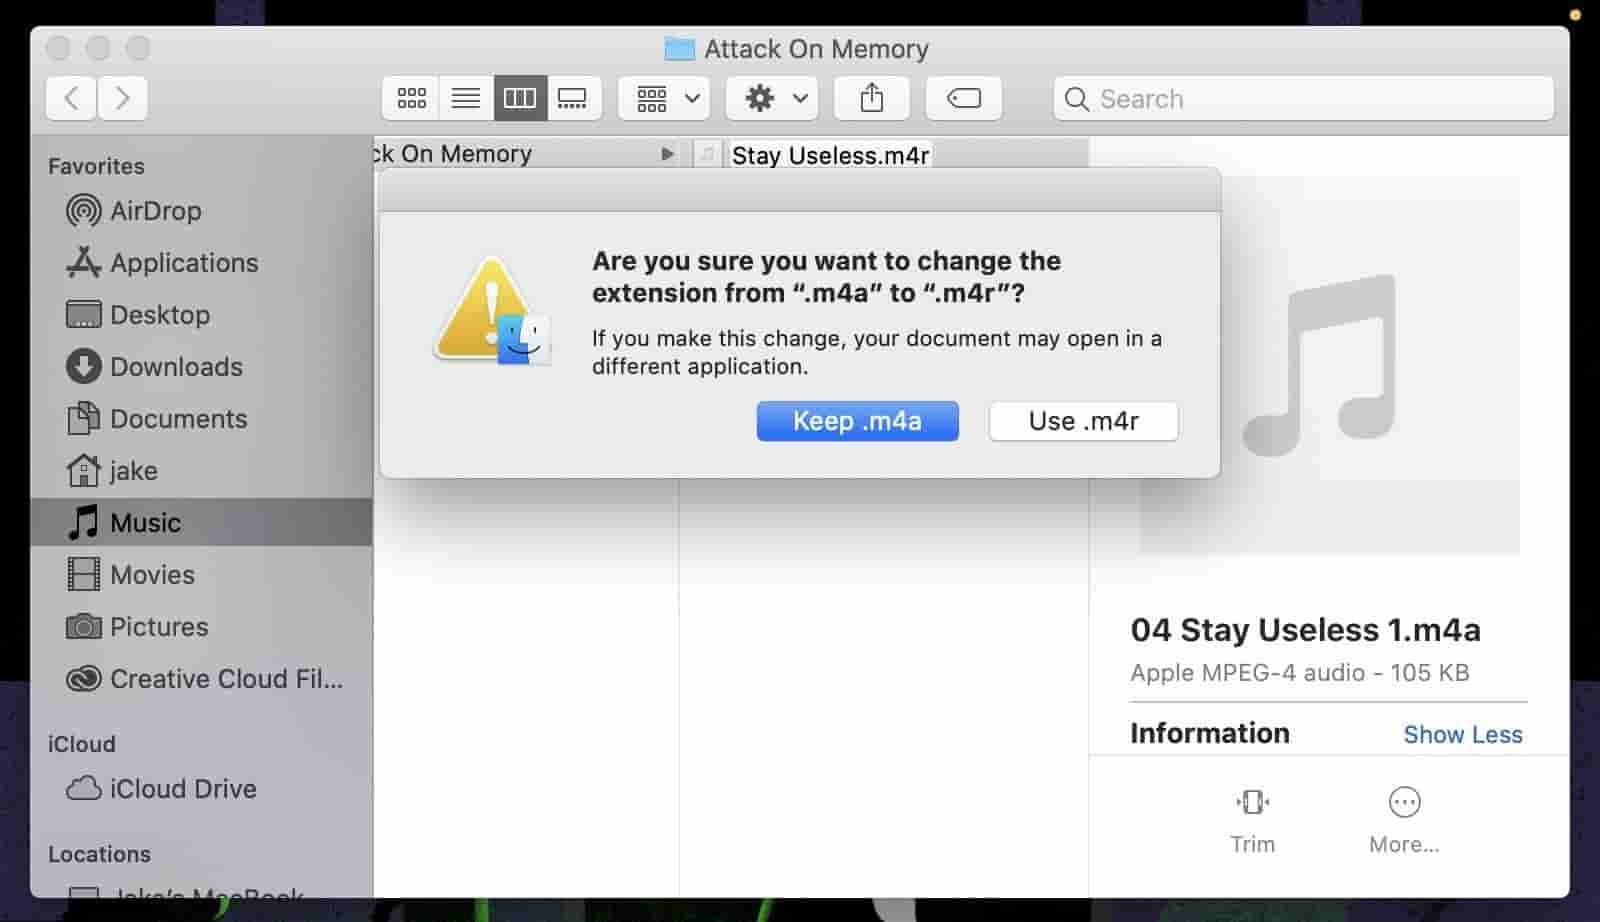
The final step is to right-click on the track, and from the menus shown, tap “Show in Windows Explorer/Show in Finder”. Single-click on the file’s name. Have the extension of the file changed from .m4a to .m4r.
Step #6. Sync Music File to Your iOS Device
You can also have the AAC file saved to your iPhone by doing the syncing process. You can connect your iPhone to your Mac using a Lightning to USB or Lightning to USB-C cable, or, if syncing wirelessly, make sure your iPhone is on the same Wi-Fi network as your Mac. Locate your iPhone in Music under Devices. Now, drag and drop the new .m4r file onto your iPhone in Music. If done right, your songs should sync with your iPhone instantly, without you needing to do another thing.
As simple as the above, you’ll be able to accomplish using iTunes and how to create AAC version process with ease. As you move to the next part, you’ll see the best way of transforming the files that you have to another format, be it AAC or MP3, especially if you are looking at processing your Apple Music or iTunes favorites.
Part 3. Best Way to Convert Apple Music or iTunes Songs
The above guide about the using of iTunes and how to create AAC version process is helpful but the one we’ll share here is more recommended to use. Apple Music and purchased iTunes tracks are protected under Apple’s FairPlay Protection program. If you are looking at getting them accessed outside the app or on devices that are unauthorized, that won’t be possible unless the protection they have will be removed first.
Many users are thinking that iTunes DRM removal is a hard task to accomplish. Well, this indeed is difficult if you will not use the best tool or resources available. Fortunately, we have the TunesFun Apple Music Converter. This is a reliable and trusted software application that is capable of easily getting rid of the songs’ protection.
Apart from this major function, this app can also aid in the conversion of files to formats like MP3, M4A, FLAC, AC3, AAC, and WAV. After this, you will get converted iTunes music without DRM protection. Now you can stream these Apple Music songs on Roku TV, Android tablet, Xbox One, PS4, iPad, etc. You can set iTunes music as ringtones for free and move or save them even on external drives!
TunesFun Apple Music Converter’s speed of 16x makes the transformation process efficient and convenient for everyone. All the songs’ ID tags and their metadata details shall also be kept and preserved. The app is proven to do lossless conversion!
The installation of this app is not an issue as well as this works so well with both Windows and Mac computers. Of course, this was designed to ensure that everyone shall be able to use it. In case you are thinking of trying out this app, we have also created the below guide that you can use as your reference.
Step #1. Get the TunesFun Apple Music Converter installed on your PC. The installation is simple. You only need some requirements to complete prior. Once installed, just launch the app and start to preview and select the tacks to process.

Step #2. Choose the desired output format from the list of the available ones. You will also notice the output parameter settings options displayed at the bottom of the page. You can get those modified as preferred.

Step #3. Tap the “Convert” button that is at the bottom of the screen. This shall trigger the app to start the conversion procedure. While the transformation of the files is ongoing, the DRM removal process shall also be done by the app.

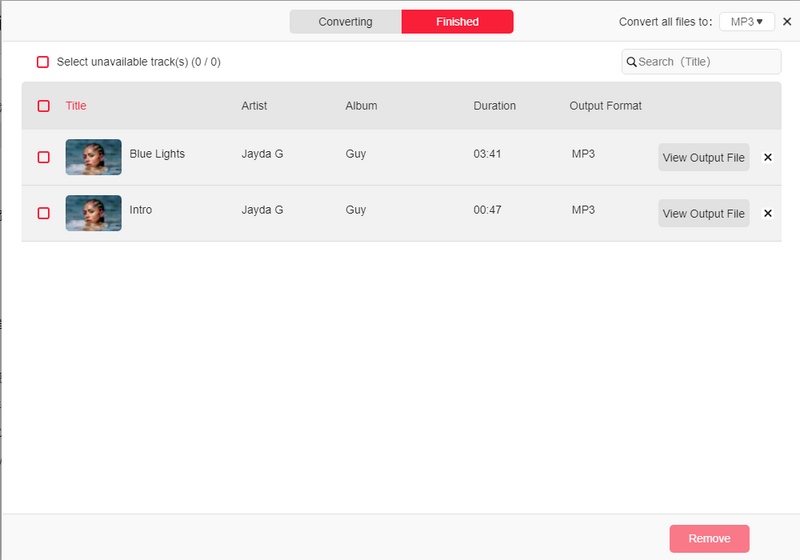
Step #4. Download converted music files from the “Finished” tab.
Part 4. Summary
Indeed, the using of iTunes and how to create AAC version is still effective. However, the case will be different if there are protected files that must be processed. DRM protection is encryption that can be removed by professional tools such as TunesFun Apple Music Converter. If you are aiming to get protected files that you have converted to another format, this tool is a good one to check out and consider.
 Home
Home
Leave a comment