iTunes To Spotify Playlist: Here’s How You Can Transfer!
“Is it possible for me to do iTunes to Spotify playlist transfer without facing any issues?” Are you also an iTunes and Spotify playlist user at the same time? If you are, perhaps, you are also wondering about iTunes to Spotify playlist transfer. Well, to give you a quick answer to the above question, it’s actually a “Yes”.
iTunes is indeed a good app since it lets you manage your media files like videos, music, audio files, and more. It is not just a simple media player but is also a file manager. Thus, we can’t blame you if you got bunches of files on your iTunes library. Now, if you got music from iTunes that you like to transfer to your Spotify playlists, you don’t have to worry that much. You can easily do iTunes to Spotify playlist transfer.
It is a good thing to know that doing iTunes to Spotify playlist transfer is possible. However, you must also take note that not all music files can be transferred because they sometimes do not sync. But that is not actually an issue because we also have a solution to solve this. We will be discussing the methods in this article so make sure to read each part.
Article Content Part 1. How to Import iTunes Playlists or Songs with Spotify?Part 2. How to Add iTunes Music songs to Spotify?Part 3. Summary
Part 1. How to Import iTunes Playlists or Songs with Spotify?
As we have stated in the introduction part of this article, it is easy to do iTunes to Spotify playlist transfer. You can actually do it manually. Although Spotify has removed the top menu that will let you import the playlists from iTunes, you can still upload local files to your Spotify account through the “Add A Source” option. With this, you have the ability to do iTunes to Spotify playlist transfer with ease. Here is a detailed procedure for you.
Share the iTunes Library File
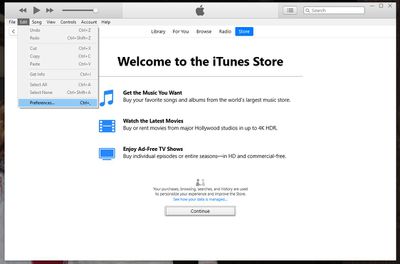
Step #1. Launch your iTunes app, and then tick the “File” menu. Open the iTunes preferences window by hitting the “Edit” button, and then the “Preferences” menu.
Step #2. There will be a popup window. Hit the “Advanced” tab on that window.
Step #3. The checkbox in the “Share iTunes Library XML with other applications” option must be ticked.
Step #4. To finish off, click the “OK” button.
Converting iTunes Songs to MP3 Format
You must know that the Spotify app can accommodate MP3 files. However, the iTunes songs are in M4A or M4P file format. You then need to convert the iTunes files first for you to add them to your Spotify account. Keep in mind that this would only work if the iTunes files are unprotected. Here is the procedure.
Step #1. On your iTunes app, hit the “Preferences” button to see the window for the settings. Afterward, tap the “General” button, then “Import Settings”, and finally, the “MP3 Encoder” button.
Step #2. Choose the playlist in iTunes and look for the songs to be added to your Spotify account. Tick the “File” button, then the “Create New Version”, and finally, the “Create MP3 Version” option. The iTunes app will then export the tracks to MP3.
Importing iTunes Songs to Spotify
Finally, you can now do the iTunes to Spotify playlist transfer. Here are the steps.
Step #1. Open the desktop app of Spotify on your PC. Head to the “Settings” menu and then scroll down to see the “Local Files” tab.
Step #2. By default, you shall see “iTunes” and “Music Library”. This needs to be switched to “On”. The unprotected tracks will then be imported.
Step #3. Head back to the main screen and then tick off “Local Files”. All the songs from your iTunes library will be shown here.
Step e #4. Now, on your mobile device, look for these local files and then just listen to them as you wish.
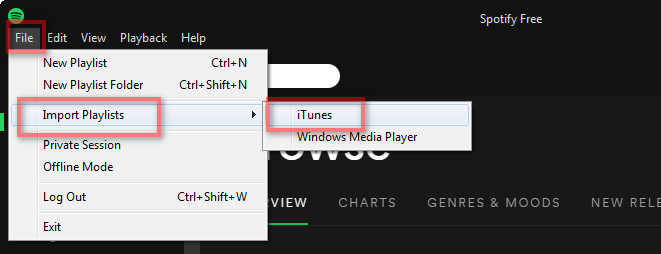
If you can’t see the option for iTunes under the “Local Files” section, you can do iTunes to Spotify playlist transfer by ticking off the “Add Source” button and locating the iTunes library on your PC. Just choose the iTunes playlists to be imported to your Spotify account.
Part 2. How to Add iTunes Music songs to Spotify?
As mentioned, the method presented in the first part will only be applicable if you have iTunes files that are unprotected. For protected iTunes files that you like to be imported to your Spotify account, you need to remove the protection first to finally proceed with iTunes to Spotify playlist transfer. But, how can you do that?
You need to first find an app that can do the removal of the Apple’s FairPlay protection. There are lots of applications that can actually do that. But, to help you out, we will be sharing a trusted professional app in this post. We’re to share how awesome the TunesFun Apple Music Converter is.
The TunesFun Apple Music Converter is a very capable app that will lead you to do iTunes to Spotify playlist transfer with ease. It has the ability to get rid of the DRM protection of the songs with ease while helping you convert the format of the songs to flexible ones like MP3. Actually, apart from MP3, it also supports other file formats like FLAC, WAV, M4A, AAC, and more.
What is even fascinating with the app is that you can do the conversion process lossless. Thus, keeping the 100% original quality of the songs as well as their ID tags. You can also do customization on the output settings.
Moreover, apart from being an Apple Music converter, this TunesFun Apple Music Converter is also a powerful audiobook converter. So, if you are an audiobook lover, this app will help you process the transformation of your favorite audiobooks to formats like MP3.
When it comes to the speed of conversion, you don’t have to worry that much because this app functions 10x faster compared to other applications. And, it was designed to have an interface that is easy to handle. The navigation keys are too simple. For your reference, we will be presenting in the next paragraphs how you can use this TunesFun Apple Music Converter to convert the protected iTunes music files that you have and remove their protection.
Step #1. Visiting the official website of TunesFun will lead you to see the detailed list of the installation needs of the app. You have to check those and meet or accomplish them to proceed with the installation of the app on your computer. It is also worthy to note that this app is supported by both Windows and Mac. Once you have it on your PC, just start by launching it, and then upload the iTunes songs to be processed. You can upload a number of iTunes songs if you want because the app does batch conversion as well.

Step #2. Now that you have successfully added the protected iTunes songs to be converted, you can now customize the output profile settings. Make sure to choose a flexible format like MP3 as this is supported by Spotify. Also, the output path is important so don’t forget to set up one. There are also other options under the output settings that you can change as you like.

Step #3. Once you are satisfied with the setup you made, hit the “Convert” button at the bottom of the page. This will trigger the app to start the conversion process. Alongside conversion, the DRM removal process will also be done by the app. So, you should expect that once it is done, you are to have the MP3 versions of the iTunes music files that are now DRM-free.

It is now the time that you to import these MP3 files to your Spotify library. You can now finally do the iTunes to Spotify playlist transfer. To do that, head to your Spotify account. Tick the “Edit” button at the top area of the main interface. From the options displayed, choose the “Preferences” button. Find the option for “Local Files”, then choose the “Add a Source” menu.
A popup window shall appear. Here, you can choose the folder where you had saved the converted files through the TunesFun Apple Music Converter. Just tap the “OK” button to import those MP3 files. After doing the importing process, you will see the imported iTunes files under the “Local Files” tab on your Spotify account.
Part 3. Summary
Indeed, it is very convenient to do the iTunes to Spotify playlist transfer. It is very easy especially if you are looking to transfer unprotected iTunes files because you can do that manually. However, if you got iTunes files that with DRM protection, it is always best that you use professional converters like the TunesFun Apple Music Converter.
 Home
Home
Leave a comment