Find Out How To Use iTunes To View Ringtones!
It is indeed good that there have been great developments on Apple platforms such as iTunes. A new available version has actually been made available for users. Unfortunately, most users have noticed significant changes after getting the iTunes app updated – the “Tones” tab seems to be missing. Among the many curious bees, are you one of them who’s also wondering about how to use iTunes to view ringtones? You’re lucky as this topic is this article’s main focus.
Though there have been huge changes to the iTunes app, the iTunes platform still remains the same old great buddy of many – doing its great functions of being a media player and a file organizer. Indeed, still a great app where you can save all your media files and get them backed up.
Since as mentioned, this article will be dealing more with the topic, we will share with you where you can access the ringtones that you have on your computer as well as the process of adding custom ringtones if you’ve already installed the latest version of the iTunes app.
Article Content Part 1. Where Are Ringtones in iTunes?Part 2. How to Add Custom Ringtones from iTunes to iPhone?Part 3. How to Download Any iTunes or Apple Music Songs for Setting as Ringtone?Part 4. Summary
Part 1. Where Are Ringtones in iTunes?
iTunes is a media management software created by Apple, Inc., for both personal computers running the macOS and Windows operating systems. You can use it to manage and play both audio and video files on your computer. iTunes also allows users to back up and restore the content of their Apple mobile devices, such as music, photos, videos, ringtones, and device settings, and restore the firmware of their devices.
However, in 2017, Apple released iTunes 12.7. It requires OS X Yosemite or later. It’s notable for losing more features than it gains. Another casualty in Apple’s war on iTunes feature bloat is ringtones. iTunes 12.7 removes the Tones library. You can no longer store ringtones and alert tones in iTunes, nor can you sync them automatically to your iOS device.
Where are my ringtones saved? Don't worry, there is still a way to find them. In this section, we will finally clarify where iTunes stores ringtones on your computer, and vital information that relates to how to use iTunes to view ringtones.
Locate Your Ringtones on Windows PC
If you are a Windows user, you must follow the below procedure to c.
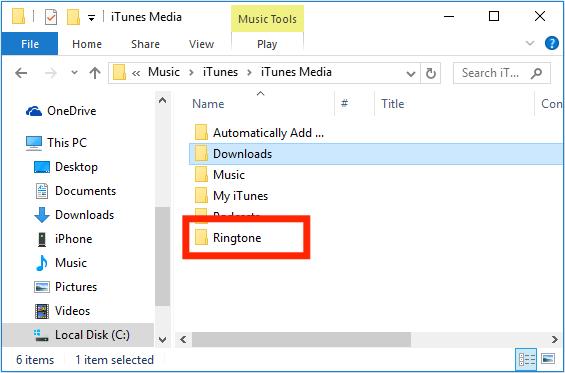
- Launch file explorer and head to “Computer”.
- Once you are done with step 1, head to “Local Disk”, choose “Users”, “Your Name”, tap “Music”, then “iTunes”, and finally, click the “iTunes Media” menu.
- You should be able to see that all your iTunes ringtones are in the “iTunes Media” folder.

Locate Your Ringtones on Mac
Of course, after sharing with you how to use iTunes to view ringtones via your Windows computer, we will also be sharing the same in case you are a Mac PC user. Just refer to the below guide
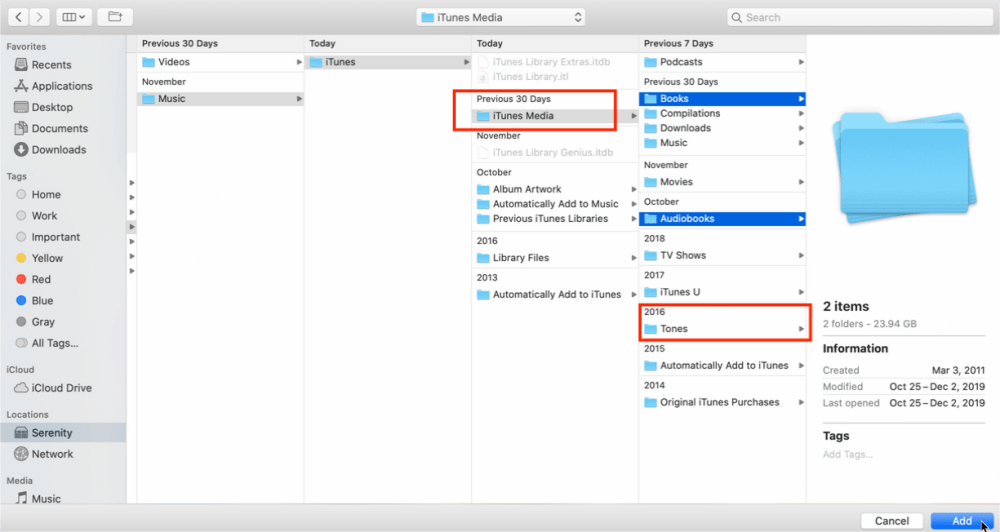
- To locate the ringtones folder on your Mac, locate the Home option in the Finder menu, then double-click the Music folder.
- Within the Music folder, you’ll find the iTunes folder.
- Finally, open the iTunes folder > iTunes Media folder. From here, you should be able to access your iTunes library files including those ringtones that you have.

Apart from the above, to use iTunes to view ringtones, you can also just launch the iTunes app, get your iPhone connected to your computer (via USB cable), and tap the drop-down option at the top-left section of the iTunes’ page. You should be seeing all your iTunes ringtones here. This only works for viewing. In case you are eyeing to move them, the previously mentioned procedures must be used.
Part 2. How to Add Custom Ringtones from iTunes to iPhone?
Another vital piece of information that we are to share in relation to this post’s topic – how to use iTunes to view ringtones, is how adding custom ringtones from the iTunes app can easily be done. This section of the article has everything you need relative to this.
In case you are also eyeing to add custom ringtones from iTunes to your iPhone, that’s actually a simple thing to do. You can just follow the below guide.
- On your PC, launch the iTunes app.
- You must have your iPhone connected to your computer via a USB cable. If you are looking to try Wi-Fi syncing so the connection will be wireless, you can also do that but make sure that your device has been connected to a stable network.
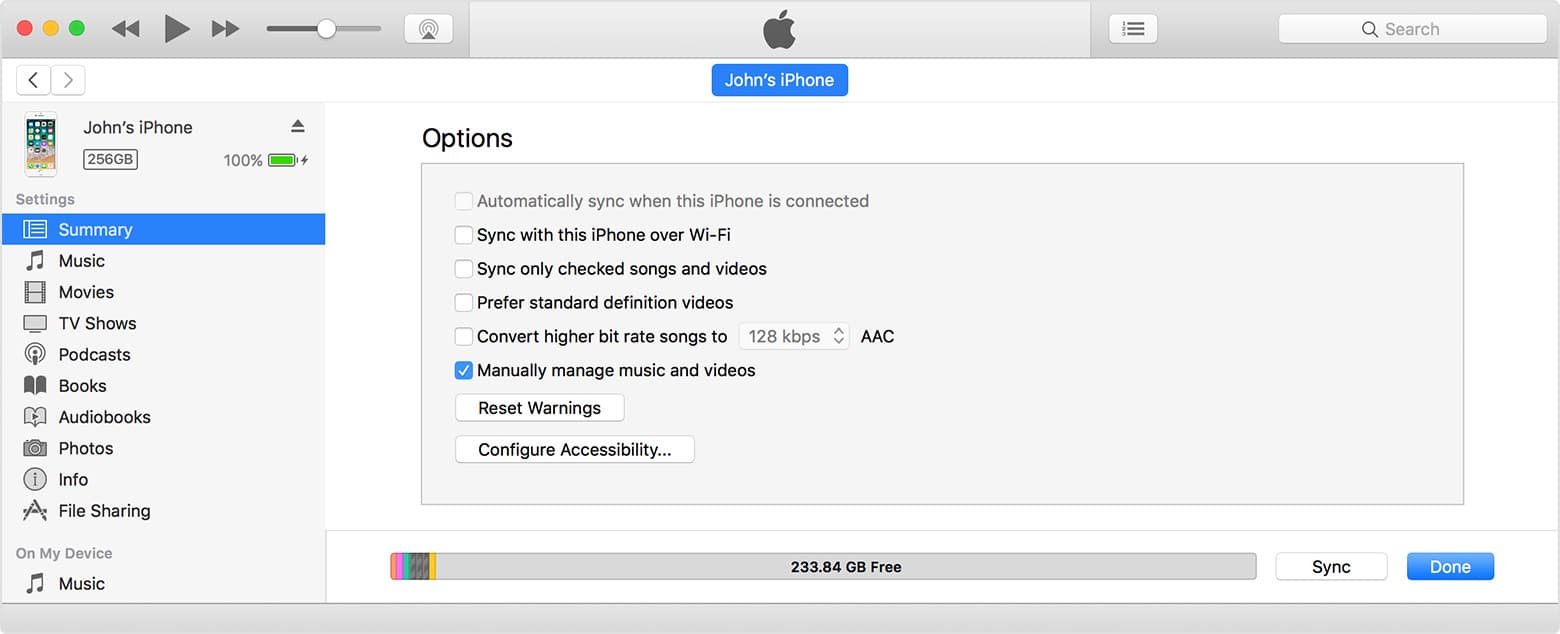
- Once iTunes detected your iPhone, just click its icon on the app.
- On the left, you need to highlight the “Summary” tab. The box next to the “Manually manage music and videos” option must be checked. This is just beneath the “Options” tab.

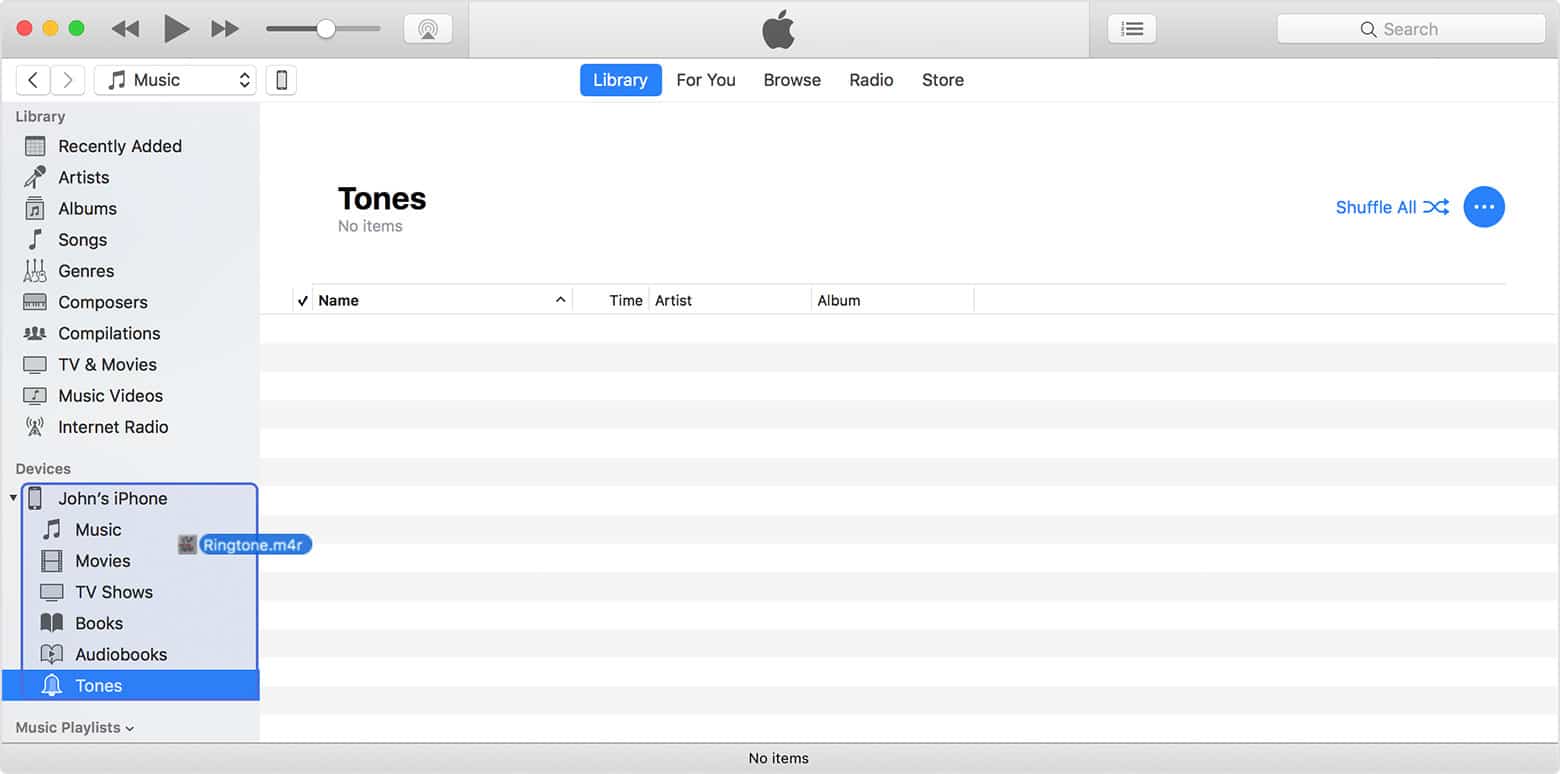
- After doing the above, look for “Tones” on the left area of the screen and click it.
- Using your file explorer or Finder, look for the .M4R ringtone that you would want to import to your iPhone from iTunes.
- You can just drag and drop the files. The ringtone will automatically copy to your iPhone.

In case you have experienced issues when dragging and dropping ringtones, you can check if that is because the file is too long (should only be 38 seconds or shorter). Additionally, you can also pause for some minutes before dragging new files or wait until the syncing of the previous files has been successful.
After all that work, it's time to set the ringtone so you'll hear it when your phone rings. Start the Settings app on your iPhone. Tap Sounds & Haptics > Ringtone. You should see your new tone in the list, tap it.
Part 3. How to Download Any iTunes or Apple Music Songs for Setting as Ringtone?
Though we have already shared significant information relating to the use of iTunes to view ringtones, we still have created this section to share with you bonus details about making all your iTunes or Apple Music favorites accessible on any device or media player and how to keep them for personal usage.
Apple Music now has over 100 million songs, and you can search for various kinds of songs to set as ringtones. Actually, songs that you downloaded under the Apple monthly music plan will be gone the moment your subscription is canceled. If you wish to continue listening to them without any limitations, you must find a way how to download them. However, some iTunes songs and all Apple Music tracks are protected by DRM. They are also encrypted in a format that is not too flexible on many devices and media players.
In this case, if you are interested in keeping all your iTunes and Apple Music favorites and making them accessible on every gadget that you have, seeking assistance from tools like the TunesFun Apple Music Converter is a must.
The TunesFun Apple Music Converter is a reliable and trusted tool that has been proven to be effective by many users around the world. Of course, it can aid in the removal of the DRM protection of iTunes and Apple Music songs as well as help in getting them transformed to common formats like MP3. In fact, apart from MP3, this tool supports various output formats including FLAC, WAV, AAC, M4A, and AC3.
When converting using the TunesFun Apple Music Converter, you can assure that you’ll even be able to save time as this is efficient enough to process bunches of tracks one time. It works at a conversion rate of 16x. You don’t need to think about losing the songs’ important details since all metadata information and ID tags of the songs shall be kept alongside their original quality.
When installing the TunesFun Apple Music Converter, there should not be any issues at all as well. This is an app that is supported by Windows and Mac computers. This was also designed to cater to every user’s needs. Being a beginner or a professional does not matter when using the TunesFun Apple Music Converter. Its navigation functions are simple.
Of course, since we are already highlighting how great the TunesFun Apple Music Converter is, we, of course, have the details relative to how the conversion and downloading processes can be done through this app. Let’s take a quick look at the below created guide.
Step #1. Check out the TunesFun Apple Music Converter’s installation needs by heading to its official website. Once all those have been accomplished, download the app and install it on your Windows or Mac computer. On the main page, you may start to preview and choose the songs you’d like to process. Choosing several songs is fine!

Step #2. Select an output format to use. You shall notice the output parameter settings displayed at the bottom of the screen. You can have them changed if you wish to.

Step #3. Tap the “Convert” button that is at the bottom of the page to let the app start converting the chosen files. The DRM removal procedure should also happen at the same time.

In a few minutes, you shall expect the transformed and DRM-free iTunes and Apple Music songs available on your computer. You may now keep them forever or play them on any device you’d like to use!
Part 4. Summary
How to use iTunes to view ringtones? In the article, we are sure you have all the information you need relative to the topic. Now, you don’t need to wonder where your ringtones are as you can locate them easily. More so, adding custom ringtones to your iPhone from your iTunes library is easy as well and can be done by following the procedure in the second part. Additionally, if you are looking at keeping all those iTunes and Apple Music songs that you love, don’t forget that the TunesFun Apple Music Converter can definitely be a good assistant!

Leave a comment