A Guide on How to Recover iTunes Library
Before the rise of the music streaming services, iTunes already provide services, especially in music that can entertain its users. Some also had invested in purchasing songs directly from iTunes which also served as their collection of music.
However, there are also instances that even how great iTunes is, one will encounter issues like their iTunes Library got lost or got damaged.
If you are one of those who have encountered such issues, then don’t panic because we will be going to provide you with solutions that will help you recover iTunes Library so you will have access to your media files again. In this article, you will learn about different methods or ways how you can recover iTunes Library.
Also, we have a bonus tip for you on how you can download music from your iTunes and convert them to MP3 for you to have a backup copy of your tracks. So, if you are excited to learn all of these, then let’s keep the ball rolling!
Article Content Part 1. How to Recover iTunes Library?Part 2. Bonus: How to Download iTunes Music to MP3 for Backup?Part 3. Conclusion
Part 1. How to Recover iTunes Library?
I understand that it is kind of frustrating if suddenly you can no longer access your iTunes Library like before due to some issues. In this part, I’m going to provide you with three effective ways which you can try so you can start to recover iTunes Library that you wanted to listen to again.
Method 1: Recover iTunes Library using iTunes.
One way to recover iTunes Library is using the iTunes application itself. This method is applicable if you have recently purchased a new computer and your music files got lost after updating any operations etc.
- Open your iTunes app, and go to iTunes Store.
- Look for the Music column which you can find on the right side of your screen and then select the Purchases option.
- In the Purchases option, you will find the list of songs and albums that you have downloaded or purchased from iTunes using your account.
- From here, you can recover iTunes Library by downloading the music that you want to restore, so you can listen to it again.

Method 2: Recover iTunes Library using backup source
If you regularly backup your iTunes media files on the external storage device, then it is going to be easy for you to recover iTunes Library from your backup.
- Using your external hard drive that contains the backup of your iTunes music, connect it to your Windows or Mac.
- Next, go to My Computer if you are using Windows and Finder if you are using Mac to access or open the external hard drive.
- Look for the folder that contains your iTunes backup from your external hard drive and copy it to your computer’s iTunes default location.
- If you have an old library folder, copy its content first to the new iTunes folder to prevent losing your previous iTunes Library.
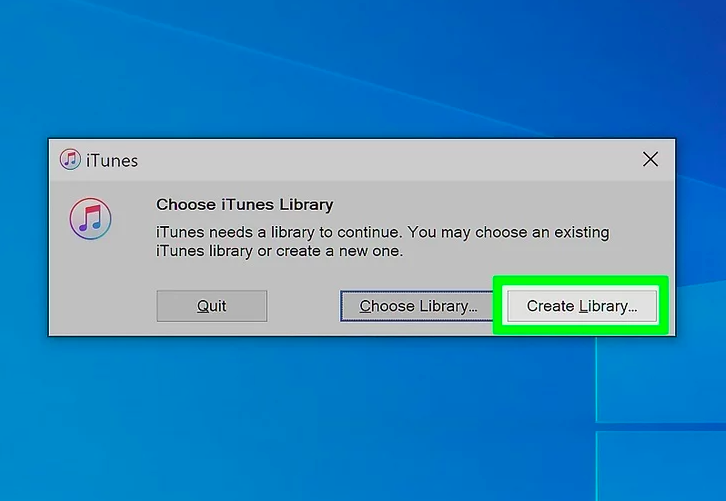
- Now, open your iTunes by holding the shift button for Windows and the option button for Mac. You will be asked whether to Quit Create Library or Choose Library.
- Select Choose library and click the folder that contains the music files that you have copied from your external hard drive.
- Once you have successfully recover iTunes Library from your backup source, just restart your iTunes app.
Method 3: Recover iTunes Library by using iPhone
Another way to recover iTunes Library is through your iPhone. This works if you have accessed iTunes using both iPhone and computer because you will also be going to have a backup copy from your iPhone if ever you have lost your iTunes library on your computer.
- You have to connect first your iPhone to your computer.
- Sync your iTunes of your iPhone to your computer once it notifies you to set up your device.
- Next, using your iPhone’s transfer purchases option, copy the media files that you wanted to recover to your computer. This allows you to transfer your purchases from iTunes to other supported devices.
- For you to be able to access the contents of your iTunes, you need to re-authorized the computer or hard drive that you have connected.
- Finally, you have to set up or sync your iPhone to your computer again after you have finished transferring all of the data that you needed from your iPhone.
By following the above-mentioned methods, you can able to recover iTunes Library and enjoy listening to them again.
Part 2. Bonus: How to Download iTunes Music to MP3 for Backup?
Now that you know how to recover iTunes Library, as a bonus tip, do you know that there is this tool that can download your iTunes Music and can convert them to MP3 so you will have a backup copy of your songs? Yes! There is and this powerful tool is none other than TunesFun Apple Music Converter.
To give you an overview of TunesFun Apple Music Converter, it is a powerful software that can able to download songs from Apple Music and iTunes and can convert those songs to more widely acceptable audio formats such as MP3, WAV, etc. It is different from a typical converter because this program has this amazing feature that can remove the DRM protection of the tracks that you will be going to download. This means that once you have removed the encrypted DRM, those songs can be easily accessed or transferred to any device that you have and you can keep them for as long as you want without worrying about your subscription.
Moreover, TunesFun Apple Music Converter has this advanced ID3 tagging technology which can help maintain the organization of the tracks after conversion. This includes the song’s information such as the title of the song, artist, album, etc, as well as its metadata and artwork. Also, what I liked about this software is its ultra-quick conversion speed which will make your waiting time much lesser and even with such speed, it doesn’t affect the quality of the song as if you are still listening to the original tracks.
So, if you like to try how cool TunesFun Apple Music Coveter is, just simply visit their official website wherein you can download and install the software’s installer which is available for both Windows and Mac. This tool is also user-friendly, so you don’t have to worry if you haven’t used it before. Once you have got it installed, return to this post, so I can help you with how to use this program and start backing up your recover iTunes Library.
Step 1. Choose songs from your iTunes Library.
Open your installed TunesFun Apple Music Converter software from your desktop and select the songs that you wanted to download and convert. You can select more than one file at a time because this tool can do batch conversion.

Step 2. Change the parameters according to your preference
Once you have selected the tracks, you will be then asked which format you want those tracks to ve converted to. Since we wanted it in MP3 format, we will choose it for now. You can also set the folder where you want the converted songs to be viewed after conversion.

Step 3. Start converting your recover iTunes Library tracks by clicking the “Convert” button.
After you are satisfied with the configuration of the songs that you have selected, you may now start the conversion process by clicking the “Convert” button. After the conversion is complete, you can open the folder that you have chosen earlier to view the converted songs from iTunes.

Part 3. Conclusion
It may sound impossible at first to recover iTunes Library especially if you have no idea that there are different ways that you can do to retrieve your music. But after reading this post, you have discovered that it is not impossible after all.
Apart from learning how to recover iTunes Library, you also discovered here that there is a way how you can make a backup of your iTunes files by using a professional tool called TunesFun Apple Music Converter. With the use of this amazing software, you can able to download any audio file in your iTunes library and convert them to formats like MP3.
As we have discussed above, there are advantages of using TunesFun Apple Music Converter because once you have converted your iTunes music using this software, you not just only have a backup but also all of your converted files will no longer be restricted meaning you can access and play them to any device for as much as you want.
I hope that by reading this post you have finally recovered iTunes library that you desired and listen to all of them again. Thank you for reading until the end and see you in my other post.
 Home
Home
Leave a comment