Learning How To Rename Albums In iTunes (2025)
When you can enjoy your iTunes and listen to songs you love, it is also possible that you sometimes figure out if it is possible to rename albums in iTunes. Well, if you gather data over the web, it will be hard to look for guides on how you do it. Many claims that it is not possible to do it by directly using your iPhone unless you go to the iTunes app and then start changing what you want there before you start syncing everything once more on your iPhone.
To do this, you have to deal with metadata that are associated with the songs or albums that you wanted to change the name of. Once the syncing has been completed, all the changes made will be reflected on your device. In this article, we are going to help you figure out such things, or in case you wanted to change them you have an idea of what should you do.
Article Content Part 1. How To Rename Albums In iTunes?Part 2. How Can I Enjoy All My Favorite Songs Without Any Restrictions?Part 3. To Summarize It All
Part 1. How To Rename Albums In iTunes?
As we have said in the introduction, in order to have some changes in the names of the album, you have to deal with it using iTunes, as they can’t be changed using your iPhone. But what if there are errors encountered when you are trying to rename albums in iTunes? So, do you have an idea of the things that you have to do?
When music files are set as Read-only, you will really have a difficult time when you wanted to rename albums in iTunes, you first have to make your music files writable, but how can you do it? Well, we have ways and we are going to share them with you, here.
- To begin, you have to open your iTunes app.
- Then go to Edit, then tap Preferences if you are using a Windows computer, if you are using a Mac go to iTunes and then tap Preferences as well.
- Choose the Advanced button.
- Then you have to take note of the location of the iTunes Media folder.
- Then you have to close the iTunes app and then start doing the steps below, steps will depend on the type of device that you are using.

If you are using a Windows computer:
- Go right-click on the Start button, and then choose the File Explorer menu.
- Then try to remember the location of the iTunes Media folder as we have said in the previous step.
- Right-click on the Music folder and then select the Properties option.
- Then you will see the Read Only box, deselect it and then choose Ok.
- Then the option that says “Apply changes to this folder, subfolders, and files” must be selected, then choose Ok.
- Then you just have to wait until all the changes have been applied to all of your files.
If you are using a Mac computer:
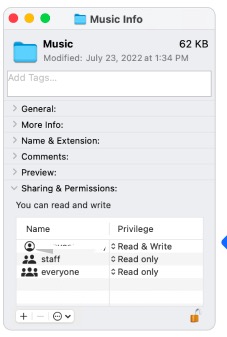
- Again, you have to take note of the location of the iTunes Media folder that you have previously gathered from the previous steps.
- Choose the Music folder.
- Go and choose File, and then tap the Get Info tab.
- Then you have to choose the Sharing and Permissions tree in order to expand it.
- Choose the Lock icon, then you have to be ready with all your credentials since there is a huge chance that you will be asked.
- Start setting your account as Everyone or Read and Write.
Once you are done with all the steps above, you can now check if you can edit the info and details of your albums or music files in iTunes. By following all the steps above, you can now rename albums in iTunes.
Part 2. How Can I Enjoy All My Favorite Songs Without Any Restrictions?
Of course, it would have been better if you could rename albums in iTunes or anywhere you want without having to follow certain rules and procedures. The thing is, if you wanted to edit songs in iTunes, you have to get a hold of them. By now, Apple Music is one of the most sought-after online music streaming sites, and it would never be a question why many music lovers want to enjoy the music that they offer, but is there a way to conveniently access them?
Apple Music tracks are protected by DRM encryption, this is why they are too hard to access except with the use of a stable internet connection and an Apple-authorized device. If you do not have any of these, then forget your chance. This is the usual connotation of people who are not into finding convenient ways to access Apple Music tracks. If you are still reading this article, you can’t just rename albums in iTunes, you also get the chance to enjoy them as much as you want. So, how can we do it?
Well, we have a tool to share with you, it is called the TunesFun Apple Music Converter, and when we say this tool is amazing you have to believe it. In case you are puzzled and would not want to believe as we said, then we have to prove it to you. We have listed some of the most notable features of TunesFun Apple Music Converter that you will absolutely love as a music lover.
- The TunesFun Apple Music Converter can help you get rid of the DRM encryption so you can easily access Apple Music tracks using any device that you own.
- This professional tool can help you save time, energy, effort, and even money. Once you decided to use it, you do not have to pay for monthly subscriptions anymore. Also, the TunesFun Apple Music Converter can convert your files at a faster conversion rate compared to basic ones in the market, helping you save time, as well as energy, and effort.
- The TunesFun Apple Music Converter can convert your files to various file types like MP3, MP4, AAC, FLAC, AIFF, WAV, and a lot more.
- Even though the conversion process is fast, the quality of files will not be compromised after the conversion process, you will still enjoy very good quality files that would seem like an original ones, and can even keep the ID tags and metadata if you want.
- The interface of the TunesFun Apple Music Converter is simple and will surely be a conversion haven for beginners! Even the steps on how to use it are easy to follow, let us have the steps below to fully guide you about the TunesFun Apple Music Converter.
Step 1. To begin the process, download all the necessary files to install the TunesFun Apple Music Converter on your computer. Once everything is installed, open the tool and start importing your music files for conversion. Tap the Add Files button, or start dragging and dropping the music files to the interface of TunesFun Apple Music Converter. You can also copy the URLs of the music files if you wanted to.

Step 2. Choose the formats of the outputs that you wish to have. Once you have chosen from what the tool offers, create a folder so you have a home for all your music files once they are finally converted.

Step 3. Then you can now hit the Convert button. In a matter of a few minutes, you get to enjoy the music files from Apple Music without any restrictions as you wish. You can also do the batch conversion if you have to.

If you want to see the status of the conversion process, you can always check it at the interface of the TunesFun Apple Music Converter. Now that you finally have the Apple Music tracks that you love on your own hands, you can now freely rename albums in iTunes or in anywhere that you have saved your converted music files.
Part 3. To Summarize It All
It would have been really great to rename albums in iTunes or in anywhere where your music files are stored. Aside from being able to express yourself in your music you also get to personalize them in case. Even if it is hard to do due to limitations and regularities, we are happy to have shared with you some of the things that you can do.
And with all that, we highly recommend that you use the TunesFun Apple Music Converter in converting your music files, with the help of professional tools like this one, tasks that you have to do for your music tracks will be easier to deal with, and faster as well. You can now have less stress or absolutely no stress at all with the aid of TunesFun Apple Music Converter!
 Home
Home
Leave a comment