How To Send Ringtone To iPhone Via Email Or iTunes?
When we receive a call, text message, email, or other notification, iPhone makes a sound to alert us, which is often referred to as a ringtone. However, by default, no matter who calls you, the ringtone is the same. Many iOS users will create new ringtones if they are tired of the default ringtone. Once you have created a nice tone, how to move them to your iPhone?
You can send any song or audio clip into a ringtone with a few simple steps. In this guide, we’ve got a step-by-step tutorial to show you how to send ringtone to iPhone via email and iTunes app. We also will discuss a useful tool to convert protected even your Apple Music songs into ringtones.
Article Content Part 1. The Ringtone Format on iPhonePart 2. How to Send Ringtone to Your iPhone via EmailPart 3. How to Send Ringtone to Your iPhone via iTunesPart 4. How to Rip Songs from Apple Music to Use Them for RingtonesPart 5. Summary
Part 1. The Ringtone Format on iPhone
Before we learn the way on how to send ringtone to iPhone via email, let's know what format of ringtones the iPhone supports. iPhone and its operating system iOS have unique features that set them apart. Apple is known to create standards for itself, rightfully so, as they are the leader in so many innovations.
The ringtones format of the iPhone is encoded in AAC. AAC stands for Advanced Audio Coding. This is the same codec used to stream music from Apple Music. No wonder Apple ringtones sound realistically like Apple Music songs. It's also the standard audio format for many other devices and platforms.
Ringtones are one of the top ways that you can really personalize your iPhone. You can set your favorite tunes to play when you receive a call, or even when you receive a notification. Quick jump to the method you're interested in!
Part 2. How to Send Ringtone to Your iPhone via Email
If you're not all that impressed with the inbuilt ones which come with your device, you may have already created your ringtones. However, once creating your own ringtones on a PC or the ringtones app, how to send ringtone to iPhone via email? No worries - this is pretty easy to do, and we'll take you through the steps you need to accomplish this quickly and easily.
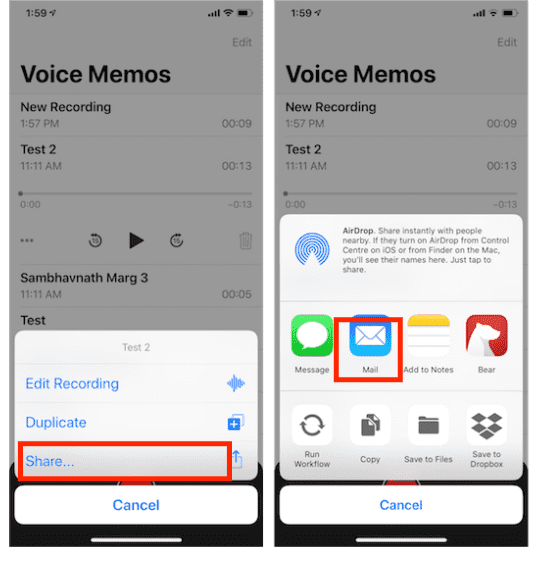
- Open your iPhone and then launch immediately the Voice Memos app.
- Tap the "Record" button to record the sound you want to use as a ringtone. This sound should be within 30 seconds. Then, tap the "Stop" button to finish the process.
- You have the option to trim the recording created. To do so, just click the “Trim Memo” option. Using the slider, you shall be able to choose where to start and stop the audio file.
- Choose “Share” next.
- From the menu list displayed, choose the Mail button. This indicates that you can send ringtones to your iPhone via email.
- After that, provide the email address of the recipient.
- Finally, tap the Send button to proceed.
These ringtones can also be sent to yourself. However, you must remember that if you want to send more than one ringtone, you should first compress it into a Zip file before attaching it to the email you create. Also, note that email usually has a limit on the size of attachments, so you should allocate some extra monitoring for this.
Part 3. How to Send Ringtone to Your iPhone via iTunes
Aside from the procedure tackled above regarding how to send ringtone to iPhone via email, you can also use the iTunes app to share ringtones with your friends. AAC files can most definitely use the .AAC file extensions but they're more commonly seen wrapped in the M4A file container, and therefore usually carry the .M4A file extension. iTunes will help you change the name of the file extension.
- Now, start adding the ringtones from the computer to the iTunes library. Go to File menu > select Add File to Library/Add Folder to Library, then you can choose the ringtones on your computer and transfer them to iTunes.
- While your song is highlighted, go to File, Convert, and then Create AAC Version.
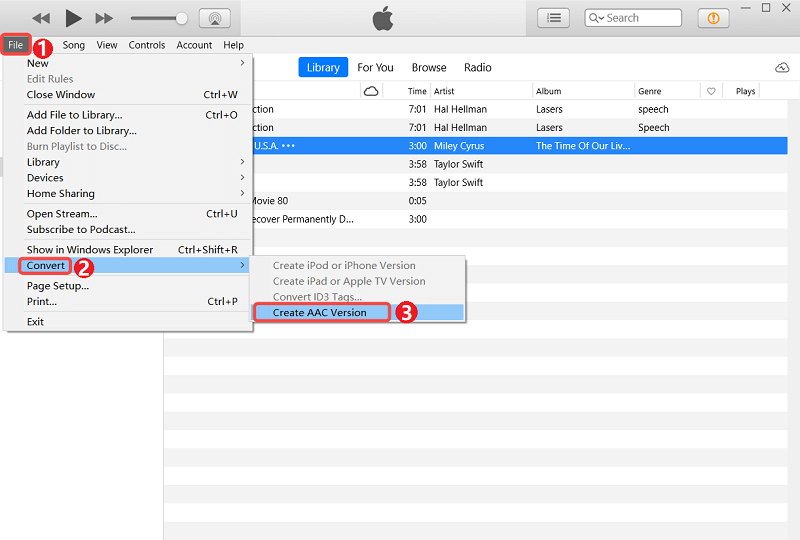
- You’ll end up with two copies of the same song file in your iTunes library: The original MP3 version and the new AAC version. Now you have to change its file extension to .m4r for it to be recognized by your iPhone.
- Right-click on the new song and select “Show in Finder” (if you are using a Windows-based operating system, select “Show in Windows Explorer). The new song will show up in your Finder window as an .m4a file. Click on it to select it.
- Rename the extension of the file from .m4a to .m4r. Make sure you just rename the extension, not the file. This step is very important. Changing it to .m4r turns the file into a ringtone.
- Connect your iPhone to iTunes.
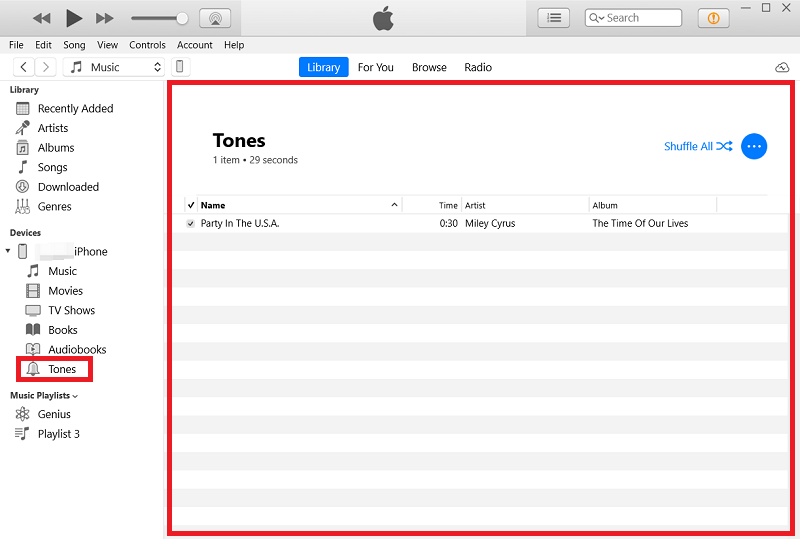
- Now return to iTunes, and under the “On My Device” section select “Tones”
- Check the box for "Sync Tones" and then check the boxes for the ringtones you want to sync. There are 2 options available, check "All tones" to choose all the ringtone files to sync, or check "Selected tones" to select the specified ringtones that you want to transfer.
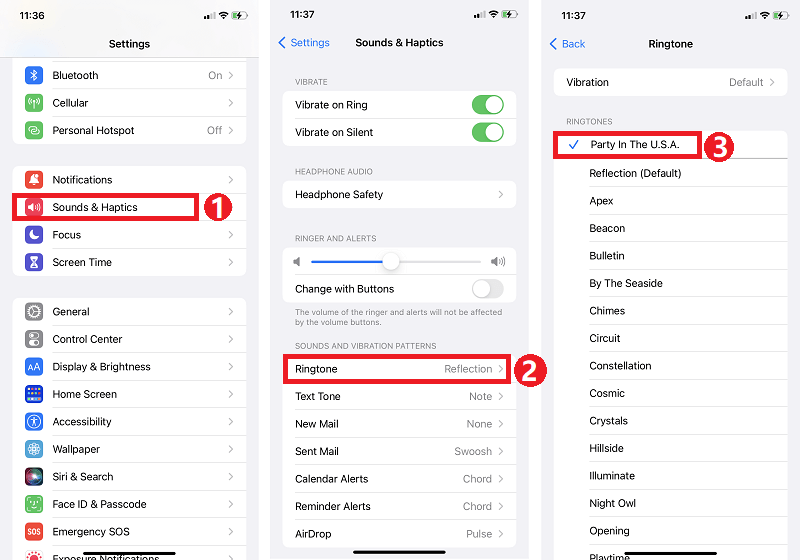
- When your iPhone is done syncing, the new ringtones can be found in your Settings app on your device.
- Go to Settings > Sounds & Haptics > Ringtone, and select your new clip.
Part 4. How to Rip Songs from Apple Music to Use Them for Ringtones
We've tackled how to send ringtone to iPhone via email and iTunes. But as a “lossy” service, AAC will discard most of the original digital data. So now, let me share with you another way to send a ringtone and other files on other devices without losing audio quality.
In Apple Music, you can find a lot of tracks that can be used as ringtones as well. everybody nowadays wants to use lossless formats because of the great audio quality. How can you get Apple Music Lossless audio? TunesFun Apple Music Converter will do a great job in such a case.
Talking more about TunesFun Apple Music Converter, as mentioned, it can convert files, it can download and can remove the DRM protection from Apple Music tracks. The formats that you can get from AMusicSoft include MP3, FLAC, WAV, AAC, AC3 and M4A. All of these formats can easily be accessed and kept on any device, so playing them anytime and anywhere you want wouldn’t be that much concern. Even if songs greyed out on your iPhone, you can restore them immediately.
The functions it has are also very easy to understand and it is also designed with a 16x faster working speed. As you will notice, all of the downloaded files are with the best audio quality and are too perfect to stream or be used as a ringtone on your device. Once downloaded, they can be transferred into other devices without restrictions. Use the following steps to convert the iTunes or Apple Music library to MP3.
- Download and install TunesFun Apple Music Converter on your PC.
- Launch the program and allow it to sync the iTunes library on the main interface. You can drag and drop if it does not import the library.

- Then select the songs you want to convert by highlighting them. Next, choose MP3 as the output format and select the folder for output files.

- Simply click Convert to start converting.

- Wait for it to finish, and then go to the Finished tab to view your converted files.
Now that your songs are in standard music format, you can use them on several things. You can transfer them to an Android phone to use as ringtones. You can even use them for your PowerPoint presentation or Web page design. The possibilities are endless when using this versatile tool.
Part 5. Summary
You’ve just learned how to send ringtone to iPhone via email and iTunes. If you want more music from Apple Music to set your favorite ringtones, using TunesFun Apple Music Converter can help you a lot. It will help you make ringtones from your protected Apple Music songs. You can choose to use the free trial version and then purchase the program when you are satisfied with its features.
 Home
Home
Leave a comment