How To Transfer Playlist From iTunes? Official Ways In 2025
Ideally, if you wish to transfer iTunes playlists to a computer or an iOS device, then you can use iTunes. But most songs from iTunes or Apple Music have DRM. Can you transfer playlist from iTunes? You may get frustrated if the operation does not proceed, especially when doing it with Apple Music songs. However, don’t worry because we got you covered in this area.
In this post, I will let you know how to sync iTunes music to different devices and would also cover another solution to move songs from iTunes without limits. Without further ado, it’s time to get ready to transfer playlists from iTunes to be able to use them on the go or with other media players.
Article Content Part 1. Can I Transfer iTunes Playlists to Other Devices?Part 2. How to Transfer iTunes Playlists via iTunes?Part 3. How to Transfer iTunes or Apple Music Playlist Without iTunes?Part 4. Summary
Part 1. Can I Transfer iTunes Playlists to Other Devices?
Can I transfer my iTunes playlists to a new computer? Of course! In iTunes, you can easily move iTunes playlists to a new computer using the Export and Import function, or syncing feature. However, one of the hurdles in transfer playlist from iTunes is DRM. DRM stands for Digital Rights Management. It’s a way to deter you from making unlimited copies of your iTunes songs. DRM keeps music pirates at bay.
DRM limits so many things you can do with your songs. The DRM tech of Apple is quite different. It uses its own proprietary algorithm called FairPlay. FairPlay makes use of the tracks on your songs and inserts important user keys inside them. It is these user keys that are used as “gatekeepers”. They are first checked before allowing you to play copyrighted Apple Music songs. These user keys are actually related to your Apple Music username and password and all of this info is uploaded to the Apple servers.
So when you download songs from Apple Music, it’s almost sure that it has DRM. However, if you downloaded songs from the iTunes Store, it’s highly likely it has no DRM. Apple decided to remove DRM from purchased songs from the iTunes store. In practice, it’s easier to transfer playlists downloaded from the iTunes store than from Apple Music.
Part 2. How to Transfer iTunes Playlists via iTunes?
Transferring playlists from iTunes to different devices is quite easy. So now, we will show you how to turn that into reality. Let’s get started with these methods.
Transfer iTunes Playlists to New Computer
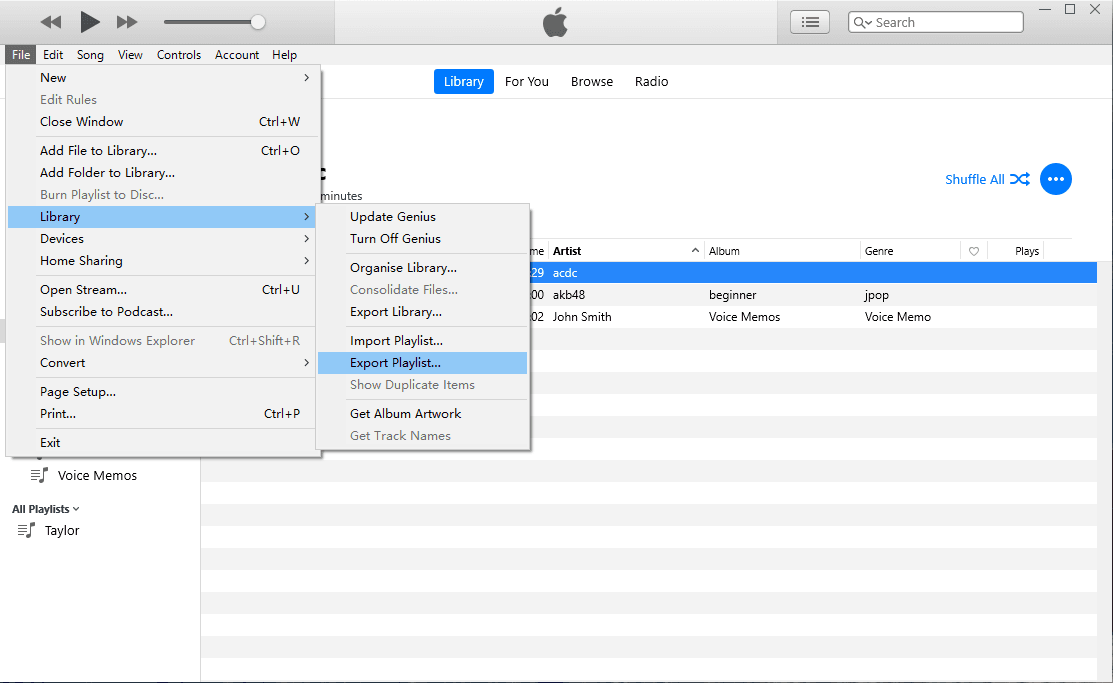
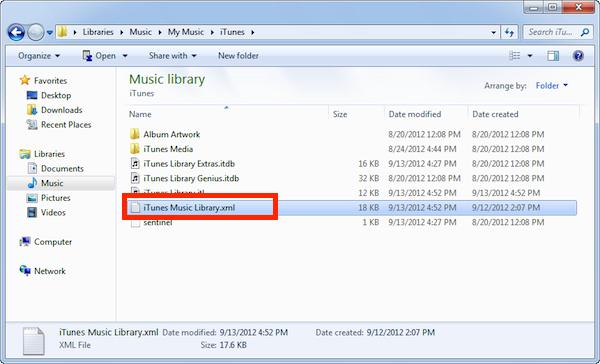
If you want to transfer playlist from iTunes to a new computer, the fastest way is using .XML file. You just need to generate and copy the .XML file (usually several KB or MB) and the transfer process could be finished in 1 minute. How can you do this? You can easily move iTunes playlists to a new computer using the Export and Import function.
- Open iTunes on your old computer. Choose File > Library > Export Playlist.

- Choose a location to save the file. You can use a USB flash drive if you have one. Finally, select “XML” as the format for your exported file.
- Copy the .XML file Library to your external drive and then paste it to your new PC.

- Launch iTunes on your new computer. Click the File > Library > Import Playlist. Navigate to the playlist XML file you exported and click Open to add the playlist to the left iTunes menu.
Transfer iTunes Playlists to iOS Device
If you're using macOS Mojave or earlier or a Windows PC, you can use iTunes to sync content to your devices. What you can sync with iTunes? Albums, songs, playlists, movies, TV shows, podcasts, audiobooks, photos and videos, contacts and calendars are included! Here are the steps for how to transfer playlist from iTunes to your iOS devices.
- Open iTunes and connect your device to your computer with a USB cable.
- Click the device icon in the upper-left corner of the iTunes window.
- From the list under Settings on the left side of the iTunes window, click the Music option. To turn syncing on for a content type, select the checkbox next to Sync.
- To sync the whole library, you can tick the box next to the Entire music library. Or, to selectively sync devices with iTunes, tick the box below the entire option, then check the box next to each item you want to sync.
- Click the Apply button in the lower-right corner of the window. If syncing doesn't start automatically, click the Sync button.

As the official software released by Apple, iTunes is always the first choice and the necessary choice for Apple users to manage files on their iOS devices on computers. However, Apple discontinued its iTunes for macOS in 2019. With the macOS Catalina update, it split iTunes's functionality between four apps, namely Music, Podcasts, and TV, with Finder and Apple Devices. Microsoft has announced that previews of new Apple Music, Apple TV, and Apple Devices apps are available in the Microsoft Store for download in 2024. iTunes is no longer the only bridge.
Part 3. How to Transfer iTunes or Apple Music Playlist Without iTunes?
Although iTunes provides two ways to transfer playlist from iTunes to other devices, the process can be a bit complicated to implement. What's more, as we mentioned above, Apple will soon phase out iTunes. We’re not sure how long Apple will continue supporting iTunes on Mac and Windows PCs as well.
If you are looking for a smart, seamless, and quick solution, then you can try TunesFun Apple Music Converter. The software offers more flexibility, it is able to transfer any music file, transferring the playlist is possible and fast, and there are no restrictions, unlike iTunes.
Key Advantage of TunesFun Apple Music Converter
- Best Alternative to iTunes to let you manage all of your tracks and videos with the desired flexibility.
- Import and convert music to any device-friendly format. Common output formats: MP3, AAC, M4A, AC3, FLAC, WAV.
- Download and convert all Apple Music songs for offline playing.
- Remove DRM from Apple Music or iTunes.
- Keep the ID3 Tags and all metadata while exporting.
- 16X conversion speed. Support batch conversion.
- Support Windows & Mac OS.
It also has an easy user interface that can be navigated even by beginners. Thus, there won’t be any issues during usage. It’s totally user-friendly! See the detailed steps below:
- Download the TunesFun Apple Music Converter from the TunesFun website or click the download button below.
- Launch the app and then start adding the Apple Music or iTunes songs that you like to convert to MP3 format. The app also does batch conversion.

- After uploading the songs to process, you can now set up the output settings.

- Tick off the “Convert” button. The app will then do the conversion process. The DRM removal procedure will also be done by the app at the same time.

- When it finishes, go to the Finished tab. You will then see your converted files.
The whole conversion process would only take a few minutes since the app works pretty fast. Your songs will become DRM free after using TunesFun. You can open these music files on any device or media player and keep converted songs from iTunes or Apple Music.
Part 4. Summary
As you can see, we have listed a stepwise solution on how to transfer playlist from iTunes in this article. Besides that, if you want to know how to transfer music from iTunes or Apple Music without the iTunes app, then you can just use TunesFun Apple Music Converter.
TunesFun Apple Music Converter can convert all of your Apple Music songs into formats that most media players can support. It’s reliable, versatile, and professionally made. Use this iTunes Alternative to make your life easier. Once you’ve used TunesFun, you’ll never look at other Apple Music converters again.

Leave a comment