YouTube to Apple Music Converter: How to Transfer Music?
Have you found out how good the Apple Music platform is? If you have been a user of YouTube Music for quite some time, and you’re currently planning on moving to Apple Music, perhaps, you are already thinking of what good YouTube to Apple Music converter to use. We’ll share the best ones to use here.
When talking about music libraries, both platforms mentioned are offering catalogs that are wide and fairly extensive. However, there are some cases when specific tracks can only be found on a certain platform. There could be songs that are only on YouTube and not on Apple Music. Thus, if you have those YouTube Music favorites that you can’t find on Apple Music and would wish to get them added to your Apple Music library, it is good to rely on converting YouTube songs to Apple Music via a converter tool.
To get those songs from YouTube Music added to Apple Music, downloading the YouTube songs as MP3 files using a YouTube Music downloader is the first step to do. Importing them to your iTunes library is what’s needed to be done next to finally enjoy them on your Apple devices.
Article Content Part 1. Apple Music vs Youtube Music: Comparison in 2023Part 2. Download YouTube Music via 4kFinderPart 3. Add the Downloaded YouTube Music Files to Apple Music or iTunesPart 4. Extra Tip: Add Apple Music Songs to YouTube MusicPart 5. Summary
Part 1. Apple Music vs Youtube Music: Comparison in 2023
Before we finally get to meet the best YouTube to Apple Music converter to use, it is also good to see a comparison between the two platforms involved.
Comparison Between YouTube Music and Apple Music
We can’t deny the fact that both are popular. Of course, they are unique in their own ways.
- YouTube Music has a free version that can be enjoyed. However, there are ad pop-ups. There is no free version of Apple Music. What the platform offers is only a free trial that’s good for 30 days.
- Apart from the free version, YouTube Music also offer s a free trial. This has two subscription tiers – 9.99 USD monthly for individual users and 4.99 USD per month for students. Apple Music, on the other hand, has several subscription plans ranging from 5.99 USD to 15 USD per month.
- When it comes to the music library, there are 100 million songs the Apple Music platform offers whereas YouTube Music has only 80 million.
- On Apple Music, the music quality that can be enjoyed is up to 3,730 kbps (lossless ALAC). Apple also supports Spatial Audio with Dolby Atmos. In YouTube Music, one can enjoy up to 256 kbps.
- There is no desktop version of YouTube Music. One can use the web player though. Users of Apple Music, on the other hand, can take advantage of either the iTunes or Apple Music app.
- YouTube Music is available in over 100 countries around the globe whereas Apple Music can be used by users in over 168 countries.
Using the above comparison, we definitely understand why you are trying to find a reliable YouTube to Apple Music converter and wish to switch from YouTube Music to Apple Music. Moreover, these items are surely added reasons for most users.
Additional Reasons for Switching from YouTube Music to Apple Music
- Apple Music offers spatial audio and a lossless listening experience. Streamers can listen to high-quality sounds without paying an additional fee.
- Apple Music is indeed considered the official music streaming platform for Apple products.
- Indeed, Apple Music is considered a great part of the Apple ecosystem.
Now that we have presented the significant differences between these two platforms, let us move into the second section wherein how to transfer tracks from YouTube Music to Apple Music shall be discussed.
Part 2. Download YouTube Music via 4kFinder
Actually, the way of transferring YouTube songs to Apple Music that we have here is 4kFinder, a tool that’s capable of downloading those songs and playlists that you have on YouTube. It is even capable of saving videos from the platform without incurring a quality loss. The app supports downloading files in MP3 format so they can be enjoyed on almost all devices.
As mentioned, when adding YouTube Music to Apple Music, the first step to do is to download the files via a good YouTube to Apple Music converter – in this case, the 4kFinder. Here is how this app works.
Step #1. The 4kFinder app must be downloaded and installed on your computer first. Launch it once done and ensure that you have copied the URL of the YouTube file to be downloaded. Afterward, paste it to 4kFinder and click “Analyze” to start analyzing the video link.
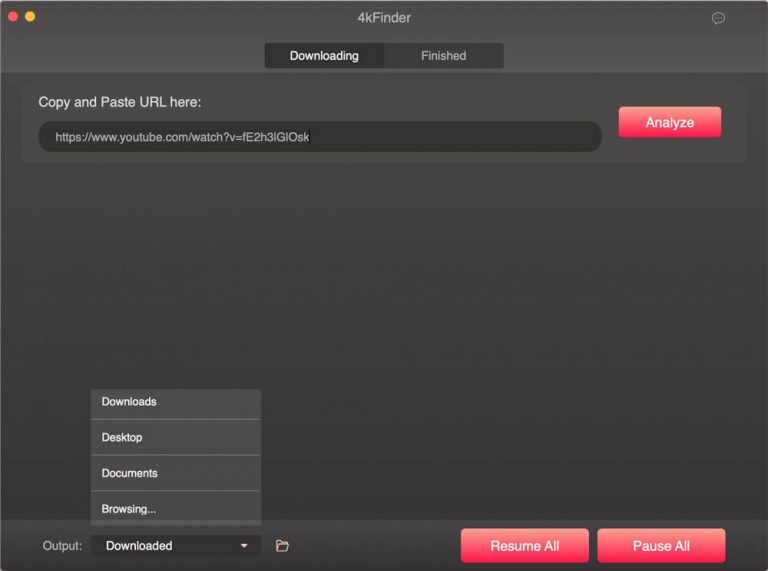
Step #2. A setting window shall pop up. Choose the “audio” option then under “Format”, select “MP3” at 320 kbps bitrate.
Step #3. The last thing to do is to tap the “Download” button to finally have the MP3 audio files from YouTube saved to your PC’s local drive.
You can see the downloaded files once the “Finished” option has been tapped as well as the “Open Folder” button.
Part 3. Add the Downloaded YouTube Music Files to Apple Music or iTunes
After using this YouTube to Apple Music converter, it is now time to finally add these YouTube Music files to Apple Music. Learn how in this part. You have two ways to add the downloaded YouTube Music files to Apple Music. Both shall be explained here.
Way #1. Adding the Downloaded YouTube Music to the iTunes App on Windows or Mac
Step #1. Using your desktop, open the iTunes app. Make sure to log into your Apple Music account with your credentials.
Step #2. Tap the “File” button that is at the top area of the screen. From the options, choose “Add File to Library”, and then select the downloaded MP3 files from YouTube Music.
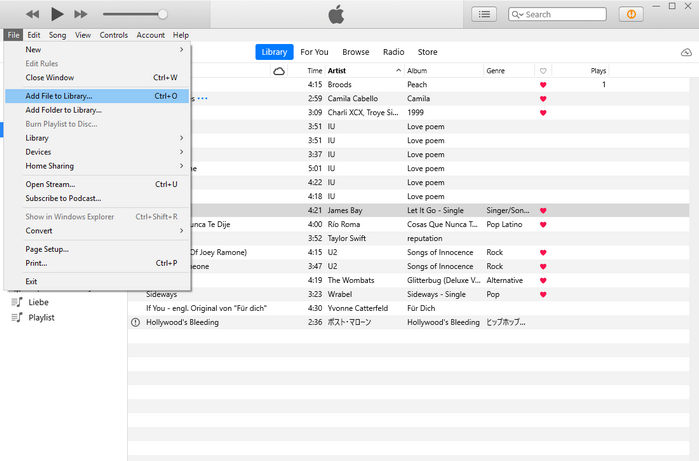
You shall see the tracks displayed in your library afterward. In case you wish to stream them on your handy devices such as your iPhone, you just have to sync the files and you should be good to go.
Way #2. Adding the Downloaded YouTube Music to Apple Music Using MacOS 10.15 Catalina or Later
Step #1. On your Mac 10.15 Catalina or later version, open the Apple Music app. Tap the “File” button, then choose the “Import…” option next.
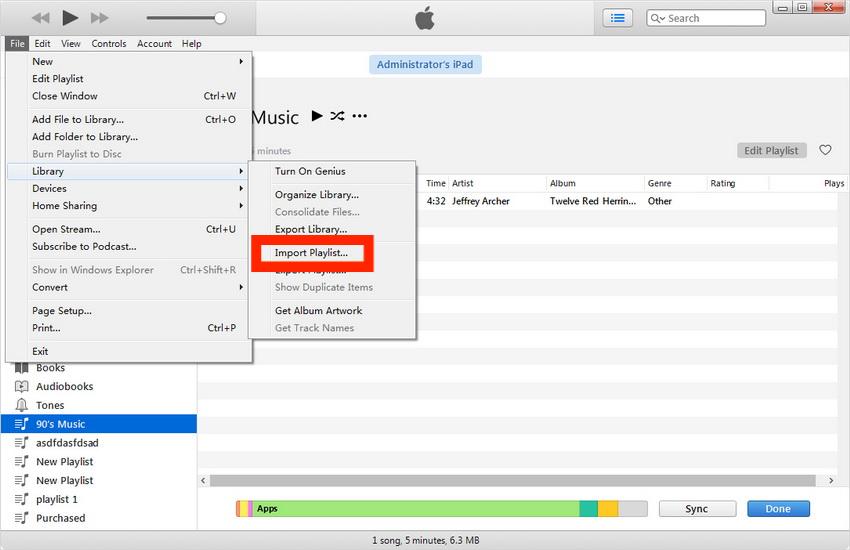
Step #2. From your local folder, you just have to choose those converted and downloaded YouTube Music files.
Upon doing so, the files shall be displayed on your Apple Music library!
Part 4. Extra Tip: Add Apple Music Songs to YouTube Music
Now that we’re fully aware of how a YouTube to Apple Music converter such as 4kFinder can be of help when adding YouTube Music to Apple Music, it would also be good to share how you can have your Apple Music favorites added to YouTube Music.
Since Apple Music songs are encrypted with DRM protection, to get them moved to another platform or be played on other devices, there is a need to remove the protection first. Luckily, there are bunches of apps that can do that. However, we suggest using the TunesFun Apple Music Converter as this is the best.
TunesFun Apple Music Converter must be applauded for its capability to remove DRM security from Apple Music tracks. Apart from the DRM removal feature, this app also has a feature that allows its users to convert Apple Music songs to MP3, its supported formats include FLAC, M4A, AAC, WAV, and AC3. So that you can play converted music files on any device, you can also set up your Apple Music sleep timer with these converted files.
It is a powerful app that does lossless conversion. Thus, maintaining the songs’ original quality, ID tags, and metadata. This is an app that can be installed on Windows and Mac and has an interface that’s simple so even novices can use this. Here is a guide on how you can use the TunesFun Apple Music Converter.
Step #1. Once the professional tool has been installed on your PC, launch it right away. On the main page, you can start to preview and select the Apple Music songs to be processed. Choosing a bunch is fine as this app supports batch conversion.

Step #2. Select your desired output format and alter those settings at the bottom if you wish to.

Step #3. Click the “Convert” button once you’re all good with the second step. The app shall then start converting the chosen Apple Music songs. At the same time, the DRM removal procedure shall also be done by the app.

In a few minutes, you shall have the converted and DRM-free Apple Music songs saved on your computer. What you need to do next is to upload the songs to YouTube Music.
- Simply go to YouTube and sign in to your account.
- After tapping your profile picture, you can choose the option that says “Upload music”.
- Choose the folder where the converted Apple Music songs are.
Part 5. Summary
It is indeed recommended to use a reliable YouTube to Apple Music converter when downloading YouTube Music files to be added to Apple Music. 4kFinder is a good example. After downloading, uploading to Apple Music or iTunes is very easy to do as well. There are two ways to do that and those were explained in this post. In addition, if you happen to be interested in the other way around – getting Apple Music songs saved to YouTube Music, don’t forget that TunesFun Apple Music Converter is a good tool to consider during the process.
 Home
Home
Leave a comment