Indeed, Apple Music’s popularity keeps on growing as time passes by. This is somehow attributed to the unique features and perks it continuously offers to its users. In fact, one of such features, its built-in settings for the equalizer, will be this post’s main topic. Specifically, how to change the equalizer on iPhones
Being able to know how to change the equalizer on iPhones will help Apple Music enthusiasts to further enhance their music streaming experience. The process isn’t actually hard. Being tech-savvy isn’t needed to ace this one. You don’t have to worry about this as this article will give all the details you need relative to the whole procedure.
We know that every user has a different music listening preference. Thus, being able to customize the equalizer settings will help one attain the best experience when it comes to streaming songs specifically Apple Music tracks. Let us now find out more about how to change the equalizer on iPhones!
Article Content Part 1. The Process of Adjusting Equalizers on iPhonesPart 2. Additional Information: List of the Best Apple Music Equalizers for iOS DevicesPart 3. Setting Up Apple Music Equalizer Without IssuesPart 4. Summary
Part 1. The Process of Adjusting Equalizers on iPhones
As we have previously stated in the introduction part, the process of how to change the equalizer on iPhones is definitely an easy task to do. In fact, it will only take a few steps to get this accomplished. Even if you are to do this for the first time, you’ll surely encounter no issues along the way. Now, check out the below steps on how to change the equalizer on iPhones as well as on iPads.
Step #1. On your iPhone or iPad, head over to the “Settings” menu. Scroll until you see the “Music” option.
Step #2. Under “Play”, you should be able to see the “EQ” button which you need to tap in order to choose the equalizer desired.
Step #3. When EQ is launched, you will be able to browse and see all the available presets. You may now select the music effect you like the most.
Step #4. Head over to Apple Music and start playing your selected track to see if the chosen effect has now been applied or taken effect.
As simple as following the above process of how to change the equalizer on iPhones, you’ll get your Apple Music streaming experience brought to a new level! Since everyone has his own preferred equalizer settings given different music tastes, we really cannot say what setting is the most perfect. However, we have found a good recommendation through research just in case you aren’t sure how your Apple music listening experience can be at its peak.
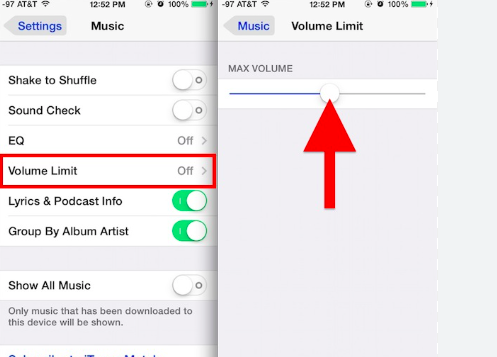
Setting Up Volume Limit Settings
The below settings are recommended for iOS users having devices in version 12 or later.
Step #1. Move to “Settings”, choose “Music”, and then “Volume Limit”.
To ensure that changes won’t be done on the volume limit, the below steps must be done.
Step #1. Go to “Settings”, select “Screen Time”, and then “Content & Privacy Restrictions”.
Step #2. The “Content & Privacy” option must be turned on.
Step #3. Click “Volume Limit”.
Step #4. Afterward, tap the “Don’t Allow” option.
Setting Up Sound Check Settings
Step #1. Head over to “Settings” and then look for “Music”.
Step #2. The “Sound Check” option must be enabled.
Part 2. Additional Information: List of the Best Apple Music Equalizers for iOS Devices
Though we have already highlighted how to change the equalizer on iPhones in the first part, we will still share additional information in this article. Thus, we have this part created to present you the list of the best Apple Music equalizers that can be used on iOS devices.
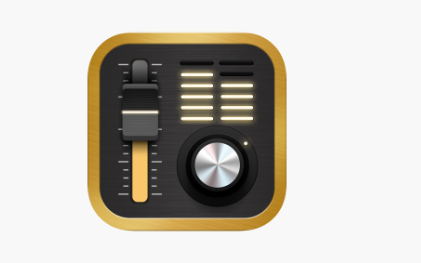
Equalizer FX: Bass Booster App for iOS
Most users are saying that this app is the best equalizer app for iPhones and iPads. It has a 7-band EQ and other great features such as dynamic bass tuning making it easy for users to create customized presets. A loudness enhancer, as well as a bass booster, can also be enjoyed to further adjust the sound effects of the music. Further improving the stereo effect can also be done through the available audio filters.
Boom: Music Player & Equalizer for Both iOS and Android
This next item on the list is an app that perfectly works with iOS and Android gadgets. It has great features including 3D surround sound, 16-band EQ, and, hand-crafted presets. Creating your own presets can also be done.
Equalizer+ Pro: HD Music Player for Both iOS and Android
We also have the Equalizer+ Pro on our list. Apart from being an equalizer, it can also be used as a music player and a bass enhancer. Using this app, you can take your Apple Music listening experience to a whole new level as you can get your favorite tracks edited, mixed, and customized as you wish. Given its 7-band equalizer, adjusting the track’s volume can be made possible as well as giving depth to the songs.
Apart from these three, there are still other various EQ apps that can be of good help to you. Also, it is good to remember these important Apple Music equalizer settings to ensure that you are always having the best music streaming experience on Apple Music.
- Acoustic – this is responsible for emphasizing the treble and bass while ensuring that the midrange is balanced and thus, improving the whole mix. It can definitely bring a huge impact on the quality of the sound.
- Bass Enhancer – this is responsible for boosting the bass to improve the sound.
- Treble Booster – It can increase the frequency and even emphasize sounds that are higher in pitch. Thus, helping to create a tune that’s more atmospheric.
- Deep – It is being used in order to minimize the treble part. This can also help boost both midrange and bass.
Part 3. Setting Up Apple Music Equalizer Without Issues
Learning how to change the equalizer on iPhones isn’t actually enough. In order for you to ensure that setting up your Apple Music’s EQ settings will be smooth and issues won’t be encountered along the way, the DRM protection of the Apple Music songs must be removed first. Changing the Apple Music songs’ format is also a must. But how can these all be done?
Fortunately, when it comes to removing the protection of Apple Music songs and changing their formats to flexible ones such as MP3, a great tool such as the TunesFun Apple Music Converter can be used! This is a powerful software app that can do both the DRM removal process as well as file conversion. It currently supports various output formats such as MP3, FLAC, AC3, AAC, WAV, and M4A. It even has a fast conversion rate of 16x making it very efficient to use. While the songs are being processed, users can also be assured that the original quality of the songs as well as their ID tags will be kept and maintained.
When it comes to having this app installed on your PC, you don’t have to worry that much because this is supported by both Windows and Mac OS. Using this app won’t be an issue as well since its interface is too simple. Beginners won’t have any issues when utilizing this app’s functions. Let us take a quick look at how this TunesFun Apple Music Converter can be of great help when it comes to converting and processing Apple Music songs. The steps that must be followed are actually pretty simple.
Step #1. Install the TunesFun Apple Music Converter on your PC once all the installation needs are met. Launch it right away and start by previewing and choosing the Apple Music songs to be processed. Choosing bunches of tracks should work since this app supports batch conversion.

Step #2. Select an output format to utilize from the supported ones and don’t forget to specify the output folder location to use. It can also be noticed that parameter settings are displayed at the bottom of the page. These options can be changed.

Step #3. Once the setup is all good. It is now time to hit the “Convert” button at the bottom of the screen. This will trigger the app to start converting the selected Apple Music songs. As the conversion process is ongoing, the DRM removal process shall also take place at the same time.

Once you have the converted and DRM-free Apple Music songs, accessing them on any other apps or gadgets shouldn’t be an issue at all!
Part 4. Summary
It is actually pretty easy to accomplish the process of how to change the equalizer on iPhones. Hopefully, what we have discussed in this post will be helpful to you as you perform the procedure. Moreover, if you are looking at using and accessing Apple Music songs on other apps, don’t forget that when it comes to DRM protection removal and file conversion, you can always count on apps like the TunesFun Apple Music Converter.
 Home
Home
Leave a comment