How to Connect Kindle Fire to a Computer?
Kindle Fire is one of the best creations of Amazon making it considered a popular and most used e-reader by book enthusiasts around the globe. Given that it’s lightweight, it became too portable making it convenient for people to bring anywhere. With Kindle Fire’s long-lasting battery life and huge storage capacity, people would surely love keeping books and documents on it and accessing them anytime.
If you are thinking to move some files from your PC to your Kindle Fire tablet, connecting Kindle Fire to a computer must be done firsthand. For users of Kindle Fire who are used to buying or purchasing content online, this could be a new process especially if they also got files from their PCs that they needed to add to their Kindle Fire tablets. Luckily, there are various ways of connecting Kindle Fire to a computer. Some of them will be presented and highlighted in this article. If you have been curious about the same topic, then just keep on reading.
Article Content Part 1: The Process of Connecting Kindle Fire to a ComputerPart 2: Additional Note for Audible EnthusiastsPart 3: Summary
Part 1: The Process of Connecting Kindle Fire to a Computer
As also stated in the introduction part, there are actually various ways of connecting Kindle Fire to a computer. We will be trying to discuss and share with you two of them in this section of the article.
#1. Connecting Kindle Fire to a PC via a Micro-USB Cable
The first method of connecting Kindle Fire to a computer is through a micro-USB cable.
On a Windows PC
Step #1. Using a micro-USB cable, get your Kindle Fire connected to your Windows PC.
Step #2. Make sure to unlock your Kindle Fire tablet next.
Step #3. Wait for a few minutes until your Kindle Fire has been recognized by your Windows PC. There should be a window that would pop up showing the device management options for your Kindle Fire.
Step #4. Tap the “Open folder to view files” to see all data and content on your Kindle Fire. If in case it won’t open, head over to “Windows Explorer” and then click either “Kindle” or “File” from the left pane of the screen.
Step #5. You have to click the “Internal Storage” folder next as this is where you should save the file. Drag and then drop the files to be moved.
Step #6. Lastly, ensure that the “Disconnect” button on your Kindle Fire screen will be tapped afterward. Remove the micro-USB cable. Once the Kindle Fire exited the “USB mode”, the home screen shall show up.
On a Mac PC
Step #1. You must download the “Android File Transfer” app first. This will be needed when transferring files from a Mac to a Kindle Fire tablet.
Step #2. Get your Kindle Fire connected to your Mac via a micro-USB cable. If in case your Mac computer has no port that’s compatible, you can use an adapter.
Step #3. Wait until your Mac has recognized your Kindle Fire. You should see an icon that is either labeled “Kindle” or “Fire” on your Mac desktop.
Step #4. Click the icon for your Kindle Fire and those files that you have on there will be shown on the Finder app on Mac.
Step #5. Make sure to click the “Internal Storage” folder from the Kindle Fire folder. This is where the files from your Mac should be saved.
Step #6. Begin to drag and drop the files that you wish to be moved. Once this is done, just close the “Finder” app.
Step #7. Don’t forget to disconnect your Kindle Fire from your Mac. You just have to drag the icon for Kindle Fire to the trash can on your Mac desktop. You will then see the “Eject” icon afterward. Lastly, unplug the micro-USD cable from your Kindle Fire.

#2. Connecting Kindle Fire to a PC Wirelessly
Some people would find it a bit annoying to use cables when connecting Kindle Fire to a computer. Thus, some users tend to look for ways to do it wirelessly. Luckily, there is a method one can resort to doing to avoid the hassle especially because the Kindle Fire tablet can’t also be used if connected to a computer using a USB cable.
Step #1. You must first ensure that your Kindle Fire has been connected to your home Wi-Fi network. Your PC and Kindle Fire tablet must be both connected to the same network.
Step #2. Install the “ES File Explorer” app on your Kindle Fire.
- You can get the ES File Explorer app from the Amazon App Store. This is free.
- Once installed, open it, and hit the icon at the top left area. This will launch the “Fast Access” menu. Select “Tools”, then “Remote Manager” next.
- You shall see the “Turn On” menu. You have to press this to see an FTP address upon activating the FTP server.
- On your PC, head to your Windows Explorer. On the address bar, you have to type the address that you see previously on the screen. Once done, hit your keyboard’s “Enter” key. You will then access your Kindle Fire’s SD card!
- What’s left to do now is to copy the files and have them moved and saved.
Note: If in case the wireless connection between your Kindle Fire tablet and your PC is unstable, you may try restarting your Kindle Fire and then see if there won’t be any issues at all.
Both methods of connecting Kindle Fire to a computer that we have presented in this section are beneficial and should work. If you feel like using USB cables would be a hassle for you, it is then recommended that you use the second option (wireless connection). But, if you think the unstable connection between devices could hinder the fast way of moving the files, then it would be best to stick with the conventional method – the use of a USB cable.
If you encountered issues while connecting Kindle Fire to a computer, these could be some of the most common reasons behind it.
- Your Kindle Fire device might not have been connected to a stable Wi-Fi network.
- The Wi-Fi network could be unstable.
- You might have forgotten to charge your Kindle Fire tablet enough for the transfer and connection process.
- Your Kindle Fire tablet’s battery needs to be replaced already.
- The USB cable that you’re using could be faulty.
Part 2: Additional Note for Audible Enthusiasts
Though our main agenda in this post is to share the process of connecting Kindle Fire to a computer, we have also added this section in the article for the sake of those readers who could also be Audible fanatics (apart from being avid Kindle Fire tablet users).
If you have been using Audible, you are probably glad with all the perks that you’re getting from the platform. Well, we can’t doubt that as Audible has been known to be one of the best in the audiobook streaming industry. One of the many benefits Audible is offering is that once a user bought a title, he can keep that forever accessible via the Audible app itself. The dilemma would be if one wants to play them outside the app or on other devices. You could think it won’t be possible given that Audible books are DRM-protected but you’re wrong! You just need to know more about a great tool that can help you deal with that.
Among the many software apps that can do the DRM removal process, we suggest using the TunesFun Audible Converter because aside from this major function, there are still a lot more that this platform offers.
- It supports the conversion of Audible books to several formats including MP3.
- It works at a fast speed of 60x.
- It does the process lossless which means that the original quality of the audiobooks and their ID tags shall be preserved.
- The app was designed to have a friendly UI and easy navigation functions.
- It is supported by Windows and Mac OS so installing it on your PC won’t be a problem.
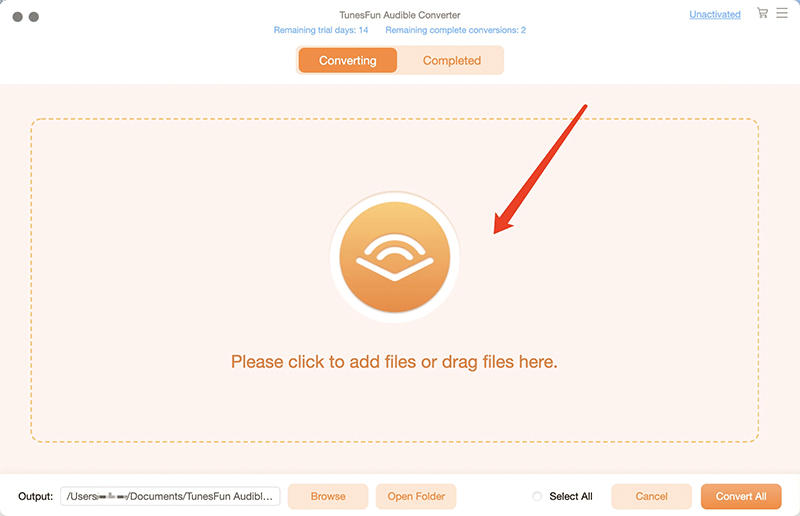
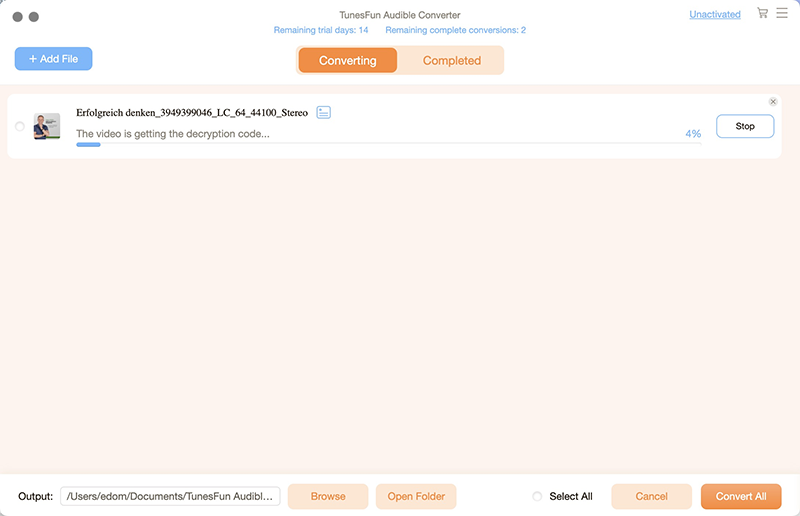
When converting Audible books through the TunesFun Audible Converter, you just have to start by adding the Audible files onto the main screen, choosing an output format to use, setting up the output folder location, and then lastly, tapping the “Convert” menu to get the process started. The DRM removal process as well as file conversion shall happen at the same time.
Part 3: Summary
When connecting Kindle Fire to a computer, you can either use a USB cable or resort to using a wireless connection as explained in the first part of this article. Transferring or moving files from your Kindle Fire to your PC or vice versa should not be a difficult task to do.
Additionally, if you love listening to Audible audiobooks as well, make sure you consider using the TunesFun Audible Converter in case you aim to make your Audible titles playable on any gadgets that you own!
 Home
Home
Leave a comment