How To Clear History On Kindle (2025 Guide)
There are lots of reasons why you should learn how to clear history on Kindle. You would always want to keep your privacy, and this alone could be enough to go and discover the process. Let us know more as we go along the article, below.
For those who value their privacy and wish to maintain their personal space, understanding how to clear history on Kindle is crucial. By learning these methods, you can keep your search history on Amazon Kindle Fire private and secure. Let's explore the various techniques to achieve this:
-
Deleting Individual or Multiple Websites: You have the option to access your Search History and remove specific websites one by one or in batches, allowing you to control what information is visible.
-
Clearing Search History for a Specific Period: In addition to deleting individual entries, you can choose to wipe out all search history within a particular timeframe, further enhancing your privacy.
In this article, we will guide you through the steps to clear history on Kindle, providing you with an understanding of the different methods available. This knowledge will not only safeguard your privacy but also help free up valuable space on your device.
Article Content Part. 1. What Are The Different Methods To Clear History On Kindle?Part 2. What Is The Best Option To Keep Your Books Private?Part 3. To Summarize It All
Part. 1. What Are The Different Methods To Clear History On Kindle?
When you are about to execute a task such as procedures on how to clear history on Kindle, it would be better if you have lots of methods to choose from. In line with this, it would be better if you can have a choice, or a backup plan in case the initial method did not proceed as planned. Let us see the list of the procedures below, as well as the steps that we have to follow to clear it well.
Method 1. Delete Items Within A Specific Period
- On the device that you are using, launch the Silk Browser. You can find it on Apps or Home, which you can see at the upper part of the screen of your device.
- Besides the search bar, you will see icons on either of the sides. Tap the icon with three dots, in case you see the one with three lines, it is also the same.
- Then you have to choose the History option, you will see it as the clock icon, and you can use it to open your history page.
- Look for the Trash icon and tap it. You will easily see it since it is the button which is located at the right side of the Search History search bar. You will then be taken to the page of the Clear Browsing Data of the settings menu.
- Then you can now select your time range. You can have the option to delete all the websites that you have ever visited from the history page, tap the All Time option in case you wanted to delete all of them. You can also have other options such as Last hour, last 24 hours, last 7 days, and even last 4 weeks.
- Go and check the box on the right side of the Browsing History option. You will also see three options along with checkboxes next to them. In case you tap the Clear Browsing Data tab, there will be six options.
- Then tap the Clear data button in orange which you will see at the lower part of the screen. By doing so, it will clear your browsing history based on the time range that you have chosen.
Method 2. Delete One Website
- To start open the Silk Browser on the device that you are using. You can do it after turning on your Kindle Fire, you will see it on the Home or Apps screen.
- Then you will see three dots or the three line options, choose one of these options. Once tapped, you will then see a pop-up menu.
- Click the History option, you can also open it by tapping the clock-like icon which is beside or above History.
- If necessary you can use the search bar. You can see it below the main web bar and is next to a magnifying glass icon. Tap the Search History option, and then type in the name of the specific website that you wish to get rid of or delete from your history.
- Tap the X option which you will see on the right side of the website name.
- It might happen that you will use the same website again in the future, in case you are, you can go over the steps once more or search the history to finally delete the said website.
And there you are! These are only some of the methods how to clear history on Kindle. There is a special thing that we would also want to share below, so if you are interested, let us get to see them below.
Part 2. What Is The Best Option To Keep Your Books Private?
When we enjoy things we tend to look for ways to access them. One of the many access of people to learning is through audiobooks. It is a great source of new information, knowledge, and even new stories to tell.
These days, we are surrounded by lots of platforms where we can listen to these audiobooks. We have apps such as Spotify and Audible, which are both great sources of audiobook files. We also have lots of online apps, sites, and platforms and some of which are also free.
This is a truly significant part that is vitally needed in accessing all the audiobook files that we love and adore. Aside from using these platforms and online sites, we also have other methods to access audiobook files more efficiently.
We also hope that you have learned all the useful things about how to clear history on Kindle from the previous parts of the article that we have already discussed. This time, we are about to share with all of you a tool that would make all audiobook lovers happy as ever.
One of which is the use of the professional tool known as the TunesFun Audible Converter. This tool is very significant in making sure that accessibility to these audiobook files will be attained conveniently. It is a reliable partner which could even give you more than you asked for, to tell you about its features, we have some of them listed below.
⭐ Many audiobook lovers have a great concern when it comes to time management. They need tools to make their work faster and more efficient. Well, the TunesFun Audible Converter can help you save time with its really fast conversion rate that runs 60 times faster compared to other ones in the market.
⭐ The TunesFun Audible Converter can transform your audiobook files into formats that are simple and common. By converting your audiobook files, you are also broadening the means to access them.
⭐ The DRM encryption that protects the files is also removed during the file conversion.
The output that you will be receiving once the conversion has been finally completed is of great quality!
⭐ The steps or the procedures that you need to follow for the file conversion are straightforward to understand, we also listed them below for your reference.
Click to download and follow the step-by-step guide! It's 100% secure.
Try It Free Try It Free
Step 1. Begin the process by installing the TunesFun Audible Converter on your device. Once installed start adding all the audiobook files that you wanted to convert.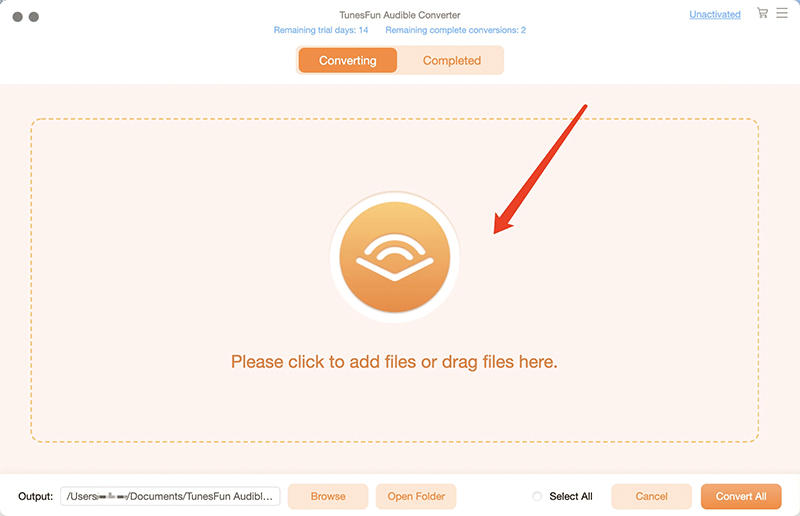
Step 2. Select the format of the file that you want to achieve as your output and then create a folder where your converted files will be saved.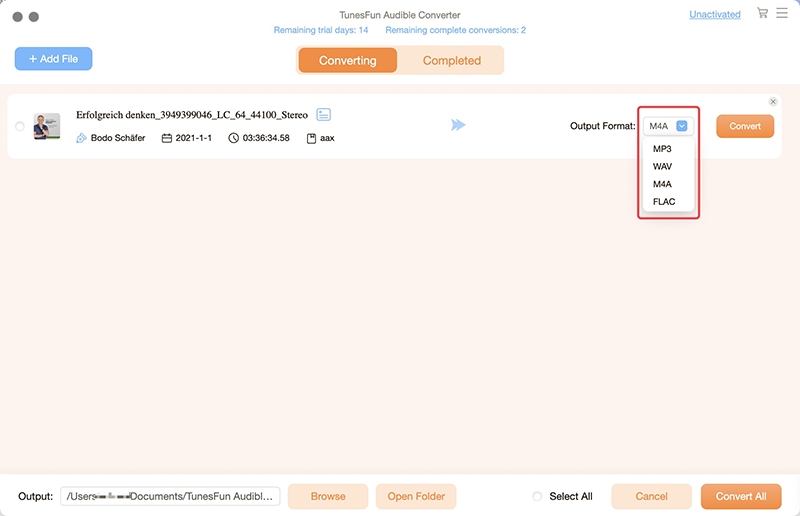
Step 3. Hit the Convert tab and wait for a few minutes until all conversions have been completed!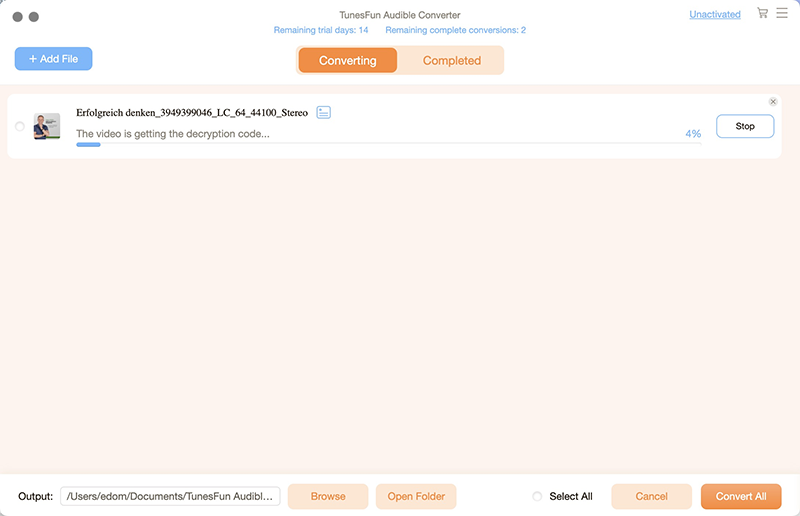
You can see the monitoring of the process on the home page of the tool. This would be better if you loved to be informed about the status of the conversion process.
Part 3. To Summarize It All
We offer a variety of methods to achieve our goals; however, not all of them may be budget-friendly for everyone. It's essential to identify the most suitable tools to ensure a seamless process. Having considered various methods, clearing your device's history is now a straightforward task.
For a more convenient way to access audiobooks, we recommend using the TunesFun Audible Converter, a professional tool. Opting for this tool is like choosing a life enriched with unlimited audiobook enjoyment.
 Home
Home
Leave a comment