How Can You Add A Music Player To Tumblr?
Tumblr is still a known platform wherein users are sharing bunches of content that they’d like to share with others – blogs, images, GIFs, and even videos. In fact, you can even share music and other types of audio files on Tumblr as well! If you just recently found out about this information, you will definitely be happy to learn how you can add a music player to Tumblr!
If you happen to love bunches of songs from Spotify, you are probably wondering if you can have them incorporated into your Tumblr content. Well, you’ll be glad to know that it’s actually achievable and, of course, possible! This post will actually mainly deal with the topic of how to add a music player to your Tumblr blog.
As you move to the first part, you will be learning right away how you will finally be able to add and personalize your favorite Spotify songs, albums, and playlists to Tumblr!
Article Content Part 1. Customize and Add Music Player to Blog via Tumblr Music PlayerPart 2. Add Spotify Music Player to Blog via Tumblr Audio SearchPart 3. Best Way to Add Spotify Tracks to TumblrPart 4. FAQs About Adding Music to TumblrPart 5. Summary
Part 1. Customize and Add Music Player to Blog via Tumblr Music Player
Actually, finding out how to add a music player to Tumblr isn’t as hard as one might think. SCM Music Player makes it rather easy, actually. SCM Music Player seamless music for your websites can be used in Tumblr or WordPress blogs as the best widget. It is a free and open-source web player. You can match your look and feel, and choose or design your own skin. SCM Music Player is also compatible with Chrome, Firefox, Opera, Safari, and IE.
- You can first download the SCM Music Player from Github or its official website.
- Choose a skin of music player for Tumblr. Scroll down the slider to the Setup Wizard part to choose your favorite skin for the music player. If you can’t find the skin you prefer on the list, you are able to click “4000+ Custom Skins” to get more choices.
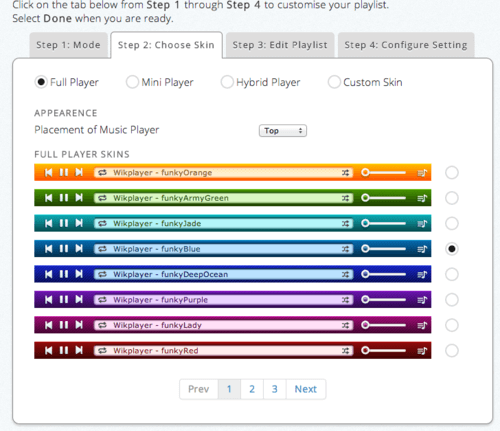
- And then click the Next option to jump to the Edit Playlist setting.
- You need to insert the music title and the song’s URL. SCM Music Player accepts MP3 links, SoundCloud tracks or YouTube addresses. Of course, you are also able to choose RSS Podcast/SoundCloud Sets. And then click the Next option.
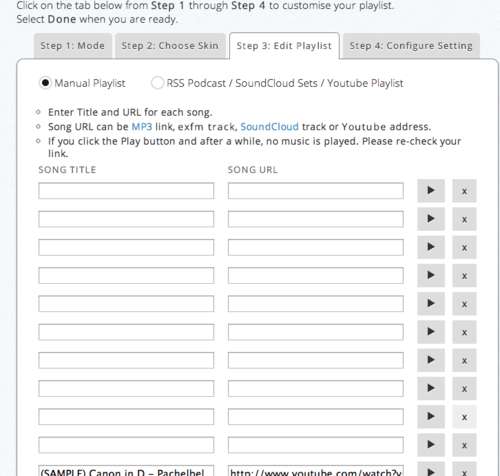
- Make the configure setting for playback and appearance on your Tumblr blog, then click Done.
- Copy the code that SMC Music provides you.
- Log into your Tumblr. Go to your blog, at hit customize. Once in the customize menu, hit Edit HTML.
- Paste the code for your SMC Music player under the tag.
- Click the Update preview and Save option to save all the settings.
- Refresh the page of your Tumblr blog, the Tumblr music player will show on the page and play automatically!
Part 2. Add Spotify Music Player to Blog via Tumblr Audio Search
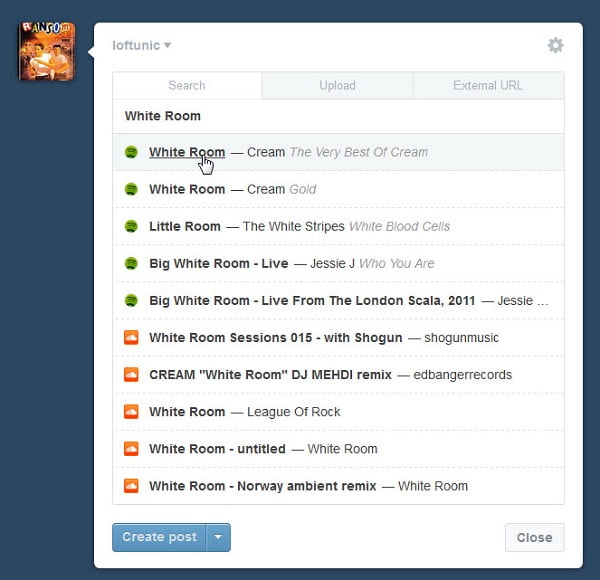
Actually, there has been a collaboration made between Spotify and Tumblr already as well as SoundCloud and Tumblr. Thus, it is really easy to add a music player to blog. In fact, just by searching an audio title via the “Search” menu that you’ll see on audio posts, you’ll be able to add a music player to Tumblr. You may also refer to these steps.
- On the dashboard, tap the “headset” icon.
- Just input the name or title of the track you’d like to be added to Tumblr and automatically, the platform will search it and will show results by using both Spotify and SoundCloud libraries.
- Just simply choose which one you would want to publish. Tumblr shall have it automatically embedded regardless if it’s from Spotify or SoundCloud.
- If you wish to add some tags or even descriptions before posting it, you can do that as well.
- To finish off, hit the “Post” button.
Part 3. Best Way to Add Spotify Tracks to Tumblr
Though we have already presented two effective ways of how you can add a music player to Tumblr, you are probably wondering if using Spotify songs without utilizing the HTML code will be possible. Some users may somehow find using the HTML code quite a difficult process to undertake so we have created this section to help out those users.
If you are not that technology-inclined, the best way for you to add a music player to your blog is to get your Spotify favorites transformed into MP3 files first. But will you be able to do that?
Fortunately, there are various great and trusted apps like the TunesFun Spotify Music Converter that can help you transform your Spotify favorites to your desired output formats such as MP3. Apart from MP3, it also supports other formats like FLAC, WAV, and AAC.
In addition to this great ability, it is also a powerful tool that helps get rid of the DRM protection the Spotify songs have. Thus, you won’t need to worry in case you are also looking at saving the songs forever on any device or gadget that you own or you wish to use. Even if you do not upgrade to Spotify Premium, you still can be able to listen to Spotify songs offline.
Though the Spotify songs are to be processed at quite a fast speed, you don’t need to think about losing the original quality and ID tags of the tracks as all those shall be preserved. Even updates are being done consistently on the app to ensure that users are experiencing the best service as much as possible. In case needed, technical support is always available as well.
Of course, the TunesFun Spotify Music Converter was developed while keeping in mind that everyone should be able to handle the app with ease. With this being said, you can check out the below how easy it is to use the TunesFun Spotify Music Converter.
Step #1. There are quite a few installation needs that you have to complete prior to having this app installed on your PC.
Step #2. Once all those are met, install this app either on your Windows or Mac computer and just launch it. The main page is where you’ll be able to upload the Spotify songs to be processed. Alternatively, using the songs’ URLs shall also work. If you are looking at processing several songs in one go, that is possible as batch conversion is supported by the app.
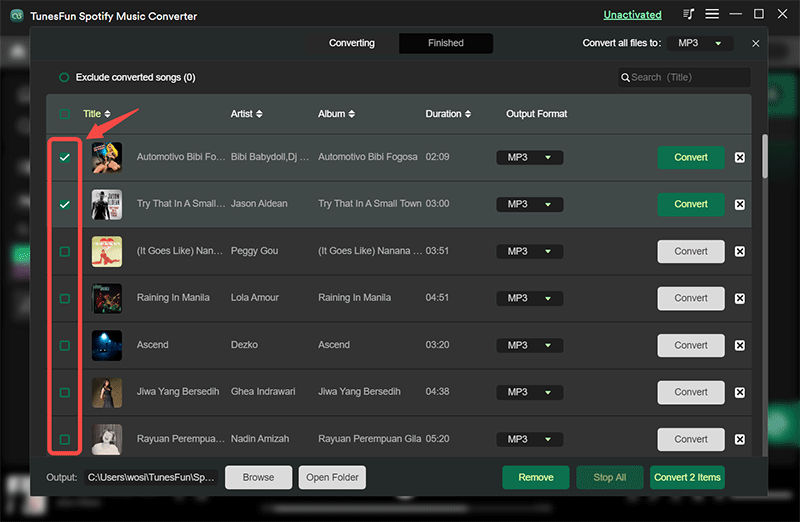
Step #3. Select MP3 from the list of supported output formats. Make sure as well that the output folder location shall be specified accordingly.
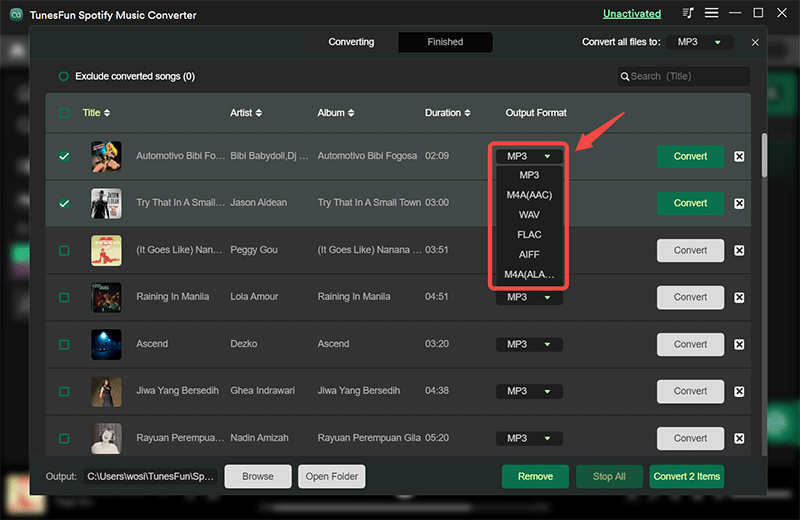
Step #4. The uploaded Spotify songs will be converted the moment the “Convert” menu that’s at the bottom of the page has been ticked off. The DRM removal process shall also happen simultaneously.
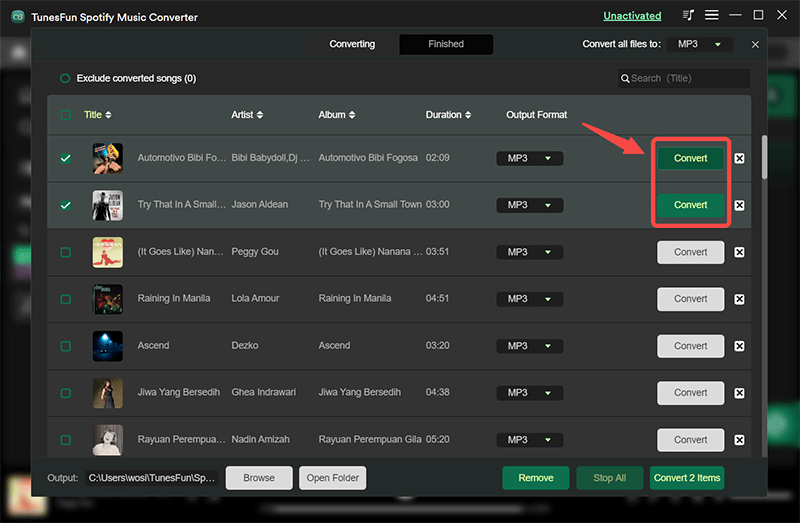
In a few minutes, the transformed and DRM-free Spotify songs shall be readily available on your PC. What is left for you to do now is to upload the songs to a blog post of yours on Tumblr.
You can just simply log into your Tumblr account and from the dashboard, hit the “Audio” icon. Just select the MP3 version of the Spotify song that’s already saved on your PC and hit the “Upload” button. As simple as doing that, you’ll be able to add a music player to Tumblr! This is somehow much easier especially if you aren’t sure about using HTML codes!
Part 4. FAQs About Adding Music to Tumblr
Though we have already fully presented the information we knew will be helpful to you when it comes to the process of how to add a music player to Tumblr, we’d like to also share the answers to some FAQs relating to this topic.
- Is it possible to automatically play Spotify songs on Tumblr after uploading them?
If you decided to use the embedding method, unfortunately, automatic playing won’t be possible. However, if you are to upload the MP3 version of the songs, you can set Autoplay using widgets!
- Is logging into Tumblr required to stream the uploaded Spotify songs?
If you are fine with listening to the preview, then you don’t have to log in. You can listen to up to 30 seconds of the track.
Part 5. Summary
You now have learned how easy it is to add a music player to Tumblr! So, if you are a Spotify lover who’s into using Tumblr as well, this tutorial will surely be helpful to you. A great tip was even given when it comes to downloading and saving Spotify songs to formats like MP3! If you are looking at keeping your Spotify favorites forever accessible on any device that you are using, don’t forget that you can always use the TunesFun Spotify Music Converter!

Leave a comment