How Do I Upgrade to Spotify Premium on Mobile And Desktop
Some of Spotify users finally decided to get their music listening experience upgraded to the next level and they will ask "how do I upgrade to Spotify Premium from free?" Well, we can’t blame such users who are curious and would want to try what a premium account can offer as indeed, this is much more satisfying than the average.
Using the free Spotify version is always good but it’s just that various disadvantages would be experienced during streaming. Now, if you are one of those asking the “how do I upgrade to Spotify Premium?” query, you have to read each part of this article to find out the detailed guide to doing so.
The first part, though, will dig deeper into Spotify’s free version. As you go into the second part, you’ll get to see more details about how to upgrade to Spotify premium.
Article Content Part 1. Why Upgrade to Spotify Premium?Part 2. How Do I Upgrade to Spotify Premium?Part 3. Keeping your Spotify Favorites Playable on Any DevicePart 4. FAQs about Upgrading to Spotify PremiumPart 5. Summary
Part 1. Why Upgrade to Spotify Premium?
Though the main agenda in this post is to discuss how do I upgrade to Spotify premium, it is still important to give further details or information concerning why upgrade to Spotify Premium as surely, many are using Free at the moment. Since there are no fees involved in the free version of the platform, you shall expect to encounter bunches of disadvantages.
Here are more details about Spotify Free vs Premium: Spotify Free vs Premium: Should You Pay To Play in 2024
- As previously mentioned, ad interruptions are always present. Usually, they appear every 2 or 4 tracks.
- Free Spotify account owners have limited skips as they can only enjoy 6 every hour. Once you consumed this number, you have no choice but to listen to all the songs and wait until the track you really wish to stream comes up.
- Downloading and offline streaming isn’t available. This feature is only exclusive to premium account users.
- Audio quality isn’t as smooth or as high as the quality you’ll get when using a premium account.
Compared to the free version of Spotify, Spotify Premium offers a range of benefits for users who want to enhance their overall listening experience. These benefits include the ability to enjoy ad-free listening, higher-quality audio streaming, offline downloading and listening to music, and more. Overall, upgrading to Spotify Premium provides users with the advantage of enjoying music more seamlessly. That's why upgraded to Spotify Premium.
Part 2. How Do I Upgrade to Spotify Premium?
The procedure of how to upgrade to Spotify premium is totally easy to follow. In fact, we have here the steps if you are to use an Android or iOS device or a desktop and web player.
Getting Spotify Premium on Android or iOS
How do I upgrade to Spotify premium via the mobile app? We will first share the detailed process of how it can be done on your handy devices such as on your Android or iOS gadget. For successfully updating the premium plan, make sure your mobile device has the latest Spotify app version installed to get optimal performance. You can update the Spotify app manually from App Store or Google Play Store.
Step #1. Launch the Spotify app on your iOS or Android device. At the bottom right corner of the screen, you shall see the option that says “Premium”. Tap this.
Step #2. Click on GET PREMIUM, you will see the different subscription plans that are being offered by Spotify – Individual, Duo, Student, or Family. Once you have selected one, you shall be directed by the app to a pop-up window highlighting the subscription process.
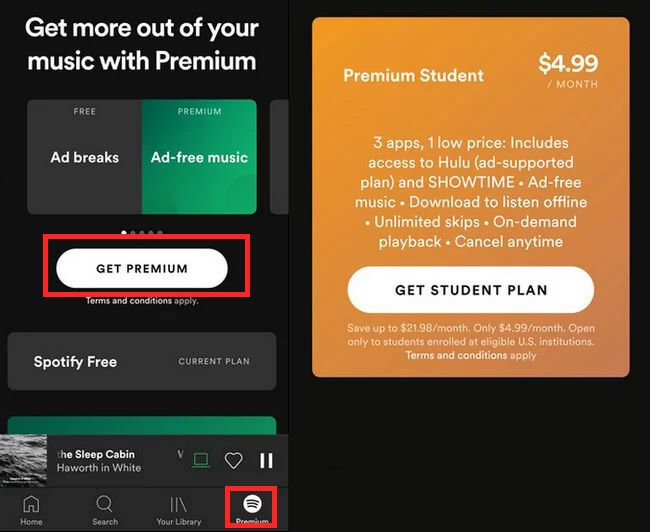
Step #3. To finally finish off the subscription process, you have to enter your payment details.
You should be getting a confirmation if your subscription has been successful. Afterward, you have upgraded to Spotify Premium and you can start enjoying all the perks being offered by the premium Spotify plan that you got!
Getting the Spotify Premium on Desktop and Web Player
Of course, we will also be showing here how do I upgrade to Spotify premium in case you wish to use your desktop or the web player.
Step #1. On your PC, open the Spotify app or head to its official website. Log into your account with your credentials.
Step #2. Once you've logged in, click the Profile icon in the top-right corner, and select "Account" in the menu that appears.
Step #3. Scroll down until you find the submenu labeled "Your Plan" — this is where you can upgrade your Spotify plan. Click "Change Plan" to change your payment plan.
Step #4. If you click "Change Plan," you'll be brought to a page that explains all the different Spotify payment plans. Click "Select" next to the new plan that you want.
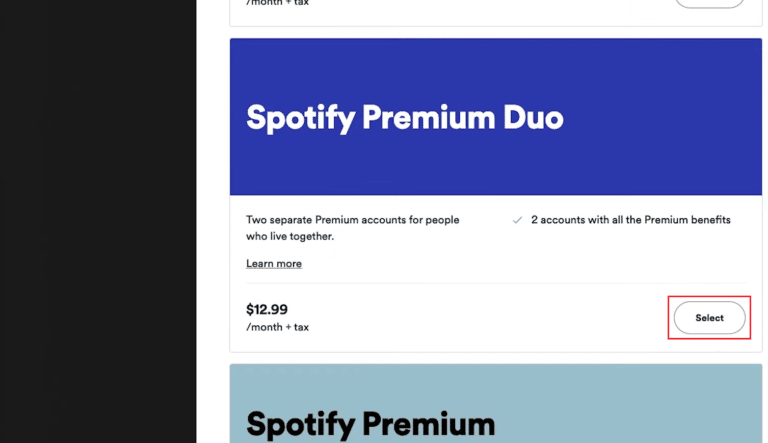
Step #5. Confirm your new plan. If you apply for the Student plan, you'll also need to provide your university's name and email.
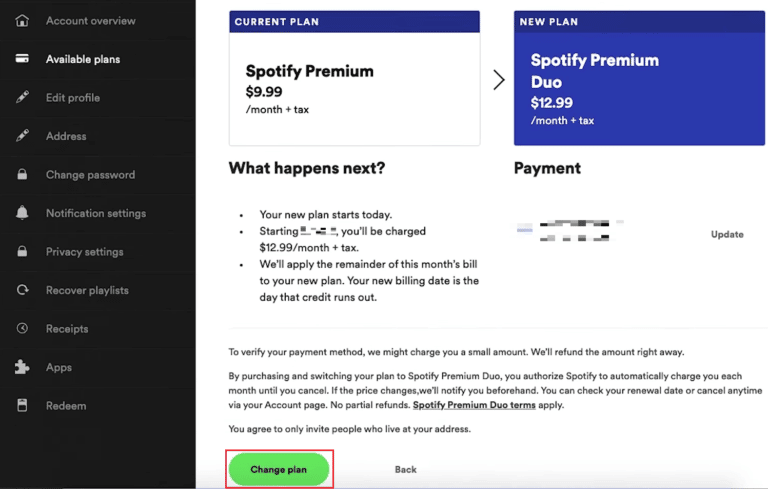
Step #6. Once you do so, your payment plan will change. You'll be charged the new amount on your next billing day.
Part 3. Keeping your Spotify Favorites Playable on Any Device
The information presented in the previous part relative to how do I upgrade to Spotify premium is indeed helpful as you will finally be exposed to all the exclusive offers of Spotify for premium account owners.
But are you wondering if there’s something you can do to get your Spotify favorites playable on any device you like to use even without subscribing to a Spotify plan? Well, apps like the TunesFun Spotify Music Converter will be very helpful!
With the aid of the TunesFun Spotify Music Converter, you can easily remove Spotify songs’ protection. Moreover, this can even convert Soptify songs to MP3 and other common formats like WAV, FLAC, and AAC. So you can keep and access the tracks on any device and media player. Although your Spotify songs disappeared by some errors, you can still restore your library.
The app works too fast and ensures that no quality loss will be encountered. All the important details relative to the tracks will also be kept and preserved. Since the TunesFun Spotify Music Converter is easy to handle, anyone should be able to use it well. Click the below button to try it for free now!
Here is also the step-by-step procedure for converting and downloading the Spotify songs you love through this app.
Step #1. Complete all the app’s installation needs and launch it right away after installation. On the main page, one can start by adding the Spotify songs – either by dragging and dropping them or by using their URLs. Adding a bunch should be fine since the app supports batch conversion.
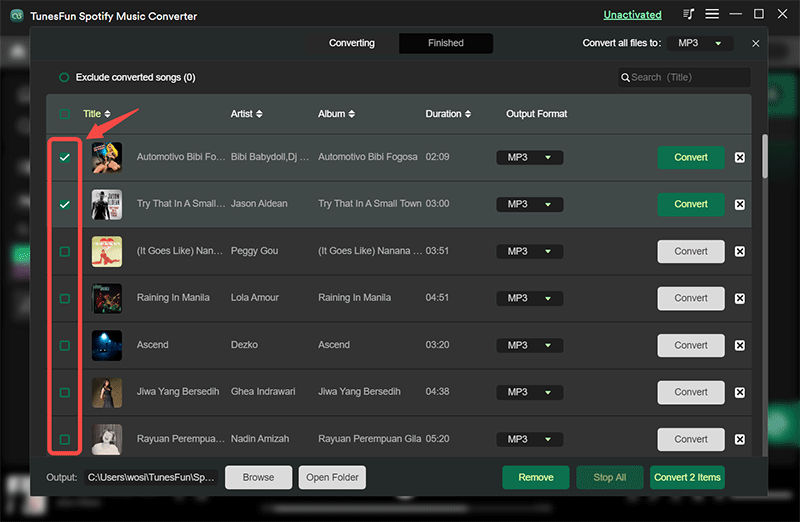
Step #2. Select an output format to use from the list of supported formats. The output folder shall also be defined to easily see where the transformed files are after the process.
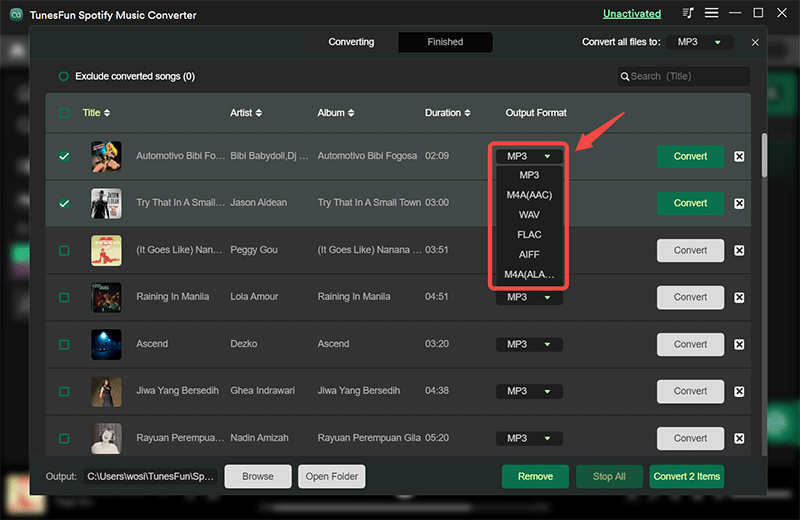
Step #3. Once everything has been all set, you just have to click the “Convert” or “Convert All” button. After doing so, the conversion process shall start. While conversion is ongoing, the removal process should also be done by the app.
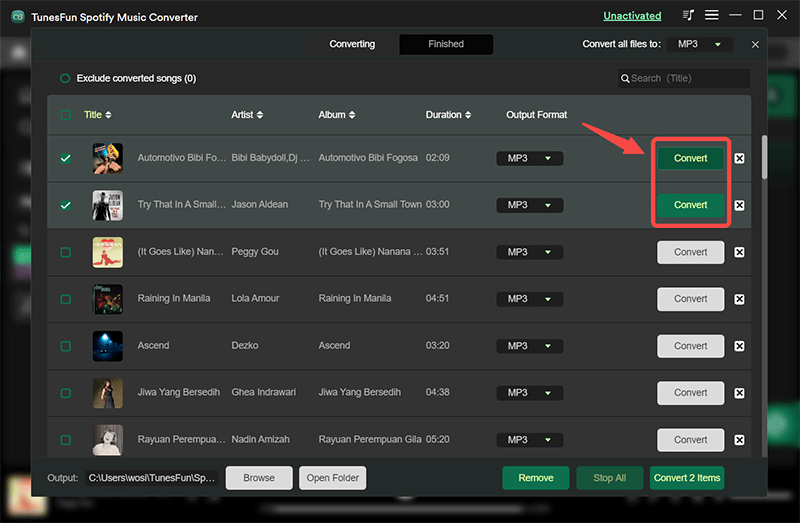
Within just a few minutes, the converted and DRM-free Spotify songs will be saved in the output folder that was defined in the second step. Now, users can stream these songs on any device they would like to use. These songs can be kept forever without thinking of any subscription fee to pay every month! Offline streaming can be done without any limitations or issues!
Part 4. FAQs about Upgrading to Spotify Premium
Q1. Why can't I upgrade to Spotify Premium?
Unfortunately, due to Apple restrictions, you can't subscribe to Premium through the app for iPhone and iPad.
Part 5. Summary
We surely can’t blame those who are into learning how do I upgrade to Spotify premium as subscribing to one of Spotify’s premium plans is indeed beneficial and good. However, if you wish to stick with using the free version of the platform, that would totally depend on you!
Just always remember that when it comes to keeping your Spotify favorites playable on any media player or gadget, the TunesFun Spotify Music Converter will always be there to help you out! Worrying about Spotify subscription fees is not a thing if you have a great app like the TunesFun Spotify Music Converter!

Leave a comment