How to Go to Settings on Spotify Web Player?-2025 Guide
Rather than using the mobile or desktop Spotify app, do you just prefer resorting to using the Spotify web player? If you do, perhaps, you are also wondering how to go to the settings on the Spotify web player. You’re lucky! That is what this post is about!
“What is the best way how to go to settings on Spotify web player?”
Spotify is a highly popular music streaming app that offers an excellent experience for music enthusiasts. Users have the option of paid plans or a free version accessible to everyone. The app can be installed on computers and mobile devices, but those who prefer not to install apps can use the Spotify web player.
If you're a long-time user, you might have wondered how to access settings on the web player. This article provides a helpful guide for users who are unfamiliar with this process. In the following paragraphs, you will discover the solution to the question of how to access settings on the Spotify web player.
Let’s begin then!
Article Content Part 1: Steps to Get to Settings on Spotify Web PlayerPart 2: Other Tips When Using the Spotify Web PlayerPart 3: Bonus Information: Downloading Spotify SongsPart 4: Summary
Part 1: Steps to Get to Settings on Spotify Web Player
You must have tried Spotify before and know how to download songs on it. And if you are wondering how to go to settings on the Spotify web player, then you don’t have to think too much. This one’s easily solvable. The detailed process of how it can be accessed will be fully explained in this section of the article.
Step #1. Launch the Spotify web player on your computer. Provide your account details to sign in.
Step #2. Upon successful login, hover your mouse on the top-left area of the screen. A “three-line” icon shall be seen. Tap this.
Step #3. A menu shall open up. From there, select “Settings”.
Step #4. The Spotify web player settings will now show up. You will then see the options here which you can change as you like (language, playback controls, etc.).
Step #5. After changing some settings, you can just simply hit the “Save” button to save all the changes made. This should be seen at the bottom area of the page.
Basic Settings of the Spotify Web Player
The presented guide above shows how to go to the settings on the Spotify web player. Adding to that, we’d also like to share knowledge about the basic settings on the web player that you might probably be interested in.
Spotify web player’s basic settings include six tabs – General, Social, Sharing, Audio, Streaming, and Advanced. Of course, on each of these tabs, there are options embedded that you modify as you like.
On the "General" tab, you have the option to change the language and set the autoplay feature. The "Audio" tab allows you to choose the audio quality and decide whether to display lyrics or not. In the "Social" tab, you can choose whether to share your listening history with others.
To change the audio bitrate or use the data server mode, go to the "Streaming" section. The "Sharing" tab is where you can share music with others and modify the audio quality. Lastly, the "Advanced" tab allows you to hide or show controls and change the theme.
Part 2: Other Tips When Using the Spotify Web Player
Though our main agenda here is to share how to go to settings on the Spotify web player, we would also be glad to share some relevant details when it comes to using and navigating the Spotify web player.
Access Spotify on Chrome, Safari, Edge, Firefox, or Opera. Search tracks, albums, playlists, and edit your library. Sign in with your account details to start. No offline downloads with a paid plan.
When looking for specific tracks, albums, or playlists, you can just simply use the “Search” function. There is even a “Browse All” option which gives you the chance to explore the platform’s huge collection.
When visiting an artist’s page, by just tapping his name, you’ll immediately be directed to his page and find the artist’s popular tracks at the top. Tapping the “Discography” option will even allow you to find out more details relative to that artist and his content.
If you wish to save songs to your library, you just have to head over to the “Your Library” tab. You can arrange your favorite tracks here per category (if you like to). Saving albums and playlists can easily be done just by tapping the “heart” icon that you’ll see above them.
If you would want to save a specific song, you then need to move to the track and tap the “heart” icon that you will see next to the track’s length.
Additionally, if you’d like to be updated with a specific artist’s content, you can do that by following him. Once he has newly released songs, those will be shown on your home page as soon as available. The platform shall also recommend other songs from all the artists that you are following.
Part 3: Bonus Information: Downloading Spotify Songs
We have already addressed this post’s main topic – “How to go to settings on Spotify web player?”. Now, we are about to share bonus information. It is quite saddening that downloading Spotify songs for offline streaming isn’t possible through the Spotify web player. Fortunately, there is a great way to still keep your Spotify favorites forever accessible on every device or media player that you own.
If you have not heard of the TunesFun Spotify Music Converter yet, then you are missing something! This one’s a total game-changer!
For saving and downloading Spotify songs, we suggest using a professional software app that removes DRM protection and converts tracks to common formats such as MP3, FLAC, WAV, and AAC. It works quickly and can process multiple songs at once through batch conversion.
TunesFun preserves your Spotify tracks' ID3 tags and metadata and offers excellent sound quality. Their team is dedicated to providing the best user experience and technical support. It's easy to use, even for beginners.
Let’s find out how downloading and conversion of Spotify songs can be done through the TunesFun Spotify Music Converter.
Step #1. Install the TunesFun Spotify Music Converter on your PC. Upon doing so, launch it right away to be able to start uploading the Spotify songs to be processed.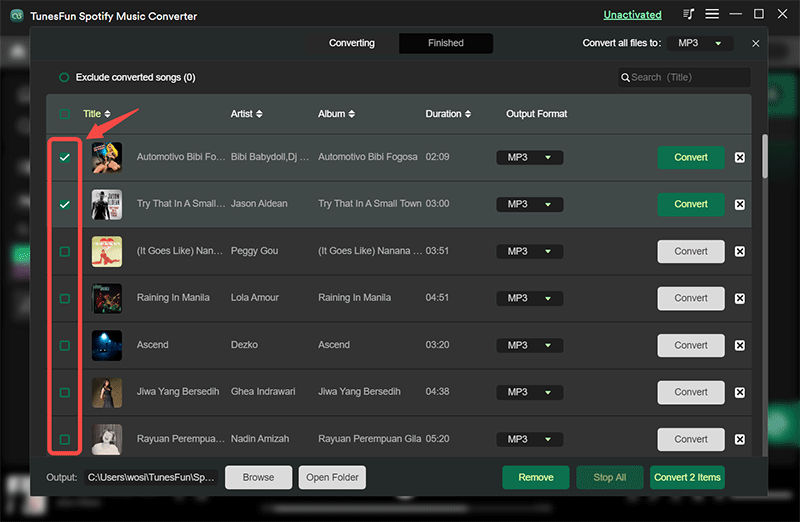
Step #2. Select your preferred output format and specify the output folder location that you’d like to use.
Step #3. Tap the “Convert” button to finally start transforming the uploaded Spotify songs to the selected output format. While this is ongoing, the removal of the songs’ protection shall also happen at the same time.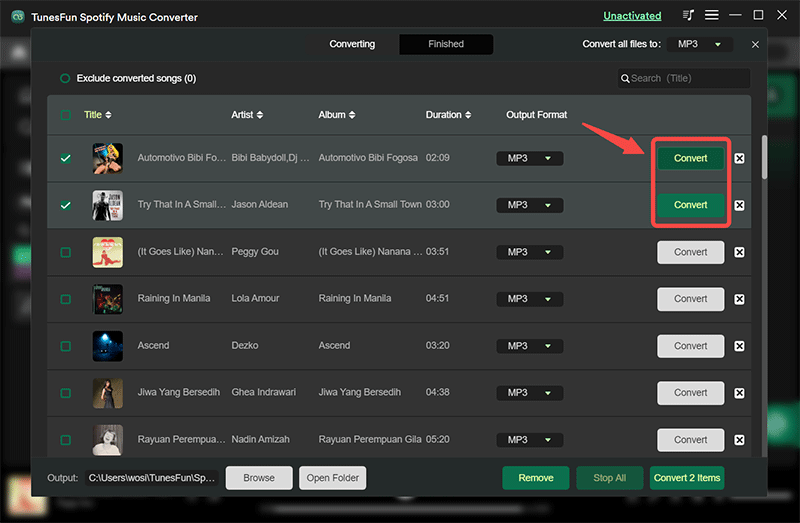
Once the songs have been freed from DRM protection, users can now be able to access them on any device or media player that they’d like to use. Keeping them forever can easily be done as well!
Part 4: Summary
Finally, you have now learned how to go to the settings on the Spotify web player! If you are someone who prefers using the Spotify web player, what this post has will surely be beneficial to you.
Additionally, if you are someone who’s looking for a way to download and keep Spotify songs forever, don’t forget that you can always rely on apps like the TunesFun Spotify Music Converter.
 Home
Home
Leave a comment