

How to Make Siri Play Spotify Music: A Complete Guide
"How to make Siri play Spotify on iPhone, iPad or Mac?" If you have been a fan of using Siri (as indeed, it is very convenient to use), and you would wish to experience much seamless Spotify streaming, learning how to get Siri to play Spotify songs would surely matter then!
Since our main goal in this post is to find ways of how to make Siri play Spotify songs, we will be giving the information you need right away in the second part after giving brief knowledge about Siri in the first part. Let us now proceed and move into the first part to finally get to start the discussion.
Article Content Part 1. What is SiriPart 2. Can Siri Play SpotifyPart 3. How to Make Siri Play SpotifyPart 4. Download and Play Spotify Songs without IssuesPart 5. FAQs about Siri with SpotifyPart 6. Summary
Part 1. What is Siri
Before learning how to make Sire play Spotify songs or playlist, it is important to give vital knowledge or information relative to Siri itself.
Siri is known as one of the most popular AI assistants as this was created and improved by Apple Inc. The “Hey Siri” feature on Apple devices was actually launched in September of the year 2014. This has been very useful to iOS device users as they can have this activated through voice commands without the need to press or tap any other buttons on the device that’s in use. Though launched almost a decade ago, this is continuing to evolve to give the best service to its users.
Siri is a popular AI assistant alongside with Amazon’s Alexa and Google’s Google Assistant. As mentioned, this is accessible across almost all Apple devices including iPhones, iPads, Apple TVs, Macs, Apple Watch, and even HomePod. Using this, you can do lots of things – navigating on your device, asking questions, etc.
Part 2. Can Siri Play Spotify
Can Siri play Spotify? Siri is accessible on iOS devices and can work with third-party apps that are installed on these devices including music streaming platforms such as Spotify.
Before, playing Spotify with Siri isn’t supported but with the latest update, iOS 13, this has now been made possible. If you are curious about how to make Siri play Spotify insteaf of Apple music, let’s see what the second section has then!
Part 3. How to Make Siri Play Spotify
As we have previously mentioned, this part is where you shall find detailed guides on how to make Siri play Spotify instead of Apple Music. We have two methods for how do I play Spotify through Siri. Let us begin by sharing the first one.
Method 1. Manually Enable Spotify Access
As you have read in the first part, Siri’s integration with the Spotify app has only been made possible when the iOS 13 update was launched. With this being said, it is advisable that you make sure that your device is updated to this version or to a much later version that’s available. If it will be your first time asking Siri to access the Spotify app on your device, it will surely ask you to let it access your Spotify data. In this case, you should select the “Yes” option to continue.
How do I play Spotify through Siri? Manually enabling Spotify access can also make Siri play Spotify on iPhone, iPad, Mac, Apple Watch, or HomePod. Here are the simple steps that you must follow if you wish to try this option.
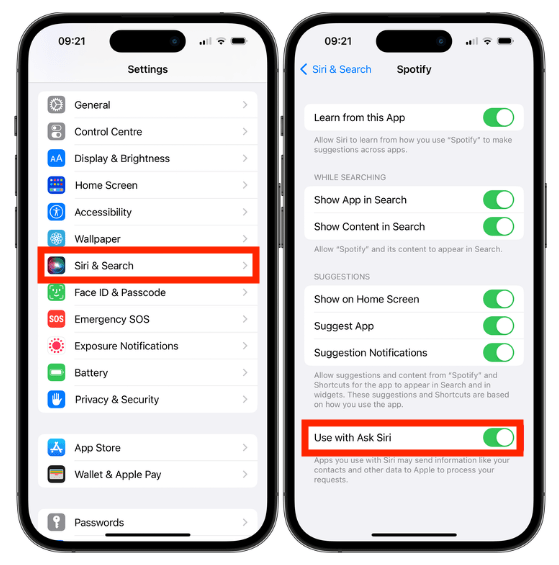
Step #1. On your iOS device, head to your “Settings” menu. Using the “Search” button, you can look for “Siri and Search”.
Step #2. Scroll down until you see the “Spotify” menu. Tap it.
Step #3. On the following screen, you should choose “Siri and Search”.
Step #4. Look for the “Use with Ask Siri” option and ensure that the slider next to it will be toggled to get this option enabled.
Method 2. Adding Spotify Siri Shortcut
Apart from the first method that was explained, the other process of how to make Siri play Spotify playlist is to take advantage of the Spotify Siri shortcut. How do I play Spotify through Siri? It is recommended that you also update your device’s iOS version to the latest that’s available and then just refer to the below steps to continue.
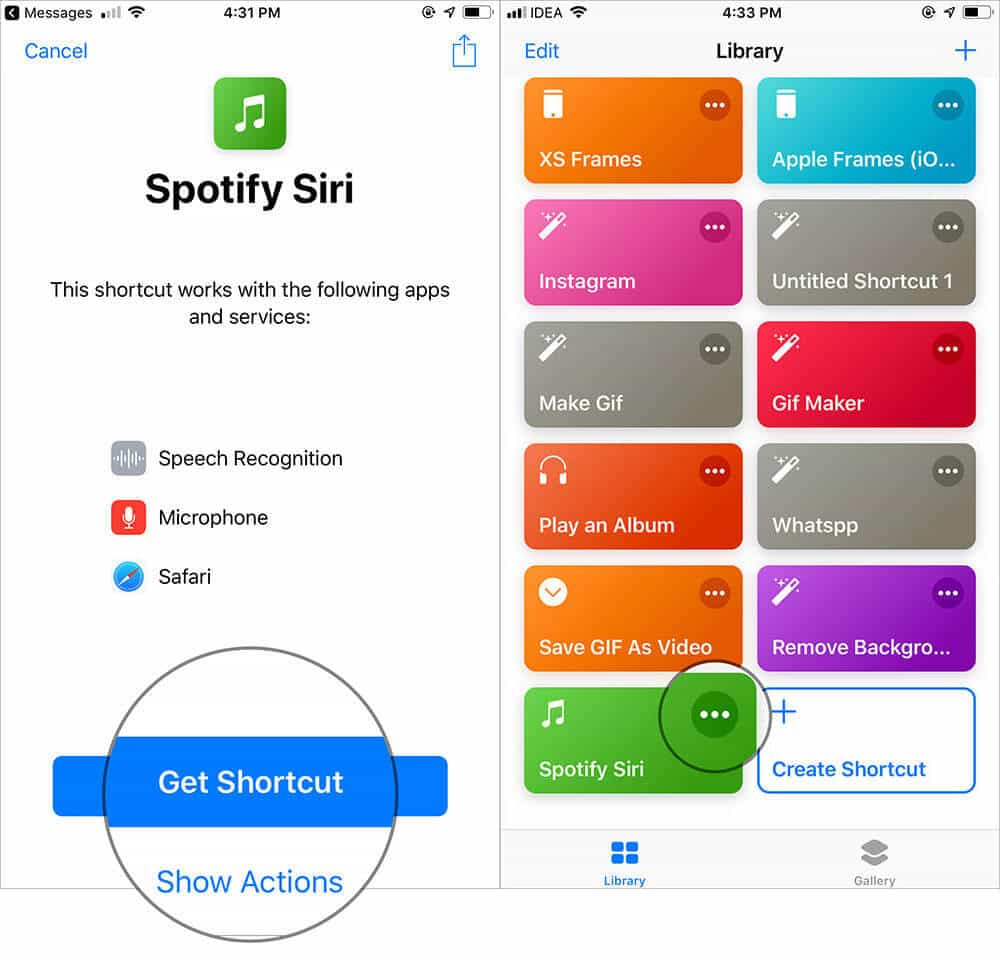
Step #1. On your iOS device, just install the “Spotify Siri shortcut". “Shortcuts” must be turned on. In order to get this in your library, you must tap the “Get Shortcut”.
Step #2. Head over to your “Library”. Hit the menu bar that’s on Spotify Siri.
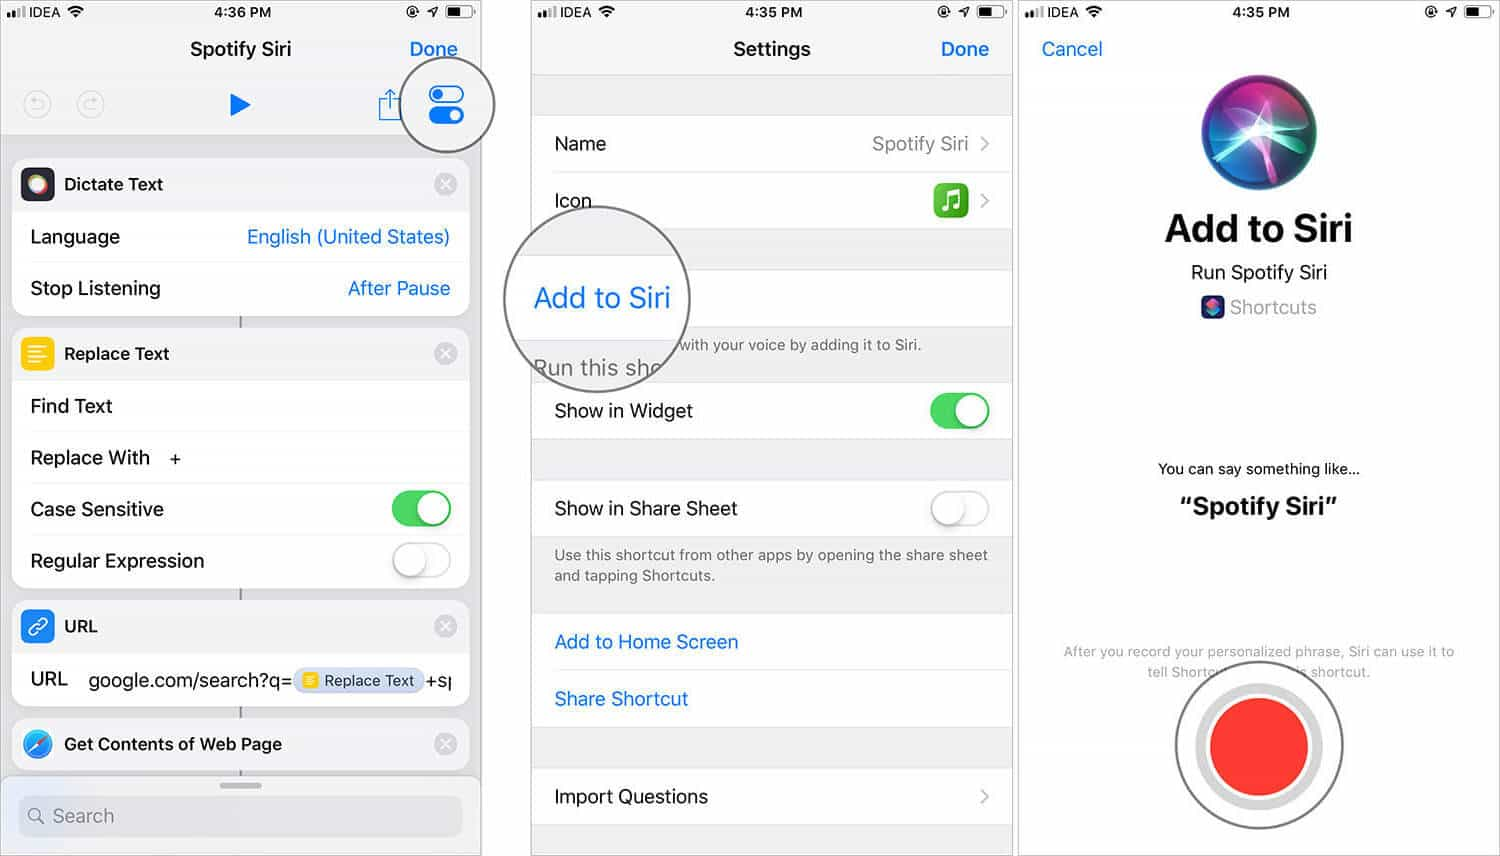
Step #3. Afterward, select the “Settings” menu from the top right corner. Choose “Add to Siri” and just record a Spotify instruction for Siri. A good example would be – “Play Spotify”. Tap on “Done” to save this phrase.
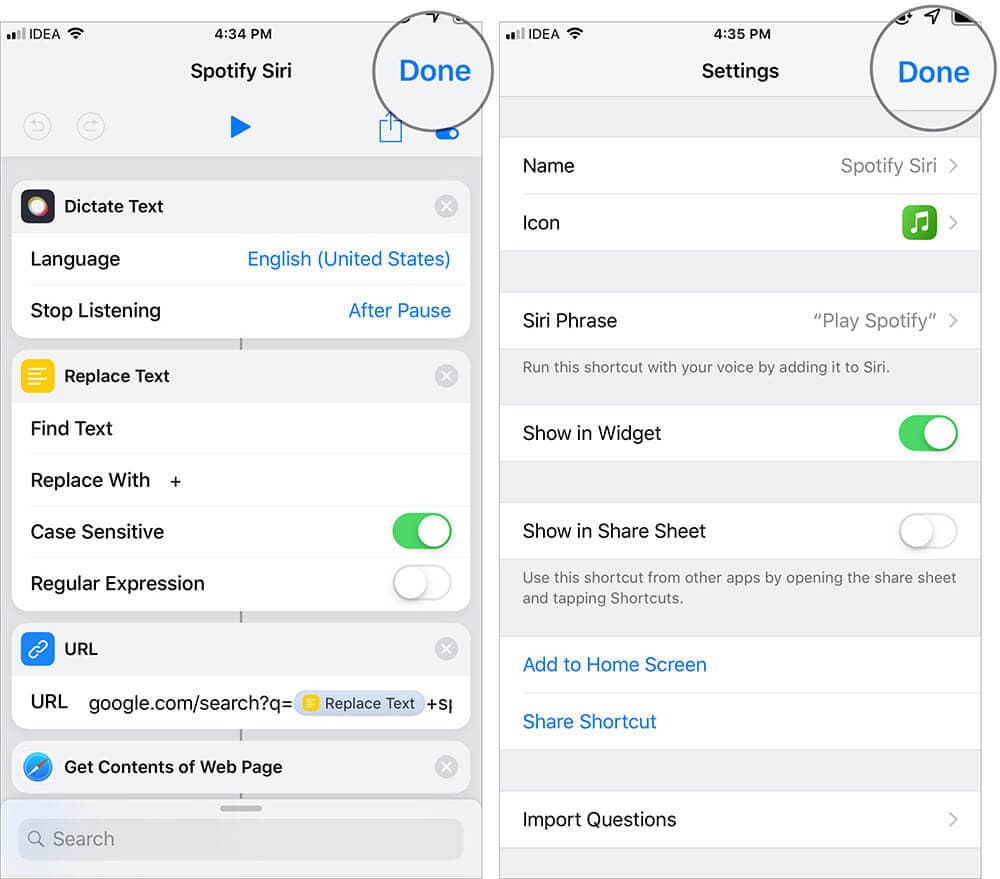
Step #4. In order to finally save the shortcut made, just simply tap the “Done” button twice.
After doing the above, the shortcut shall be added and will be connected to Siri. All you need to do is just say “Play Spotify” once Siri is launched. What Siri will do is run the shortcut created and show the Shortcuts app’s interface. You will notice a dictation box. You just need to mention the name of the artist or the album you’d like to listen to on Spotify. Your dictation shall be encrypted on the app automatically.
Though these methods of how to make Siri play Spotify instead Apple Music seem to be effective enough, it is also important to note that there are some Siri functions that won’t work when the device is not connected to a stable internet network.
More so, there are also users who have previously complained about using Siri. So, for you to still be able to listen to your Spotify favorites even without using Siri, there will always be a much better way to do that. In fact, as you move into the next part, you will be exposed to the detailed method of seamless and easy Spotify streaming.
Part 4. Download and Play Spotify Songs without Issues
Indeed, the use of Siri is very convenient and makes iOS device navigation more efficient. Though we have discussed how to make Siri play Spotify instead of Apple Music in the previous part, we would also wish to share with you a better method of Spotify streaming.
Spotify songs are protected by DRM. With this encryption, you can’t have the tracks played outside the app or on unauthorized devices. More so, they are in OGG Vorbis file format which is not so flexible on other devices and media players. How can you experience better Spotify offline listening then? This is simple. You just need to get rid of these limitations first.
With the above being said, we are suggesting the use of a professional software converter, the TunesFun Spotify Music Converter. Why would it be good to select this app over the others?
Well, the TunesFun Spotify Music Converter is a proven effective tool when it comes to removing the DRM protection of Spotify songs. It is a great app that even helps with file conversion to common formats including MP3, WAV, FLAC, and AAC. You don’t have to worry about the time you’ll spend in using this tool because it’s fast enough and could even let you process bunches of songs in one go.
With these main features, you can surely be able to enjoy the songs on any device that you like without worrying about any limitations. You don't have to worry about Spotify playback issues like not downloading songs, Spotify keeps skipping songs, Spotify local files not showing, and more. Also, when using this professional converter, you won’t be worrying about the quality of the output files as the original will be maintained. All the ID3 tags and important metadata information of the songs shall also be preserved.
This app is being updated by the TunesFun team in a timely manner so it’s definitely worth giving this app a shot. Improvements are always being done! In case you will need technical support, you may easily reach out to the TunesFun team as they are always available to help. Also, this app’s navigation functions are too simple that even first time users won’t have issues when using it. The interface is indeed user-friendly. Try it for free now!
We have here a quick guide on how the TuneFun Spotify Music Converter can be used when converting and downloading your loved Spotify songs.
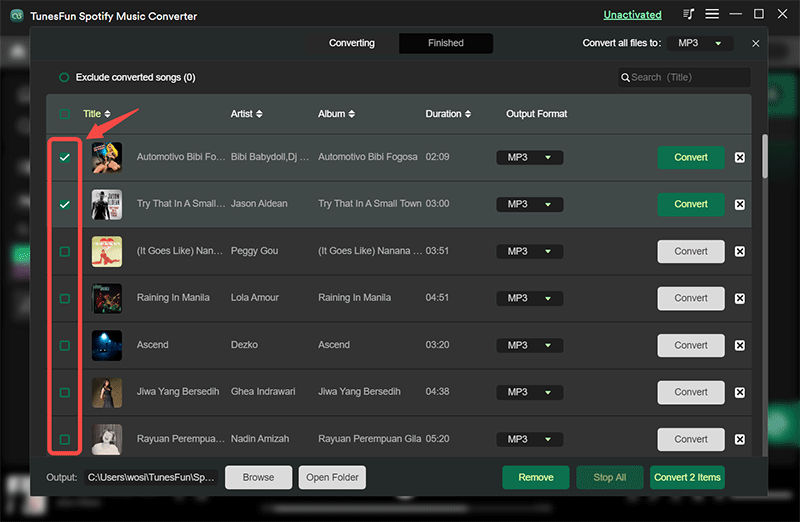
Step #1. Complete all the installation needs of the app and get this installed on your computer. Once this has been installed, launch it and start by adding the Spotify songs you wish to download. Choosing bunches shall work as batch conversion is supported. Using the songs’ URLs also works.
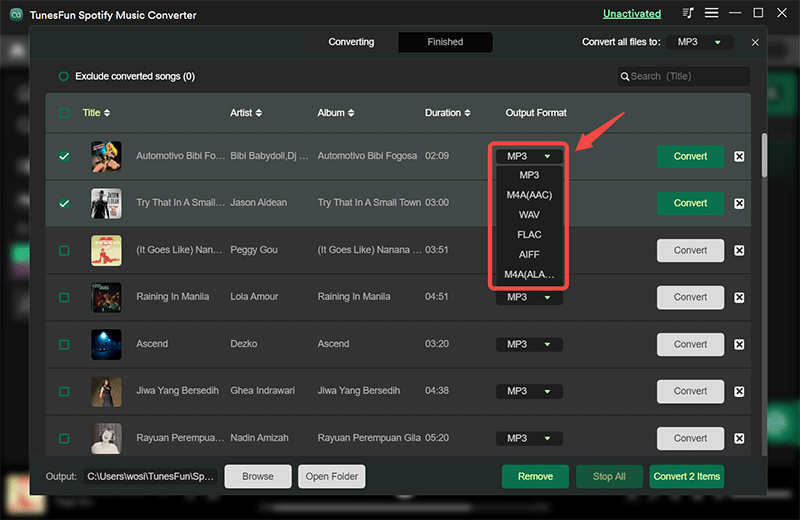
Step #2. Choose an output format you’d like to use from the list of supported formats. Define the output folder location that you’d like to utilize as well.
Step #3. Tap the “Convert” or “Convert All” button once you are all set and ready to start the conversion of the files. While the conversion is ongoing, the DRM removal process shall also happen at the same time.
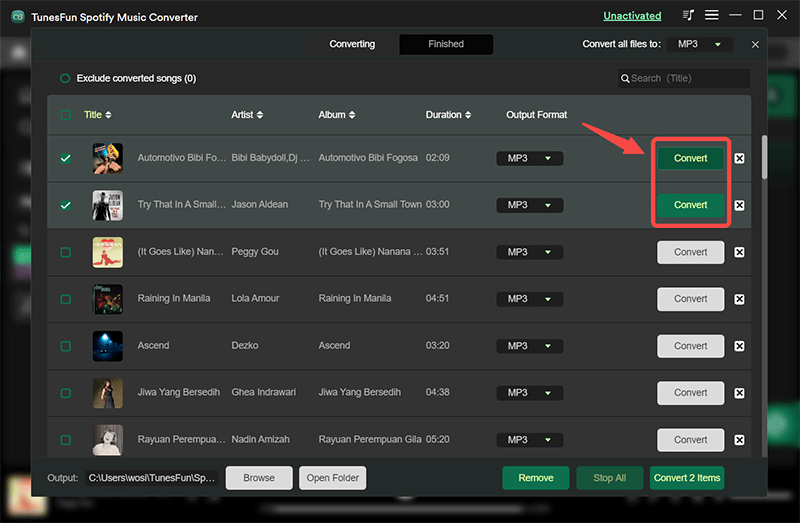
Once the process is over, you will have DRM-free and converted Spotify songs saved to your PC for streaming even in offline mode!
Part 5. FAQs about Siri with Spotify
Q1. Why does Siri not work with Spotify?
If your iOS system is lower than iOS 13, Siri does not work with Spotify.
Q2. Do I need Spotify Premium subscription to use Siri with Spotify?
No. To make Siri play Spotify does not need premium. However, some certain features such as playing specific songs on demand, may require premium subscription.
Q3. Are there any limitations when using Siri to play Spotify?
Yes. The level of integration and functionality may vary depending on factors such as the device, iOS version, and support implemented by the Spotify app.
Part 6. Summary
We are indeed fortunate that Apple has finally launched iOS 13 which made the process of how to make Siri play Spotify songs much easier. But in cases when Siri won’t function as expected, it is still good that you have copies of your Spotify favorites. All thanks to the TunesFun Spotify Music Converter! Downloading and conversion have been made possible through this professional tool!
 Home
Home
Leave a comment