How to Upgrade to Spotify Premium on iPhone?
For most music enthusiasts, Spotify is considered one of the best. It is one of the most commonly used having 400 million active users around the globe – including both the paid and free version users. Studies are saying that Spotify is indeed the largest music service provider in the world. Since this platform gives lots of benefits to its users, it’s important to learn vital things about it such as a guide on how to upgrade to Spotify Premium on iPhone. Luckily, this is what this article is about.
Spotify is the home of millions of digital content – songs and podcasts that listeners would surely love. The huge library that it has contains tracks that are categorized under different genres. Users would definitely be able to easily choose the type of content they’d like to listen to.
With the goal of bringing only the best music streaming experience to its subscribers and active users, Spotify is continuously making sure that its features are being upgraded and enhanced consistently. Currently, this platform offers various paid plans that are priced differently. In fact, before we head into the discussion of how to upgrade to Spotify Premium on iPhone, we’ll first highlight some important notes about Spotify premium in the first part. If you wish to immediately delve into the process of how to upgrade to Spotify Premium on iPhone, you are free to jump into the second part. Else, start off with the first section!
Article Content Part 1. Brief Details About Spotify PremiumPart 2. The Process of Upgrading to Spotify Premium Using Your iPhonePart 3. Learn How to Keep Spotify Songs ForeverPart 4. Summary
Part 1. Brief Details About Spotify Premium
As previously stated in the introduction part, we will be giving off basic details relating to Spotify Premium first before we head into discussing the process of how to upgrade to Spotify Premium on iPhone.If you aren’t aware yet, Spotify actually offers a free version apart from the premium plans that it has. If you are someone who’s all good with experiencing streaming limitations such as ads popping up from time to time, unlimited skips, and others, then resorting to the free version of the app could work for you.
However, if you’d like to unlock the platform’s benefits and you’d like to experience high-quality streaming, then subscribing to a premium plan is what’s recommended.One of the many loved features of Spotify premium users is the ability to download songs for offline listening. Thus, being able to bring the songs they love anywhere they are at. Additionally, the Spotify app is supported by lots of gadgets already so installing it won’t be an issue at all.

Before subscribing to one of Spotify’s paid plans, you can even enjoy a 30-day free trial offer. You can experience all the features being offered without paying anything. However, if you won’t proceed with the chosen subscription plan upon sign up, you must cancel the free plan before the cut-off so as to avoid incurring charges.
Spotify is currently offering three paid subscription tiers. You can get the Individual plan that costs 9.99 USD per month, the Family plan that is priced at 14.99 USD monthly (which can be enjoyed by up to 6 members already), or the Student plan that is at 4.99 USD per month (as long as you’ll pass the verification process and proof or documents of enrollment will be presented accordingly).
Additionally, in this Student plan package, you can even enjoy Hulu and SHOWTIME subscriptions without paying any additional fees. We think we have given enough basic information about Spotify Premium. It is now time that we move into this article’s main topic – explaining the detailed process of how to upgrade to Spotify Premium on iPhone. As previously mentioned, we have the procedure in the second part. Now, head into the next part to learn more!
Part 2. The Process of Upgrading to Spotify Premium Using Your iPhone
Finally, we will now be discussing the detailed process of how to upgrade to Spotify Premium on iPhone. All you need to do is just follow these steps.
Step #1. On your iPhone, head to your preferred web browser.
Step #2. Head over to Spotify’s official website. Hit the “Log In” option and input your Spotify credentials – username and password, to finally be able to access your account.
Step #3. Upon successfully logging into your account, hit the “Account Overview” option that is at the top area of your screen. Once the drop-down menu appears, hit the “Subscription” button.
Step #4. The next screen will be showing you the free Spotify Premium trial page. This will give you the chance to enjoy the features of the app for free within its offered trial period. Afterward, if you wish to continue, you should know that you’ll be charged depending on your chosen paid plan. Simply tap the “Try Premium Free” button.
Step #5. You will now arrive to the payment screen. You would have to provide your payment information. If you wish to pay via your credit card or via PayPal, you are allowed to do so. After providing the needed details, just simply hit the “Start Free Trial” to finally be able to enjoy your premium subscription.
Upon following the above procedure of how to upgrade to Spotify Premium on iPhone, you can now download the Spotify app and install it on your iPhone. By logging into your account with your Spotify credentials, you may now start your seamless music streaming experience on Spotify! Since our main focus here is to explain how to upgrade to Spotify Premium on iPhone, we will now be delving into the guide of how upgrading your plan can be done if you are a PC user.
But, of course, that is possible as well especially if you’d like to use your PC instead of your mobile device such as your iPhone. If you’re interested in knowing how you can download and keep Spotify songs though they are known to be encrypted with DRM, keep on reading the third part.
Part 3. Learn How to Keep Spotify Songs Forever
It is definitely important that you are aware of the process of how to upgrade to Spotify Premium on your iPhone. However, it must be noted that when the subscription has ended or is canceled, all the downloaded songs for offline listening will vanish. Getting them back after plan renewal isn’t possible and redownloading them would be required.
If you would want to avoid hassles such as those mentioned, then you have to find a way out! Good thing, there are professional software applications like the TunesFun Spotify Music Converter that can help you with the process of saving Spotify songs. Though protected with DRM, this tool can make the downloading process possible as this has the power to get rid of that encryption! In addition to the DRM removal ability, the TunesFun Spotify Music Converter can also help transform the selected Spotify songs to formats like MP3, WAV, AAC, and FLAC. It works fast enough and ensures that the conversion process will totally be 100% lossless (keeping the original quality and songs’ ID tags).
The TunesFun Spotify Music Converter is being updated in a timely and consistent manner giving users the best service they are supposed to enjoy. In case needed, technical support is also always available. If you are wondering about installing the TunesFun Spotify Music Converter, you don’t have to think that much as this is supported by both Windows and Mac OS. The easy interface the app has will also make it easy even for beginners to navigate the app’s functions. ave a look at the below guide for converting and downloading Spotify songs via the TunesFun Spotify Music Converter.
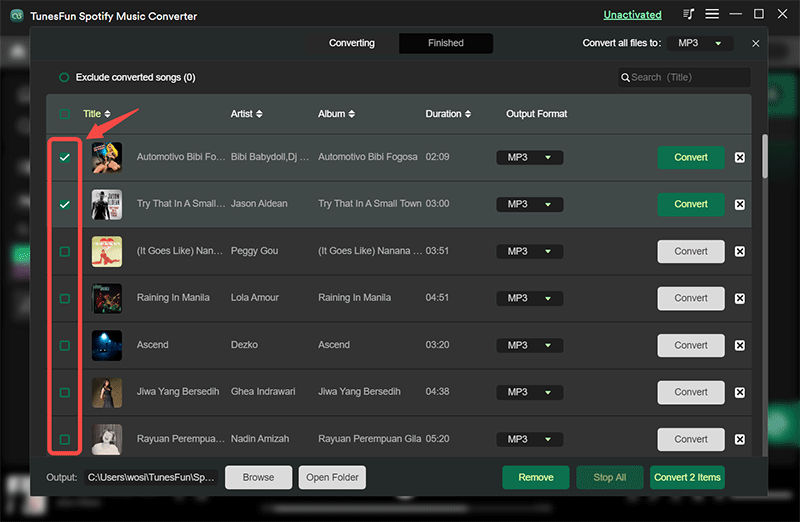
Step #1. Upon the complete installation of the TunesFun Spotify Music Converter on your computer, open it and start by importing the Spotify songs you wish to convert. Selecting a number of songs would be fine since batch conversion is supported by this professional tool.
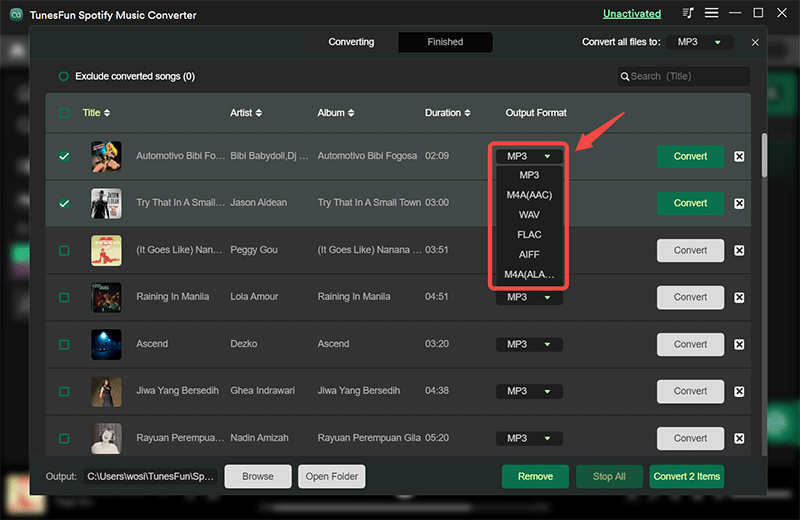
Step #2. Choose your preferred output format and ensure that you have set up your desired output folder location.
Step #3. Hit the “Convert” button once you’re all good with the setup. The transformation of the uploaded songs shall happen right away. The DRM removal procedure shall also happen during this time.
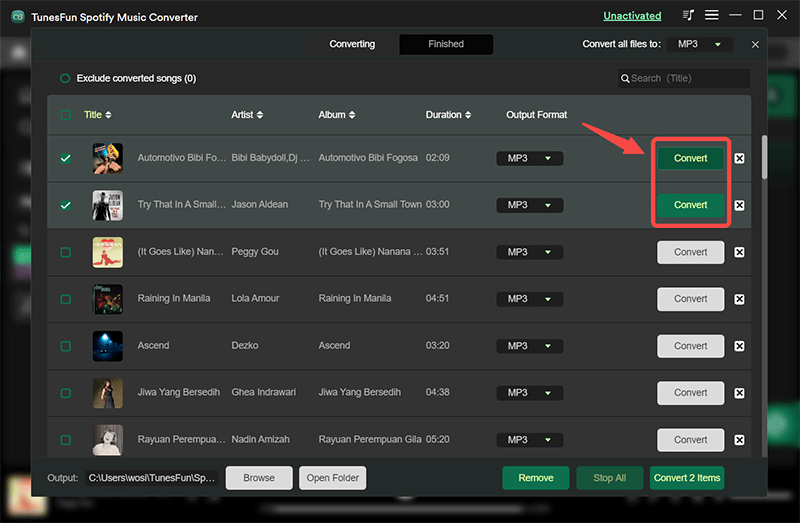
And, that’s it! Once the process has ended, you’ll get to have the transformed and DRM-free Spotify songs saved on your PC.
Part 4. Summary
You are finally well aware of the easy process of how to upgrade to Spotify Premium on iPhone. If you are thinking of doing so, you may refer to the guide that was highlighted in the second part of this article. Additionally, if you are looking at keeping your Spotify favorites forever accessible on every gadget that you have, always remember that tools like the TunesFun Spotify Music Converter can help you with the downloading process.
 Home
Home
Leave a comment