The Process of How to Reset Spotify History
“Is the “reset Spotify history” process easy to follow?” Spotify is one of the most loved by many music enthusiasts if we are to talk about music streaming platforms. That is because apart from offering paid plans (to enjoy exclusive perks), it also has a free version that can be used by anyone.
One of the many features that users can enjoy of the Spotify platform is its “history” section that allows one to access those albums, tracks, playlists, and even artists that were recently played. What is even more fascinating is that your listening history can be viewed by everyone who’s following you and those who have your playlists’ access. However, other users view this as somehow an invasion of one’s privacy.
Now, if you are someone who’d like to keep your Spotify history to yourself only, then what this post has will surely benefit you – the “reset Spotify history” process. Remember that Spotify’s recommendations are based on your listening habits so if you wish to have fresh and new suggestions from the platform, trying to reset Spotify’s history could also help.
Article Content Part 1. How to View Your Spotify Listening HistoryPart 2. How to Reset Spotify Listening HistoryPart 3. Hiding Your Spotify Listening HistoryPart 4. Downloading Spotify Songs on One’s Recently Played ListPart 5. Summary
Part 1. How to View Your Spotify Listening History
In order to reset Spotify history, you should first know how you can view them. Fortunately, you can do that through the Spotify mobile and desktop app as well as through the web player. Jump into the next sections as procedures will be presented in this part.
Checking Spotify History via the Mobile App
Step #1. On your mobile device, open the Spotify app and log into your account using your credentials.
Step #2. Head over to the home screen by simply tapping the “Home” menu.
Step #3. Hit the icon next to the settings icon in order to see the list of the recently played content.
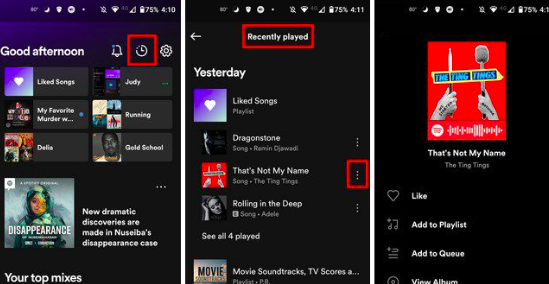
You will then be able to see the list of all the content (songs, albums, playlists, and others) that you recently accessed on the app.
Checking Spotify History via the Desktop App
Step #1. On your PC, open the Spotify desktop app, and using your account details, make sure to sign in.
Step #2. You need to click the “play with horizontal lines” icon. This is the “queue” menu.
Step #3. Once tapped, the queue shall open and you will then see the tab displaying the recently played items on the platform.
Checking Spotify History via the Spotify Web Player
As previously mentioned, you may also check your Spotify listening history through the web player. If you haven’t installed the desktop app yet, you may follow the below procedure.
Step #1. On your preferred web browser, head to spotify.com and just log into your account. From the left pane, you should select “Home” next.
Step #2. Upon tapping the “Home” menu, the tracks or albums that you recently listened to shall be shown.
And, that’s it! The abovementioned guides are easy methods of how you can view your Spotify account’s streaming history. Now is the time to finally learn how you can reset Spotify history! The detailed process is presented in the next part.
Part 2. How to Reset Spotify Listening History
Fortunately, we can do the “reset Spotify history” process on both mobile devices and PCs. Regardless if you are a mobile gadget fanatic or a computer user, you can easily reset Spotify history. Of course, we’ve got all the details that you need relative to the whole procedure.
Resetting Spotify Listening History on Android or iOS Devices
If you’d like to use your Android or iPhone to reset Spotify history, you can just follow the below guide.
Step #1. Start by opening the Spotify mobile app on your device. On the top left area of the screen, there is a three-dot icon that you’ll see. Tap this. On the drop-down list that will be displayed, select the “Recently played” option.
Step #2. Look for the specific Spotify songs that you wish to delete from your recently played list. Simply swipe left in order to be able to click the “Delete” menu.
After accomplishing the second step, those deleted tracks won’t any longer be seen in your Spotify account’s listening history section. Alternatively, you can also reset Spotify history by just simply logging out of your Spotify account on your mobile device.
Resetting Spotify Listening History on PCs
Using your PC when doing the “reset Spotify history” process is also simple. Here are the steps that must be followed.
Step #1. On either your Mac or Windows computer, open the Spotify desktop app and log into your account. From the home page, scroll down until the recently played list is seen. Tap the “See All” option next.
Step #2. Just simply identify which tracks you would want to remove from the list. Just hover your cursor over the media to see the “three-dot” option. You can also right-click it if you prefer doing so.
Step #3. A menu list will be shown. From there, tap the “Remove from Recently Played” option.
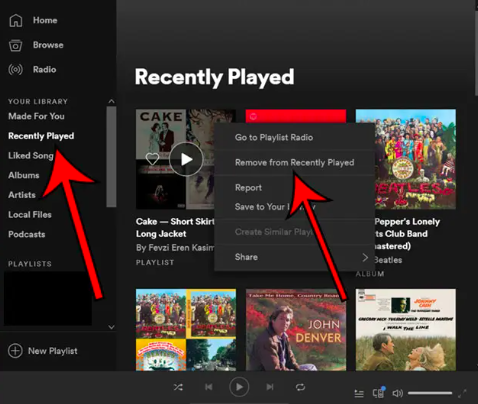
Just take note that you can only do the above if you are using the Spotify app that’s not updated to the latest version available.
Part 3. Hiding Your Spotify Listening History
If you don’t feel like resetting your Spotify listening history, you may also resort to just hiding it to keep your recently played tracks private to you. Here are the steps that you must follow.
Step #1. Using your device, launch the Spotify app and sign into your account.
Step #2. At the top-right section of the screen, hit the “drop-down” arrow that you’ll see.
Step #3. Choose “Settings” and then scroll down until you see “Social”.
Step #4. The slider for the “Share my Listening Activity on Spotify” option must be toggled off.
Once the above has been completed, you’ll then be able to hide your listening history on Spotify!
Part 4. Downloading Spotify Songs on One’s Recently Played List
Rather than just resetting your listening history on Spotify, you can also try looking for ways on how you can keep them accessible even outside the Spotify app. Spotify tracks are known to be protected by DRM encryption. Thus, it makes it a bit hard for users to stream them on unauthorized gadgets. More so, they are in OGG Vorbis format which isn’t that playable on many devices. Given these limitations, is it still possible to keep them forever accessible even without a Spotify subscription?
Fortunately, there are apps like the TunesFun Spotify Music Converter that can help with both the DRM removal process and the conversion procedure. It is a powerful tool that supports various flexible output formats such as MP3, FLAC, AAC, and WAV. With this app’s fast speed, one can even ensure efficiency and convenience since the transformation process would be fast! Additionally, the whole procedure will be lossless. Thus, all the songs’ ID3 tags and metadata information will be maintained or preserved. The TunesFun team also makes sure that the app is being updated in a timely manner giving the best experience to its users. If needed, the technical support team is always available to help.
When talking about installing the app, there should not be any issues as well. It is supported by Windows and Mac PCs. It was also designed to have a very simple user interface with easy navigation functions. Surely, even first-time users won’t have problems when using the app. If you are interested in checking out and trying how good the TunesFun Spotify Music Converter is, you may review the below guide on how it does the conversion and DRM removal processes.
Step #1. Once the TunesFun Spotify Music Converter has been installed on your computer, open it and start uploading the Spotify songs to be processed.
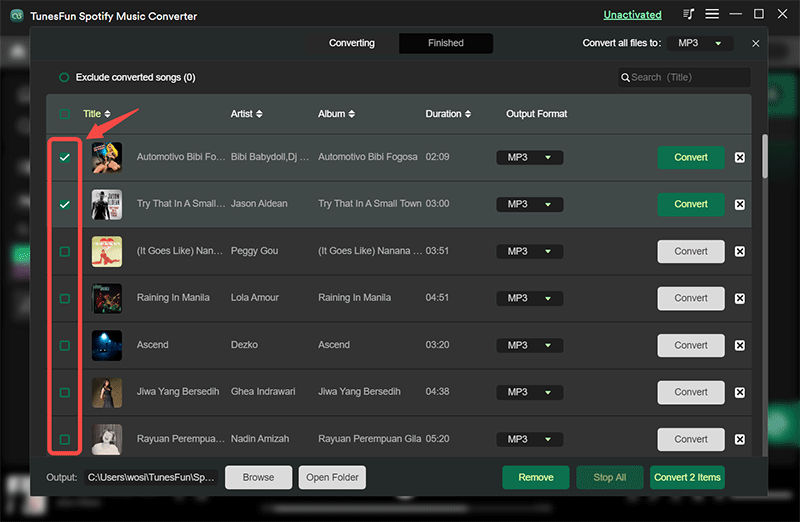
Step #2. Choose your desired output format and don’t forget to specify the output folder location to be used.
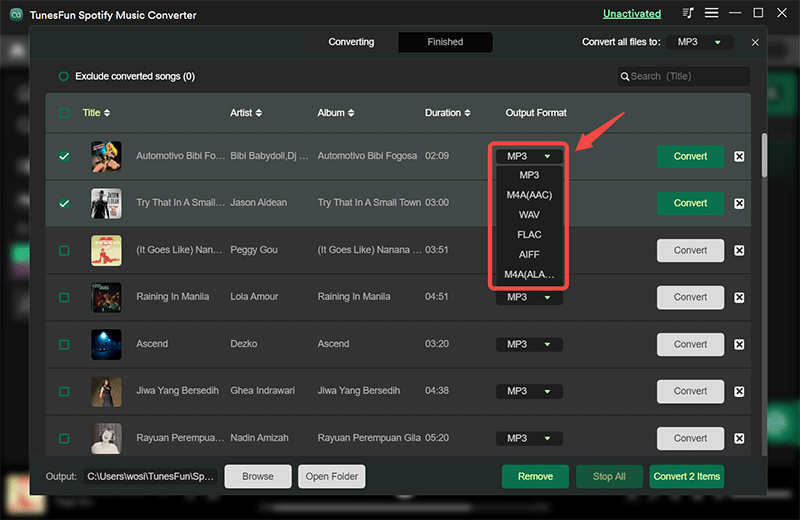
Step #3. Hit the “Convert” button once you’re ready. The app, afterward, shall immediately start converting the selected Spotify songs. The removal of the songs’ DRM protection shall also happen at the same time.
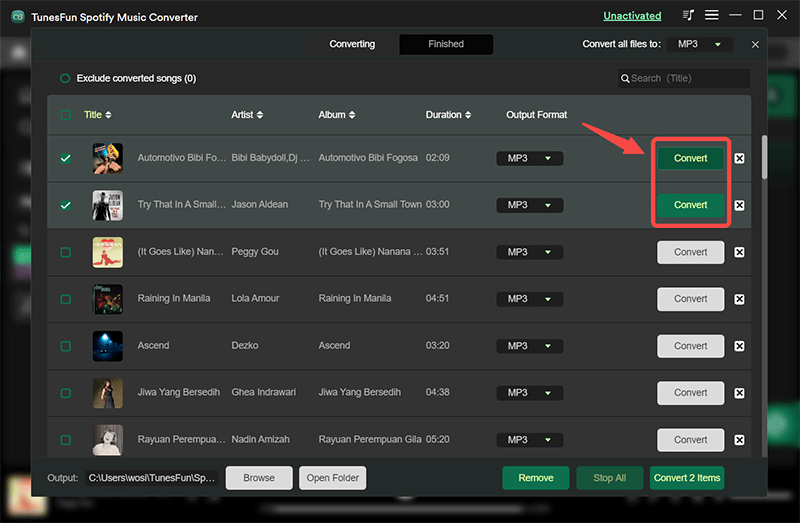
Once the above process is done, the DRM-free and converted Spotify songs will be saved to your PC. Now, accessing them on any gadget would be possible as long as you want to!
Part 5. Summary
In order to reset Spotify’s history, you just have to follow the procedures that were presented in the earlier parts of this article. Fortunately, the process can be done on both mobile gadgets and computers. Just remember that once you performed it, there’s no turning back. If you’d like to create a backup of the songs you love listening to, you can always use apps like the TunesFun Spotify Music Converter when downloading them. You’ll get to keep them forever and listen to them as long as you want to!
Leave a comment