How to Play Spotify on Sonos in 2025 [Update Guide]
One of the best things that users love about Spotify is that bunches of devices and media players support it. In addition to this, Spotify also has lots of partnerships built with other apps and platforms. Sonos and Spotify make a perfect pair for music lovers who want to enjoy high-quality streaming music throughout their homes. Whether you're throwing a party, relaxing, or just want a seamless audio experience, Sonos Spotify will offer a powerful solution.
Initially, listening to Spotify on Sonos was only possible if you were a Spotify Premium user. Fortunately, before 2019 ended, the free version users also were able to enjoy the same. Thus, opening the flexibility to a more affordable streaming experience via the Spotify app through Sonos.
We know you are on this page because you are interested in knowing more about how to add and play Spotify on Sonos speaker. Without that much ado, we will be giving you two ways to do that. The first one will be explained right away in the first part!
Article Content Part 1. How to Add Spotify to SonosPart 2. How to Play Spotify on SonosPart 3. How to Play Spotify on Sonos Offline without PremiumPart 4. Common Issues and Solutions for Sonos Spotify Not WorkingPart 5. Summary
Part 1. How to Add Spotify to Sonos
We have here the full tutorial of how you can finally enjoy Sonos Spotify – adding, playing, and even changing Spotify accounts on Sonos. Integrating Sonos with Spotify allows you to control your Sonos speakers directly from the Spotify app, making it convenient to stream your favorite music throughout your home.
To enjoy Sonos Spotify, you have to get the Spotify app added to Sonos. Here’s how to add Sonos to Spotify on mobile and desktop.
Add Spotify to Sonos on iOS/Android
Step #1. On your mobile device, launch the Sonos app. Head to “Settings”, then to “Services & Voice”, “Music & Content”, “Add a Service”, choose “Spotify”, and finally tap the “Add to Sonos” option.
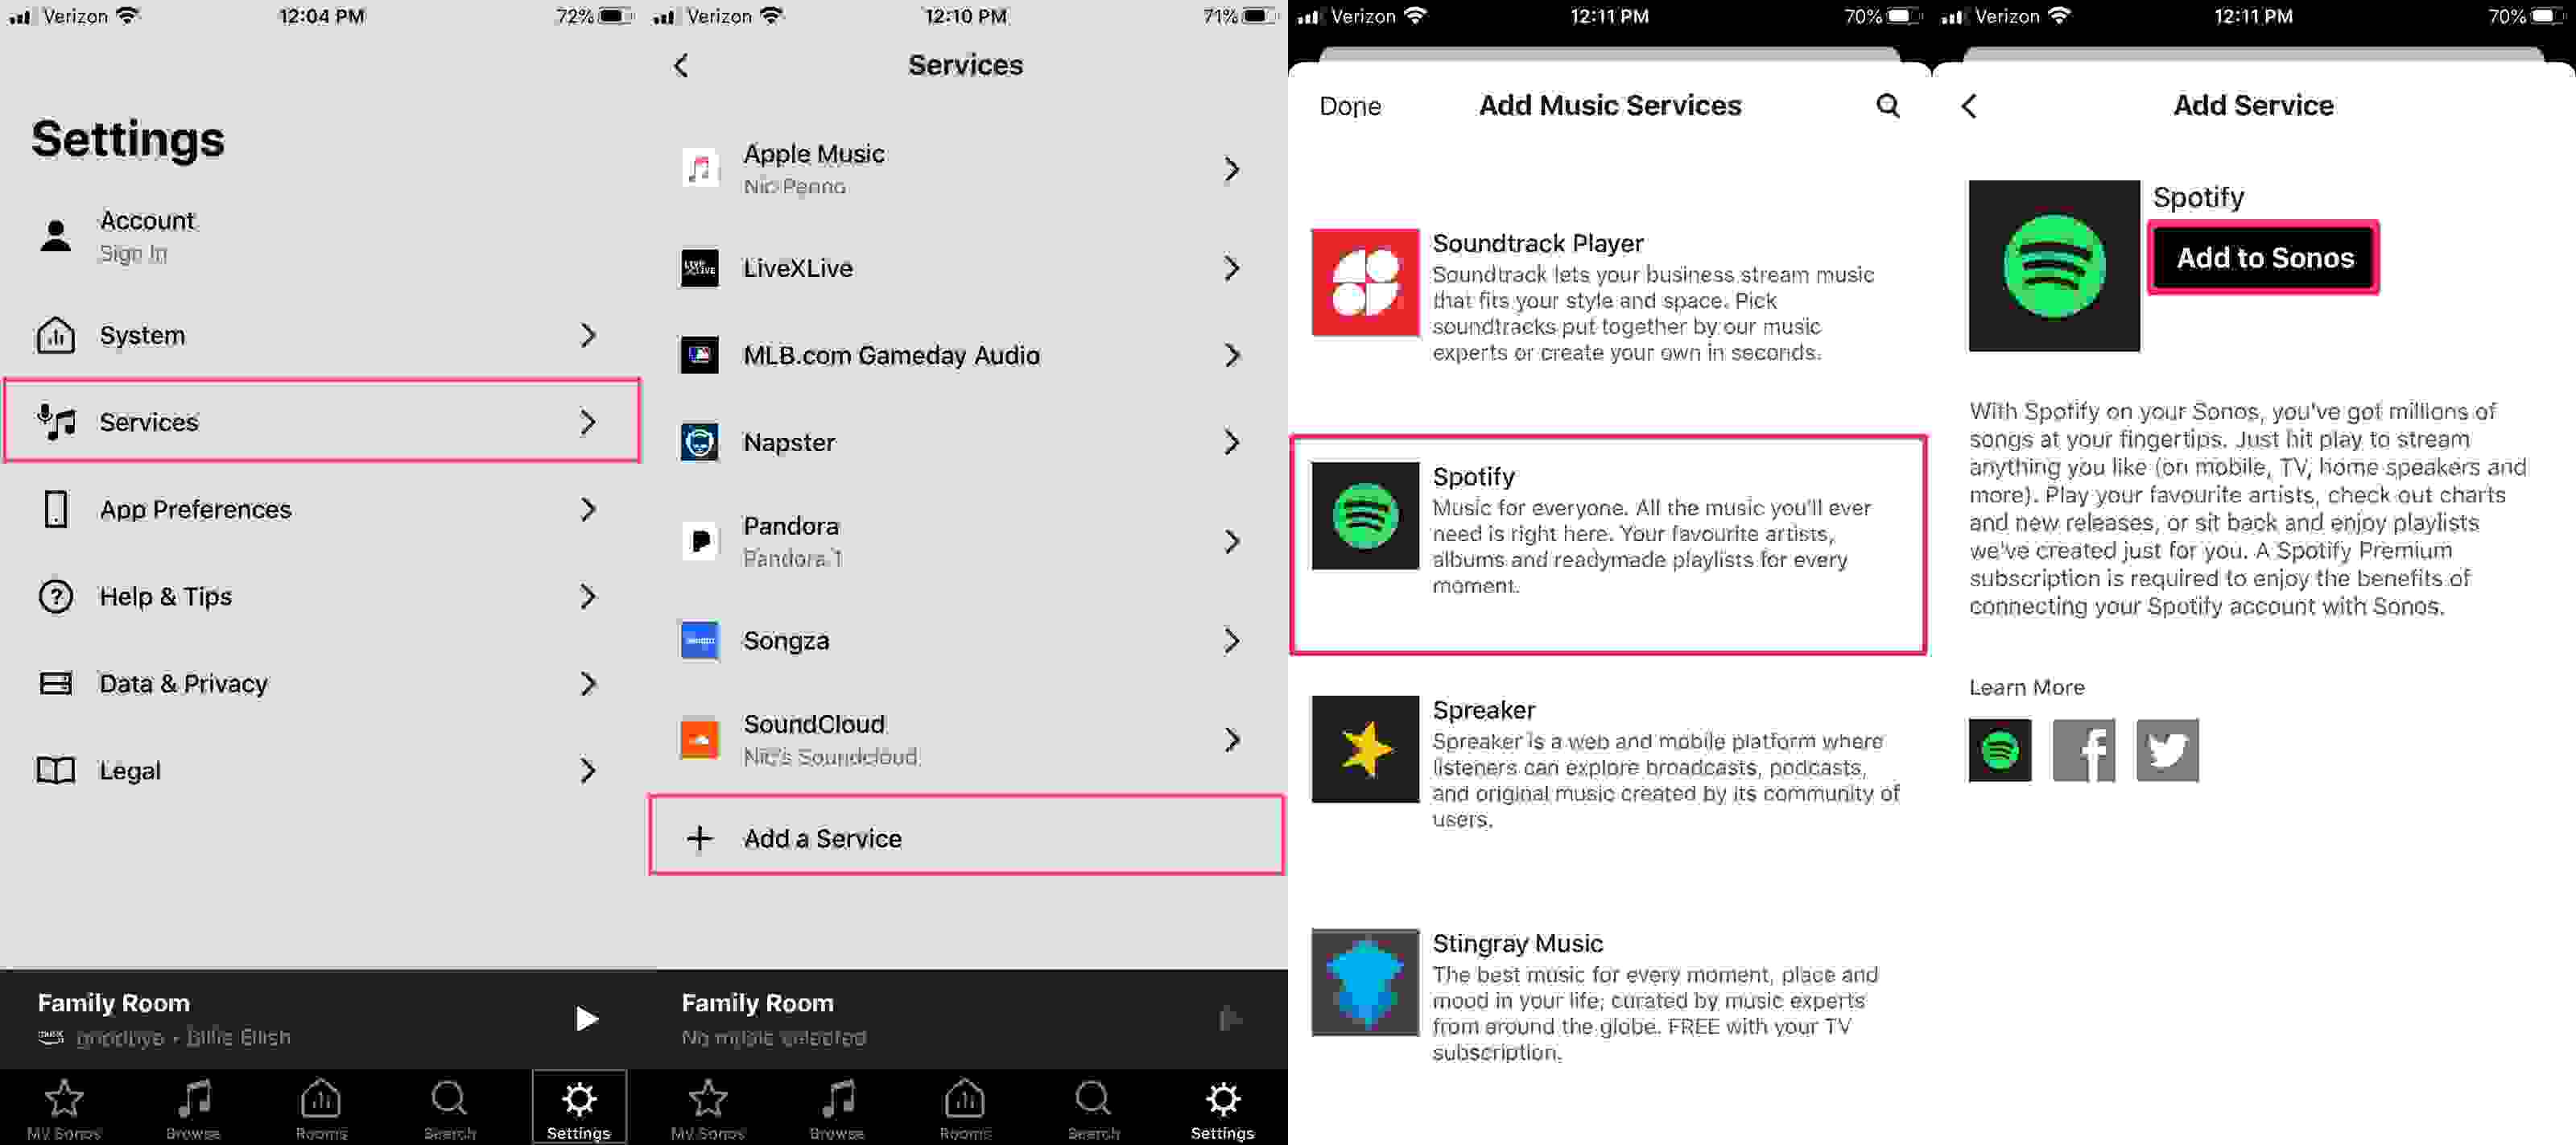
Step #2. Tap "Connect to Spotify" to log in to an existing account or tap "Sign up for Spotify" to create a new account. Once you've successfully logged in, Spotify will now appear on your services master list and in search results for songs, artists, playlists, and more.
Add Spotify to Sonos on Mac/Windows
Step #1. If you’d like to enjoy Sonos Spotify on PC, you can do that as well! Just open the Sonos app and head to “Select a Music Source”, then “Add Music Services”, and finally, choose “Spotify”.
Step #2. Continue and finish off by following the instructions displayed on your screen.
Part 2. How to Play Spotify on Sonos
Can you play Spotify on Sonos? Of course. Now that you’ve finally added Spotify on Sonos, you can now start enjoying it! Playing Spotify on Sonos allows you to enjoy your favorite music in high-quality audio throughout your home. You should learn how you can control Sonos Spotify and here’s how:
Play Spotify on Sonos via Spotify App
Step #1. Open your Spotify app. Afterward, just select a song to play and move to the “Now Playing” screen.
Step #2. At the bottom, click the “Devices Available” option. From there, you just have to select your Sonos speaker.
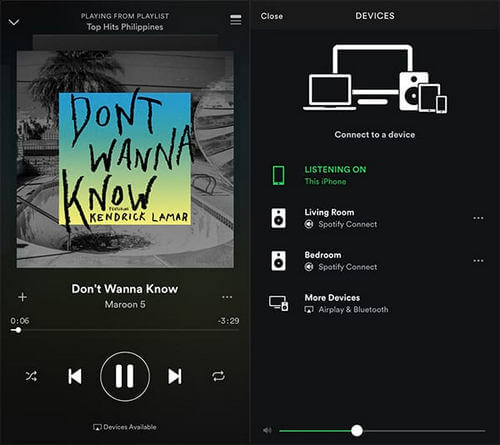
You have to take note that to ensure a successful connection, you must have a Spotify Premium account, and both the device you are using and your Sonos speaker must be connected to the same Wi-Fi network.
Play Spotify on Sonos via Sonos App
Step 1. Launch the Sonos app on your mobile device or computer.
Step 2. On mobile: Tap the "Browse" tab at the bottom. On desktop: Click the "Select a Music Source" option in the left-hand menu.
Step 3. Select Spotify from the list of music services.
Step 4. Browse or search for music as you would in the Spotify app. You can access your playlists, recently played songs and more.
Step 5. Choose which Sonos speaker or group of speakers you want to play music on.
Step 6. Use the Sonos app to control playback, volume, and other settings.
Logging Out Spotify on Sonos
Now that you learned more about finally getting to enjoy Sonos Spotify, you might have been curious as well about the logging out process. Well, you can do that easily as well. You just have to log into your Spotify account using your chosen web browser on your PC and then tap the “Apps” option. From there, you have to remove Sonos from the list of those approved applications.
After doing the above, just head back to the main page and then tap the “Sign out everywhere” option. As simple as that, you can remove your Spotify account on Sonos.
Changing Spotify Accounts on Sonos
Apart from sharing the previous information, you should also be aware that you can actually change Spotify accounts on Sonos. You can do the process on your mobile gadgets or on your PC. Here is a detailed guide for your reference.
On your iOS or Android Device
Step #1. Head to “Browse” and then look for Spotify. Tap the account name. Upon doing so, you shall see the list of added accounts.
Step #2. Just select the account wish to change to.
On your Windows or Mac
Step #1. You need to head to the “Select a Music Source” panel. Tick the drop-down menu.
Step #2. Select “Spotify” and then just choose the account you’d like to switch to.
We hope after reading this section, you can finally enjoy Sonos Spotify. Remember that this works regardless if you are a free or a premium account user. It’s just that you’ll, of course, encounter limitations in case you are using the free version of Spotify.
Part 3. How to Play Spotify on Sonos Offline without Premium
Though both the free and Premium Spotify users can now enjoy Sonos Spotify, we still can’t deny the fact that free users will continue facing the drawbacks of using a free account, and the Premium users will continue to pay the subscription fee. Additionally, if there will be issues while streaming Spotify on Sonos, there would be a need to still check the fixes and solutions available to address the concern.
Of course, we don’t want you to feel the above hassles as our goal here is to let you enjoy Spotify on Sonos without worrying about anything. Fortunately, Sonos also allows adding common or local tracks. So, if you have Spotify files with you, you can just listen to them on your Sonos speaker without facing any troubles. The only question here is how can you do that?
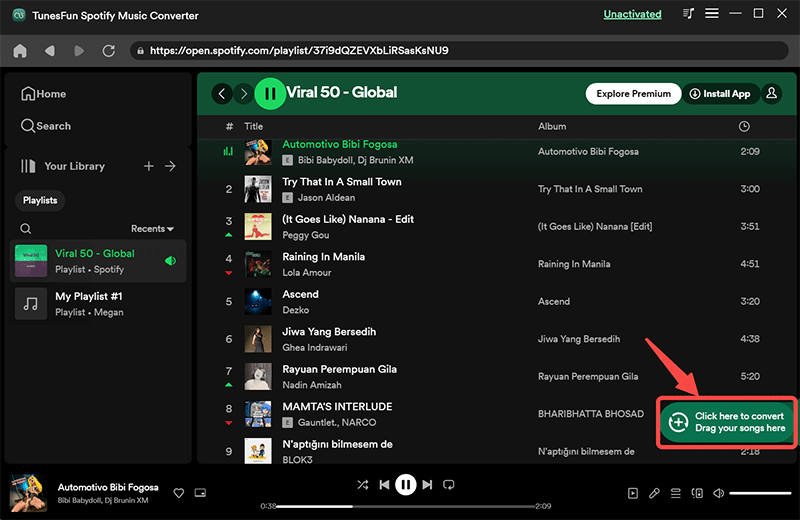
This is simple. As mentioned, Sonos can accommodate local music files. With this being said, why not just download your Spotify favorites? We know that Spotify songs are encrypted with DRM protection. You might be thinking that with this protection, it would be impossible to download Spotify tracks. Well, you’re thinking wrongly! The downloading of Spotify songs can easily be done through the help of amazing apps like this TunesFun Spotify Music Converter!
This TunesFun Spotify Music Converter can help you with the DRM removal process and even in the transformation of the songs to flexible formats like MP3, FLAC, WAC, or AAC. Spotify also includes excellent integration with other services, including Discord and more media apps. If you have both a Discord and Spotify account, you can link Spotify to your Discord account and finally be able to play Spotify music files on Discord.
With the fast conversion speed of this app, you can ensure efficiency! More so, you don’t have to worry about quality loss because the app does lossless conversion! The output files will always have almost the same quality as the original ones. Even the ID3 tags and metadata information of the songs will be maintained and kept. Click the below button to try it for free now!
Of course, this was designed to have an intuitive and user-friendly interface. Here’s the procedure of how to use the TunesFun Spotify Music Converter to convert and download your Spotify favorites to finally play Spotify on Sonos offline without premium!
Step #1. Once all the installation needs of the TunesFun Spotify Music Converter have been met, you can just proceed to install it and launch it. On the main page, you can just drag and drop the Spotify tracks to be processed.
Step #2. Set the output parameters as you like. Of course, choosing a flexible format like MP3 is the most recommended output format to use.
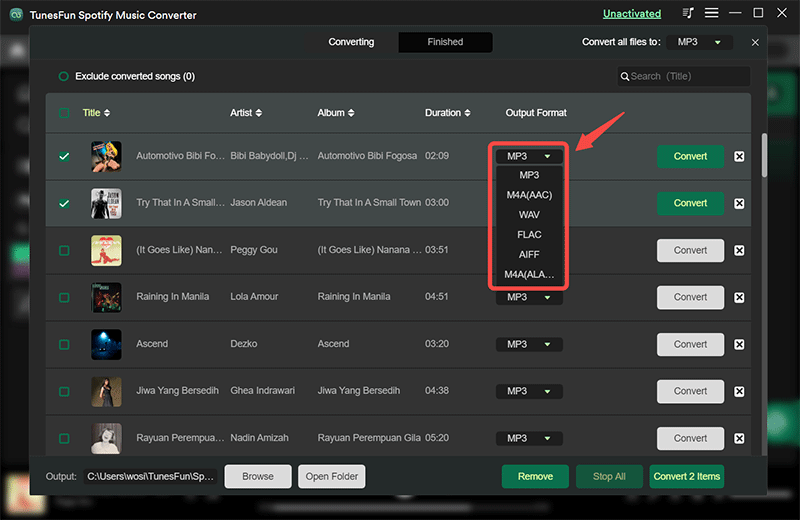
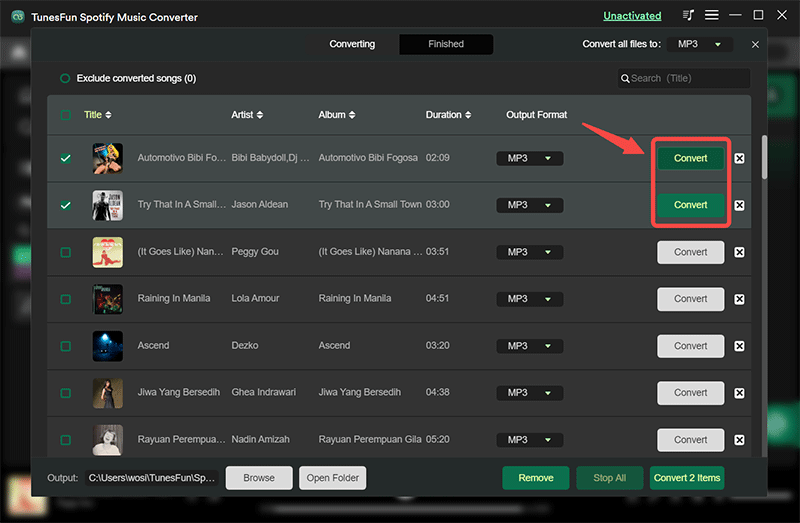
Step #3. Tick off the “Convert All” button at the bottom area of the screen once you’ve finished the setup.
After only a few minutes, you shall have the non-DRM and transformed Spotify tracks on your PC. All you have to do now is to have these tracks available on Sonos for you to finally enjoy Sonos Spotify without worries!
To do the above, just launch the Sonos app on your computer, then under the “Manage” menu, tap the “Update Music Library Now” option. You would need to tick “Yes” to confirm. You can now import these converted tracks into your library. Once you’ve successfully added them, you can now just select a track to play on your Sonos speaker!
Part 4. Common Issues and Solutions for Sonos Spotify Not Working
While trying to stream Spotify on Sonos, you might also encounter some common issues:
Problem #1. Missing Spotify Music Services while Adding to Sonos
When you face this problem, you should know that there are locations wherein you can’t access Spotify. You must check first if your current location supports the app. Also, you can check the registered country in your account. Your Sonos account must be ensured to be registered under the correct one.
Problem #2. Spotify Won’t Work on Sonos Speakers
When the “not working” issue is encountered, you can try relinking your Spotify account to your Sonos speaker. You can also try clearing the cache on your Spotify app. Lastly, try restarting or resetting your Sonos speaker and see if the issue will be resolved.
Part 5. Summary
We’re glad to have shared with you the details you need to finally enjoy Sonos Spotify! Remember that if you feel burdened about some issues while streaming Spotify on Sonos via the conventional way, you can always just download them through apps like TunesFun Spotify Music Converter and listen to them without worrying!
 Home
Home
Leave a comment