What Is Cache on Spotify and How to Clear [2025 Update]
In iOS and Android apps, a cache usually refers to a memory storage area in the phone that stores copies of media that is likely to be needed in the near future, so it can be accessed faster. Spotify is no exception here. What is cache on Spotify?
For example, when you visit a playlist on Spotify, a copy of the playlist may be stored in the phone's cache memory. Then if that playlist is requested again, it can instantly be displayed from the cache, instead of waiting for the playlist to download from the Internet again.
But in some cases, data in a cache can become corrupt or outdated anyway. There are times when Spotify collects a corrupt cache, leading to playback issues. With lots of users of Spotify around the globe, it is so important to have a wide understanding of what is Spotify cache and how to delete them. In this article, we are about to discover a lot of things about it. Are you interested to be informed? Let us begin!
Article Content Part 1. What Does Cache Mean in Spotify?Part 2. How to Clear Your Spotify Cache?Part 3. How to Enjoy Unlimited Songs Without Worrying with Storage Space?Part 4. To Summarize It All
Part 1. What Does Cache Mean in Spotify?
Before we go into other things related to Spotify cache, let us gather more information and get to know what is cache on Spotify a little more. Spotify cache helps in relieving the pressure on the internet provider that you are using, and on the servers of Spotify as well, this is because it already stored the tracks that you have listened to before and tracks that you may listen to again.
There is a way for you to change the size of your Spotify cache, just go to the Preferences pane. As per settings of Spotify, the size of the cache can never be huger than 10 percent (10%) of the free space that your device has. This setting allows you to have a large space to store tracks you love without worrying that there will be less left of the remaining hard drive space on the computer that you are using.
The size of the cache can be adjusted from 1GB to 100GB and you can control it using the Use at Most button, and then by dragging the slider to the size that you desire. It is best to know that the bigger the cache, the more the track fragments that Spotify will be able to save on your computer. The advantage of this could be less downloading as well as less use of Spotify’s network resources.
You also do not have to worry if the cache is full, when it reached the maximum capacity; the system will automatically get rid of the less listened tracks from the cache, and then replaced these songs with the latest ones.
If you are a starter using the Spotify app, it is a good thing you have an idea of what is cache on Spotify, so you can enjoy your experience at maximum.
Part 2. How to Clear Your Spotify Cache?
It is a given that lots of people who love to listen to music would love to use Spotify as well. And if people use it all the time, there are a lot of significant things to see such as the hard drive being filled up even if you did not download something new. It can be because Spotify caches files that are stored on your computer, allowing the Spotify app to run faster than usual. And while this can be more convenient to most listeners, there can be a problem such as low disk space.
And now that we know what is cache on Spotify, it is now time to know how to get rid of it, as well.
Clear the Spotify Cache on Your Android Device
- To begin, open the Spotify app, and then go to Settings which you will see in the upper right corner of the interface.
- Scroll down until you see the Delete cache, and tap it. You will then be asked to confirm your action, and then you have to tap the Delete Cache option, once more.
You can also use the Settings app that you have on your Android device. Here are the steps that you must follow.
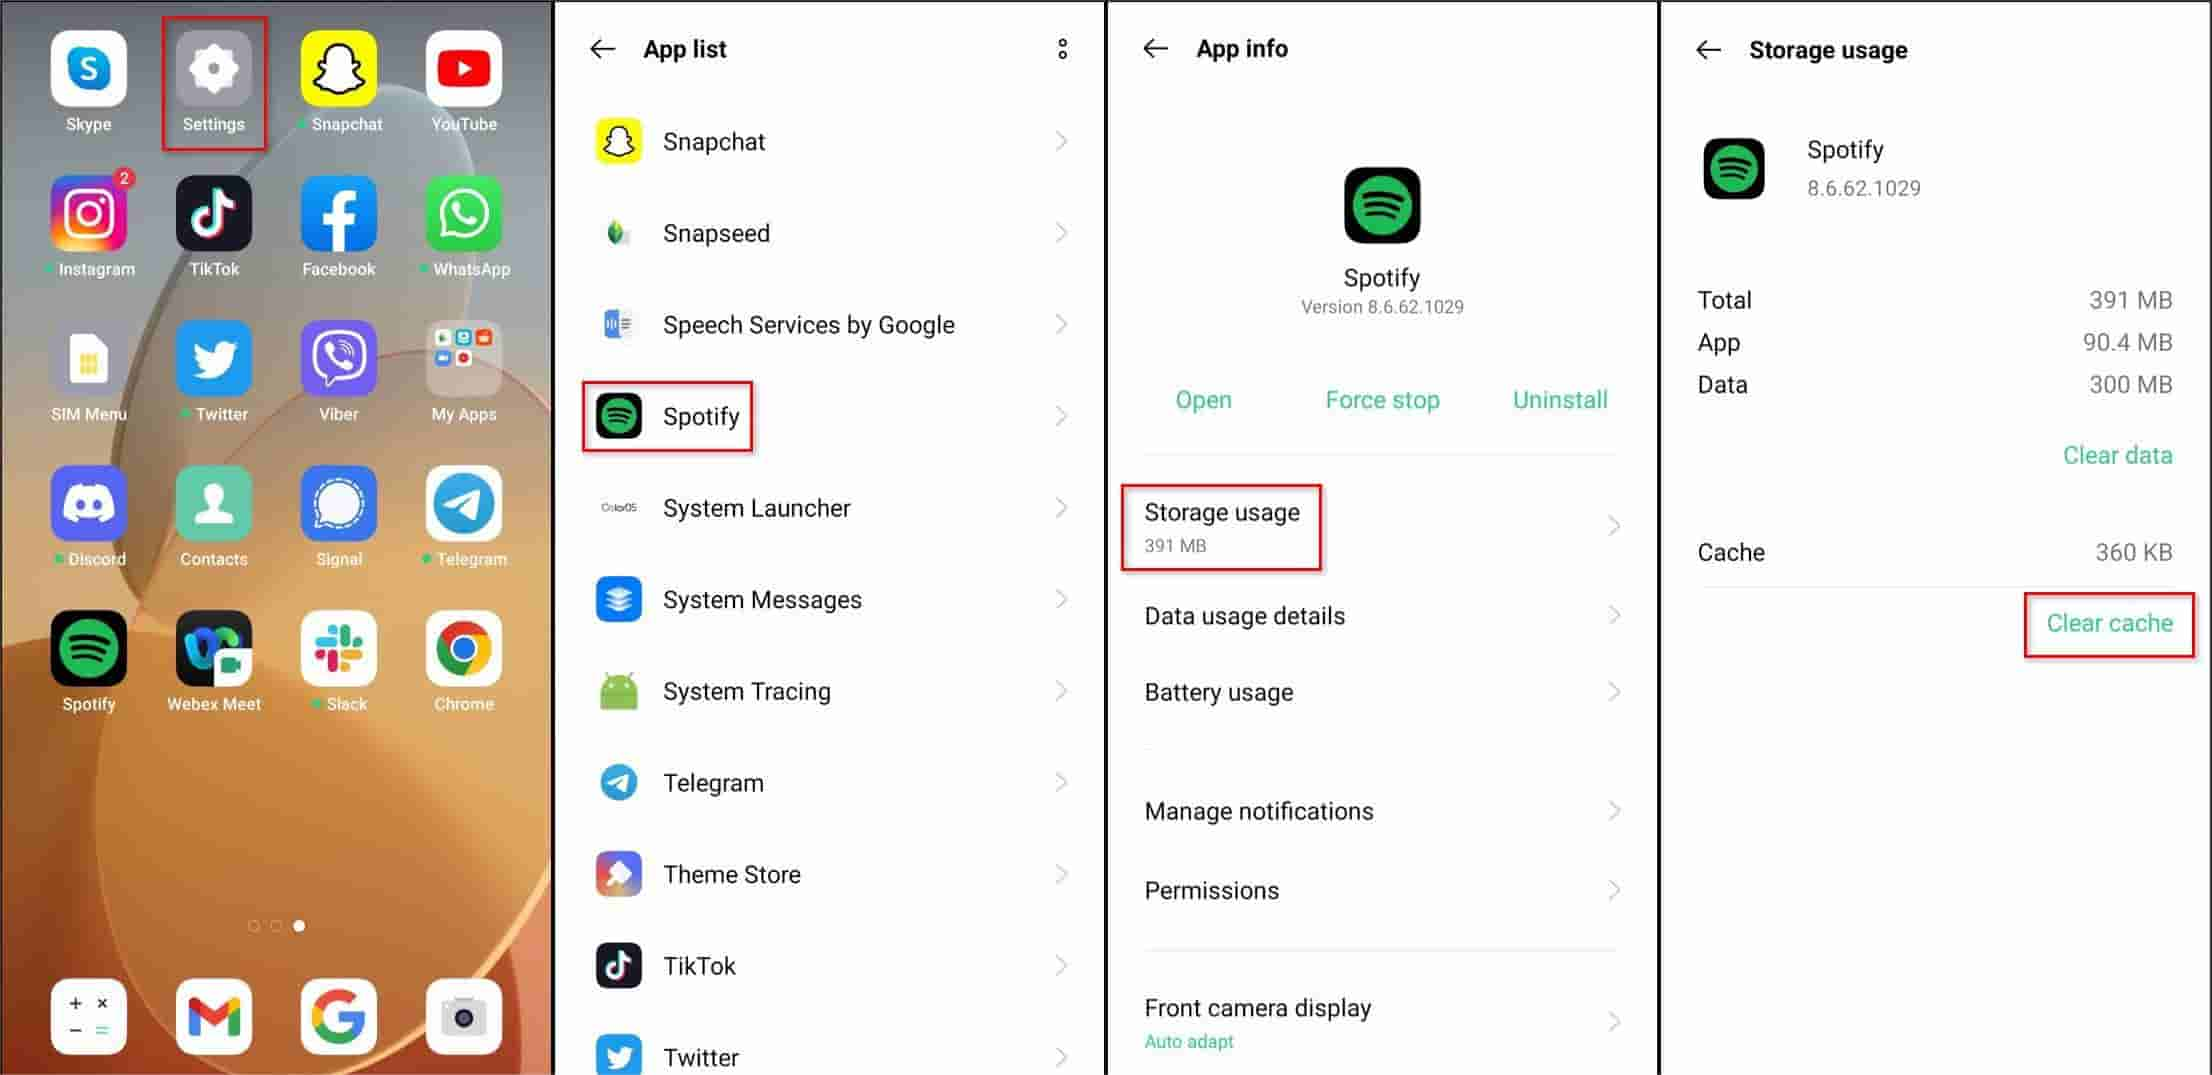
- Launch the Settings app, and then tap Apps and wait until you see the list of the apps that you have on your device.
- When you see Spotify on the list, choose it. Then you have to tap the Storage option > Clear Cache.
Clear the Spotify Cache on Your iOS Devices
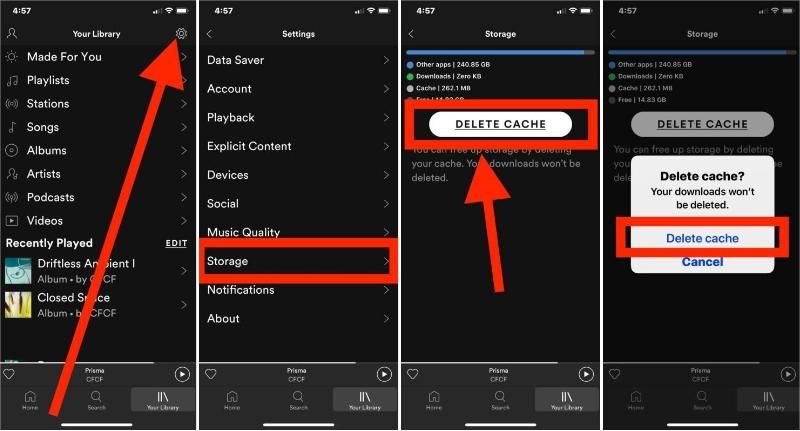
- Go and open your Spotify app, and on the upper right part of the interface hit the Settings option.
- Go down, look for Storage, and press it. Then you have to tap the Delete Cache button as well.
- You will then see a new window asking you to confirm your actions, if you are finally sure, you can tap Delete Cache and you will see that the cache will be removed in just seconds.
Clear the Spotify Cache on Your Mac
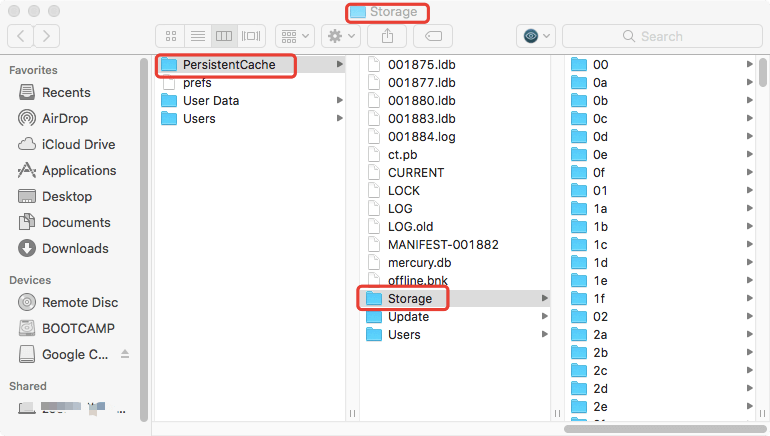
Now, you want to clear the Spotify cache on Mac. But what if you can’t find the Spotify cache? Where is Spotify cache on Mac? Well, that is a problem that’s easy to fix. Generally, the Spotify cache on Mac can be found in the “Caches” folder within your Library folder. You can go to this Library folder by using Finder.
- Launch Finder. The initial step will be to launch Finder and click the menu called Go. Choose the option to Go To Folder.
- Enter The Right Directory. Now, enter the directory without the quotes and period in it: “~/Library/Application Support/Spotify/PersistentCache/Storage”.
- Another thing you can do is to visit the Advanced Settings of Spotify and then click the section for Offline Songs Storage. Locate the cache folder there.
- Once you are in the cache folder, delete all its contents.
- Empty Trash. Finally, you should empty the Trash to save more space on your Mac computer.
Delete the Spotify Cache on Windows Computer
- Close Spotify app first.
- Proceed to your local disk which is usually labeled as C.
- Choose Users > Your username folder > AppData > Local.
- You have to hit Spotify in the Local folder.
- Find the Storage folder, and delete it.

Part 3. How to Enjoy Unlimited Songs Without Worrying with Storage Space?
Given that we already have enough ideas on what is cache on Spotify, it is now time to share with you a secret. Do you know that there is something that you can do in order to enjoy all the songs that you love from Spotify without having any problem with your device’s storage due to the build-up of the app’s cache?
If you have been using the Spotify app for quite a long time, it is surely known to you that songs here are protected by DRM or Digital Rights Management technology. It means that you will not have the chance to listen or stream songs using devices that can be deemed unauthorized or access them while you are not using the app.
And this is where we are about to tell you something good, you can still solve the dilemma, through the use of professional tools such as the TunesFun Spotify Music Converter. When you used this tool, it can be easier for you to download songs you love, since it can help you get rid of DRM protection easily.
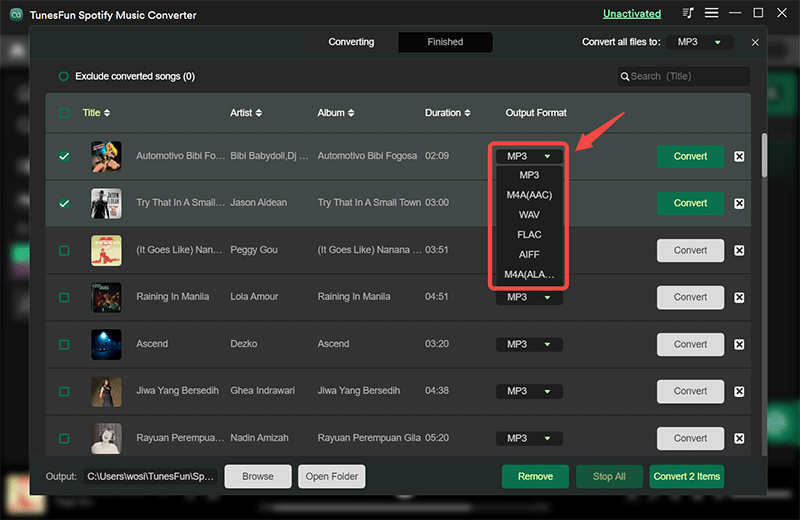
You can also use the TunesFun Spotify Music Converter to convert your songs to other file formats like FLAC, MP3, AAC, and WAV. With this, you’ll be able to play music freely. You can now play them with different kinds of media players such as MP3 players, iTunes, and Windows Media Player. You will also be able to make your own ringtone with these songs.
It can also help you save time since it can do the conversion process 5 times faster than basic ones and the tool can also make sure that you have the hundred percent original quality of the songs as well as their ID tags and metadata. Here are the details on how can we use the TunesFun Spotify Music Converter to convert our files to formats that we need easily.
- Make sure to get the TunesFun Spotify Music Converter installed on your personal computer. Open it once installed to see the contents of the tool.
- Start adding the songs from Spotify based on the instructions that you will see on the main screen or interface of the tool. You can also do the copying and pasting of the URL method or start to drag and drop the tracks on your home screen.
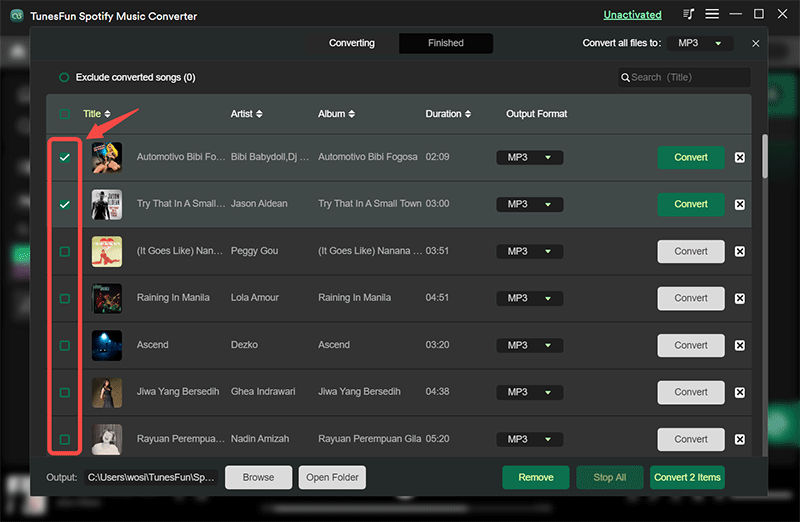
- Secondly, select and set up the format that you wanted to have and choose from the formats that are available. You can now also create the output folder where you will be saving all the converted files.
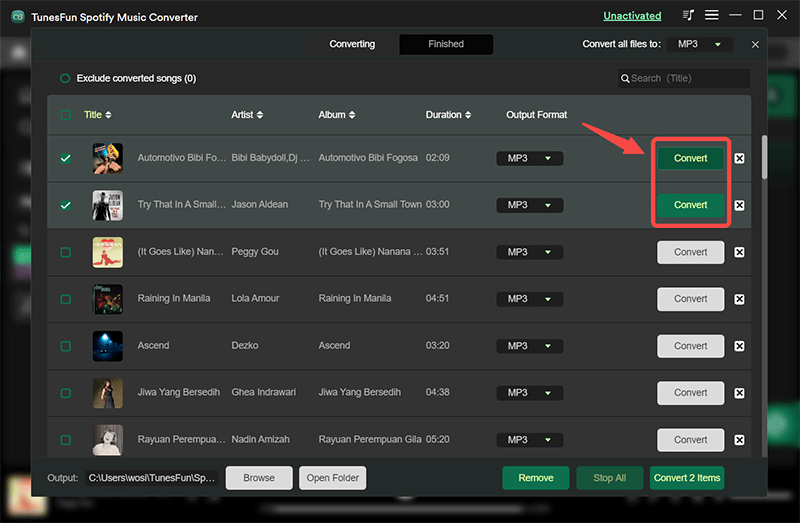
- Then, finally start ticking off the Convert or the Convert All buttons that you will see at the bottom of the interface. Once tapped, the process of conversion will now start, and the removal of the DRM as well.
If you can just play your Spotify favorites offline without limitations, you don't need to download the Spotify app. So that you won't get annoyed when encountering Spotify issues like the Spotify app logging you out suddenly, Spotify local files not showing or Spotify playing random songs. Indeed, using apps like the TunesFun Spotify Music Converter is the best solution!
Part 4. To Summarize It All
Now that we have reached the end, we believed that we have shared with you all the vital information to know what is cache on Spotify. We have also shared with you the proper ways how you can get rid of Spotify caches in case they are all over your device and you are having problems with the lack of space. In addition, it is such a pleasure to share with you the TunesFun Spotify Music Converter which is such a great tool to use in all of your conversion needs.
 Home
Home
Leave a comment